Thinkific Review 2023 (Fully Updated)


A full in-depth Thinkific review from the point of view of an experienced course creator. I will cover in detail all Thinkific pros and cons including its email marketing features, course creation, and student experience, to help you decide if it's the right platform for you.
You might be wondering whether Thinkific is the best online course hosting platform for you, considering that there are a lot of other similar hosting platforms out there.
Well, since this in-depth review looks at tall the Thinkific pros and cons, rest assured that you'll have your answer at the end of the post. 😉
I'm a course creator too just like you, so I know it can be a bit confusing to choose a course hosting platform. There are a lot of options available on the web, in all price ranges.
To help you decide if Thinkific is the right platform for you, I will walk you through all the features in the platform, giving you a detailed review of each of them including some screenshots.
This way, you can see what the platform looks like without having to try it directly.
I will also point out in this review the benefits and drawbacks of each of the Thinkific features and how this platform compares with other course hosting platforms.
To make things simple for you I will give you a verdict per feature, as well as a final verdict for the whole platform at the end, that you don't want to miss. 😉
So without further ado, let's get started with our deep dive into the Thinkific review, feature by feature.
You can also check out all the free guides here at the Course Creator Academy by clicking on the Academy link on the top menu bar.
You might also be interested in these other posts related to Thinkific:
- Thinkific Pricing: What's the Right Plan for You?
- Thinkific vs Teachable - The Ultimate Guide
- Thinkific vs Kajabi - The Ultimate Guide
What Is Thinkific?
Thinkific is an online course platform that allows you to create, deliver and sell your online courses from your website, under your brand. I'm sure the next question on your mind is, "How does Thinkific work?"
Well, for starters, the platform comes with built-in tools that every course creator with little or no coding skills needs to set up their website, upload courses, and monitor their sales.
In addition to that, you have complete control over the pricing and you can issue quizzes, assignments, and completion certificates to your students.
If you already collected students’ data from a different source, Thinkific allows you to import that data to your new account (you will need the Pro+Growth plan for that).
Not only that, you can use third-party tools like Disqus (a comment system) to help you interact with students one-on-one. They can also leave reviews on your website.
The good part is that you don’t need to be a tech guru to confidently use the tools. A few tweaks, drag, and drops are required to get the ball rolling.
On how to use Thinkific, it also helps that the platform has an app store where you can download, install and configure applications on your website.
Thinkific Company Overview
In the mid-2000s, Greg Smith, passionately delivered LSAT classes (Law School Admission Tests) in person at the University of British Colombia.
He wanted to reach more students, especially those outside Colombia. With the help of his brother, Matt Smith, Greg was able to launch his LSAT classes online.
Not only did Smith reach more students globally, but he also generated more revenue and had the freedom to focus on other areas of his career. Soon, the income generated from his online courses exceeded his income as a corporate lawyer.
When other entrepreneurs and businesses started reaching out to him, asking how they can sell courses on their websites and build their brands, Thinkific was founded!
The platform was incorporated in 2012 but launched fully as a learning management software in 2014.
Greg had one goal in mind, “To help other budding entrepreneurs create something that is totally theirs”.
As a result, Thinkific is user-friendly and has guided more than 50,000 course creators to set up and manage their course websites from scratch.
What Does Thinkific Look Like?
Below is a screenshot of how the dashboard looks upon signing up and purchasing a subscription plan;

As you can see, you can design your website, manage your content, market and sell your courses, and support your students all in one place. These tools have been carefully divided into various sections, making it easy to find them.
For example, from the "Market and Sell" section, you can access and set up affiliates, orders, coupons, and sales widgets.
Now, let us look at how each of these Thinkific tools works.

Course Creation and Delivery on Thinkific
Thinkific's drag-and-drop feature makes it easy to upload and create your online course in a blink of an eye.
Notice that using a drag-and-drop editor to create a nice-looking result still requires some basic notions of design. You can go for a very simple, minimalistic design first.
You have six templates to choose from when uploading your courses. These templates have been configured to suit different course types. They include:
Blank: Useful if you have a specific curriculum mapped out and would prefer to build your course from scratch to meet the curriculum.
Pre-sell: Maybe you are still testing the waters with your online course and want to gauge people's interest. You can then create a pre-sell landing page and build a waitlist.
Mini-course: You can also create a free or low-cost mini-course to generate leads for your full-flagship course.
Flagship Course: Useful if you are interested in building a full-online course using Thinkfic's pre-built but robust curriculum outline.
Webinar Replay: This comes in handy if you have a recorded webinar that you would love to replay to your audience either for free or for a fee. This helps attendees review your pitch and offer, and delivers the pitch to anyone who missed the live presentation.
Membership Resource Library: This template allows you to upload different downloadable resources in a membership bundle.
Once you have selected your template, you can then start uploading your course. Your course can be organized into Chapters and lessons.
The Thinkific Course Builder allows you to upload different course content such as videos, text, pdfs, audio content, live lessons, and even downloadable files.
You also have an option to embed external files as lessons under the multimedia option.
You don't need to worry about how Thinkific works in terms of bulk uploads. There is a "Bulk Importer" tab that allows you to upload videos in bulk onto the platform.
You can also upload, and save your videos on the Video Library and reuse them in subsequent courses which is very convenient.

There is also an option to copy lessons from previous courses which saves you lots of time if your courses are similar. So, instead of importing duplicate lesson content, you can simply import it from your previous course.

You can either make a lesson free for students to enroll in or set it as a prerequisite before they can access the next chapter. If you want students to either download the course material or engage in discussions, you can always enable it from the Lesson Settings.
Thinkific Course Delivery
Course creators can always customize how lessons appear on your website. You can choose either a dark theme with light text on the background or a light theme with dark text on the background.
Progress Tracking
The "Video Lesson Progress" option allows you to either set your lessons on autoplay or attach a completion percentage. If you want your students to automatically progress to the next lesson, then the "Autoplay" option comes in handy.
However, if you would rather have them watch the video to a particular point before proceeding to the next lesson, then you can set your desired completion percentage.
Course Visibility
Thinkific allows you to either make your online courses public, private or hidden. Private courses are public but students have to request access from you before they can enroll. Hidden courses do not appear on the website but students can access them if they receive a direct link from you.
It makes sense that Thinkific cares about a creator's copyright. The platform gives you an option to disable text copying. This means that your work can't be plagiarized so easily.
To gain more visibility, especially on the search engine, you can also optimize your online course - add your SEO title, description, and high-ranking keywords.
Let's now summarize everything and I will give you my final impression of the Thinkific course creation tools.

Course Creation on Thinkific - Final Verdict
Thinkific has done solid work concerning course creation and delivery. The features are rich, strong, and user-friendly.
First, you have six templates to choose from when uploading your courses. Then you can import your videos either individually or in bulk. Your videos can also be saved on the Video Library, allowing you to use them again in your future courses.
In addition to that, there is also an option to copy lessons from previous courses and you can make your courses private, public or hidden.
I particularly love how course creators can easily set a completion percentage for their courses. It's a good way to ensure that students are thorough with the courses; that they didn't just skim through it because then, it would have defeated the aim of putting together the course.
Another smart feature is the option to disable text copying, protecting one's copyright. And you can always optimize your course for search engines.
You get to do all these on your online course website without needing any coding skills.
However, if this is your first time navigating a learning management platform, it will be a huge learning curve for you. But don't be afraid, it's a walk in the park.
If you are not a designer yourself, try to use a minimal design for your pages. Remember that the drag-and-drop tools are designer tools, after all, they do take some skill to use properly.
But the templates give you a very good starting point, so you should be able to create a great-looking course page with no problem.
In the next section of the Thinkific review, we will look at how the platform helps you make your online courses interactive and engaging.

Thinkific Course Engagement
Thinkific has powerful tools that enable students' engagement and interaction. Tools like quizzes, assignments, surveys, completion certificates, and life lessons will spice up your online course. There are also features like students' course reviews and discussions.
Now, let us look at these tools in detail:
Quizzes
Aside from making your classes interactive, Quizzes are important for gaining more insight into your students' performances and progress.
Thinkific's quiz section is rich with features and easy to navigate. You can either choose to have one answer to a question or multiple answers.

You can also choose to explain the correct answer. Your students will see it when they provide their answers. This feature is quite helpful because your students get to know the reason why they failed a question.
If you have already drafted your questions using an Excel spreadsheet, you can always import them either as a file or template.

Additionally, you can choose whether or not the quiz requires a passing grade. If you want your students to pass the quiz before moving on to the next lesson, there is an option for that as well.
You can also choose to randomize your order of questions. That means you can add as many questions as you want to your quiz bank, then specify how many questions will be used in each quiz attempt. That way, your students will rarely see the same set of questions when they retake the quiz.
However, if your course assessment mode is more complicated, Thinkific allows you to integrate a third-party platform that you can use for your student evaluation - Brillium.
Brillium for Thinkific is a third-party assessment software that helps you create more sophisticated and powerful exams. You can randomize your questions, give your students an option to skip questions, and overall, set a time limit for the assessment.
Brillium also allows course creators to issue automatic grading as well as give personalized feedback to their students.
However, this powerful tool can only be accessed by Thinkific users subscribed to the Pro + Growth plan.

Assignments
Assignments are also another way to engage your students. In Thinkific's case, course creators can choose to issue assignments to mark the completion of each lesson.
You can also provide a template or an example to help your students in completing the assignment. All assignments are reviewed before the student moves on to the next lesson.
This feature is excellent as it allows you to provide individual student feedback.

Surveys
As an online course creator, it is important to know your students' expectations before the class begins and if the course is delivered on that. This will help you know what areas to focus on and where you need to improve.
Thinkific affords you this opportunity with its built-in survey tool. Your students can either provide one answer, multiple answers, free text, or give ratings and scales.
If you wish to use survey tools from third-party platforms like Typeform, Google form, or survey monkey, you can always embed them into the Multimedia lesson type.

Live Lessons
Thinkific gives you an option to teach your students one-on-one. This is a feature rare in some platforms.
As long as you have a zoom account, subscribed to Thinkific's Pro plan, or higher plan, you can always host live lessons, webinars, or coaching sessions.
The only limitation here is that you can only admit 100 students to the class. If your students are more, then, you can consider splitting them into batches for the classes.

Note that another option that a lot of coaches use is to host their live classes directly in Google Meet. Here is a guide on how to do it - How to Host Online Classes For Free (with Google Meet).
Completion certificates
Issuing completion certificates at the end of your online course is a great source of motivation for your students. There are 7 different templates to choose from and you can fill in details like student name, completion and expiry dates, and custom fields.
You can also add your logo to the certificates. It's a great way to build your brand.
Upon issuance of the certificate, the course creator can view and download the same from the student's profile. That means if any update needs to be made on the certificate, like a change of name, it can be done easily.

Thinkific Course Engagement - Final Verdict
Thinkific took online course engagement to another level. It's how easy it is to set up quizzes and choose to have one answer or multiple answers. Even if you had already drafted the questions differently, say using an Excel spreadsheet, you can always import it.
You can randomize your questions and choose whether or not the quiz requires a passing grade.
It's brilliant that there is an option to explain the correct answers. The lesson sticks more when a student knows the reason why they failed a particular question.
You can always get feedback from your students using the in-built survey tool. They can either provide an answer, multiple answers, free text, or give ratings and scales. Third-party platforms like Typeform, Google form, or survey monkey, can always be embedded into the Multimedia lesson type.
It makes sense that you can deliver Live Lessons through zoom. However, it is not a viable option if you have more than 100 students registered for the class.
You can issue completion certificates to your students which goes a long way to establishing your brand's credibility.

Designing and Branding Course Website
Learning management platforms come with tools to help the course creator build and design their website; from choosing a custom domain name, logo, theme, site header, and footer.
You might be wondering, how does Thinkific work in terms of course website design and branding?
In this section, we are going to look at the site design tools available on the course hosting platform.
Theme Library
Every website starts with a theme. It covers the overall look, feels, and style of your website. If your design is not attractive or friendly enough, it will affect your user engagement.
3 primary and responsive themes are available on Thinkific, each with three or four styles. So, in total, you have 13 themes + style combinations, to design and brand your online course site.

You can also import themes or even change the one you already installed whenever you want.
This freedom to switch themes even after your website has gone live is very convenient. You may stumble on a better theme in the future that you can use for your website.
Site pages
Thinkific's site pages contain all the active pages on your website. You can easily edit the pages, add new custom pages, and set which page your prospective students will see when they first visit your website.
Thinkific creates two pages for you - your course page and your home page. When you are just starting, these are the pages that matter. But you are free to add other pages like, "About Us", "Product Page", "Contact page", etc.
All your pages can be customized using Thinkific's site builder.

Site Builder
Thinkific's site builder is where you have complete control over the look and feel of your course web pages. You can customize your homepage, course page, and product page by simply dragging and dropping elements until it suits your taste.
It's also great that you get to add as many sections as you want. You can have a section featuring a countdown timer, FAQs, bonus materials, reviews from happy students, logos of companies you have worked for in the past, pricing options, and even new instructors.

These sections can be rearranged, deleted, or edited to suit your taste,
The "Theme Settings" is where you apply your brand's color, style, and desktop and mobile typography.
However, you must be consistent here as all changes will reflect on all your pages like home and course landing pages. Colors and fonts cannot be customized per page which can be a bit limiting.

Designing and Branding Website on Thinkific - Final Verdict
Reviewing Thinkific pros and cons in this section, it's quite glaring that the platform did a great job providing design and branding tools that are easy to use.
First, there are 13+ themes including the style combinations to choose from. You are free to tweak the colors, and typography to suit your brand style. This gives you complete control over your site's appearance.
You can also add and customize different pages on your website. And all these are done by simply dragging and dropping the necessary elements until it suits your taste.
There is no need to be a tech guru or employ the services of a web designer.
However, there is a limiting factor. Colors and fonts cannot be customized per page. Any change made to the color or site's font affects all your pages. So, you have to be careful to choose a style appropriate for all the pages.
Let's now talk about all the features related to managing your website and your students.

Thinkific Site Administration
Monitoring and gauging your business growth is as important as designing, branding, and uploading your online courses.
How many students are buying my course? Who are they? Are they new or returning students? Which course is making the most revenue? Which course has the highest completion rate?
You need answers to questions like this to make smarter decisions regarding your online course business.
Advanced Reporting
Thinkific's Advanced Reporting is a powerful feature that helps course creators pull back to analyze which course is bringing in more income, track transactions from new and returning students, and lessons that have the highest engagement and completion rates.
That way, you will have a deeper insight into your course revenue, orders, enrollment, and student engagement. The good part is that these reports can be exported as CSV files.
This tool is divided into four parts, let us look at them in detail:
Revenue report
This part shows you how much revenue your courses have generated over time either hourly, daily, weekly, monthly, quarterly, or yearly. The data is broken down by product name, product type, payment type, payment provider, affiliate source, and new vs returning students.
Orders Report
This report shows you the number of orders your course has accumulated over time. The data also shows whether the orders are from new or returning students, their email addresses, mode of payment, and coupons used.
Enrollment Report
The enrollment report shows you the number of students that have enrolled in your courses, whether new or returning students, their emails, and the percentage completed.
Student Engagement Report
This is where you see and analyze the students currently engaging with your courses. You also get to see the type of content generating the most engagement, the number of quiz attempts, and your course reviews.
The number of times your videos have been loaded, played, hours watched and the total number of visitors across all videos since they were uploaded are also presented to you.

Without insights like these, you will be running around in circles which would affect your business big time.
However, you can only access this report if you are subscribed to Thinkific's Pro+ Growth plan.
Assigning User Roles
As your online school is expanding, you will need more people to step in and assume some roles.
For example, as the site owner, you might decide to have another person serving as the "Course Admin". The person's primary role is to create new courses, and instructors, update old courses assigned and also analyze the students' progress.

Thinkific allows you to create and assign 8 different user roles. Each of them has different access and functionality. The available roles are:
Site Owner: When you first create an account on Thinkific, you automatically become the site owner. You have access to all the features available.
Site Admin: same permission as the site owner, except that they cannot transfer account ownership or set up payment integration.
Course Admins: They can only create new courses, and edit the existing courses that they are currently overseeing.
Group Analyst: They can view student names and emails for assigned groups as well as export their progress reports.
Affiliate: They earn a commission for promoting your courses.
Revenue partners: They share a percentage of sales made from certain courses.
The only limitation here is that the number of user roles you can access and can assign depends on your Thinkific subscription plan.
Also, Thinkific makes it easy for course creators to connect with their students on the go. You can set automated student welcome and completion emails.
In addition, you can bulk import and enroll students as well as send out bulk emails which saves you a lot of time.
Thinkific Site Administration - Final Verdict
Thinkific provides the necessary tools to enable course creators to monitor and measure their business growth.
The Advanced Reporting tool shows you how much revenue your courses have generated, the number of orders you have had, how many students have enrolled in your courses, and the courses generating more engagement.
This helps you know the areas in your business that need improvement, and where you are getting it right.
As a business owner, you need all the help you can get to grow your business. Thinkific makes that possible by providing a feature that allows you to assign roles to your team members.
For example, you can have affiliates whose main duty is to spread the word about your courses and earn doing so. This makes marketing a bit easier for you.
The only limitation in Thinkific's site administration function is that you can only enjoy it fully if you are subscribed to Thinkific's Pro+ Growth plan which is a bit on the high side.

Let's now talk about all the features that Thinkific has available to help you sell and market your online course.
Thinkific Sales and Marketing
When you are done designing your website and uploading your courses, the next on the list is to sell and market the courses.
This part is usually tricky and should be handled carefully. The question now is, what marketing tools are available on Thinkific and how do they work?
Thinkific provides just the necessary marketing features like pricing options, sales widgets, coupons, and affiliates.
Now, let us discuss these features in detail:
Pricing Options
If you're wondering how much does Thinkific cost? Well, the good news is that the pricing plans are quite affordable and you have the option to select your desired pricing option for your courses. You can either set the prices per course or bundle.
There are several options available when pricing your course. They are:
Free: You can make your courses free. In this case, all the student needs to do is to create an account on your website and they can access the course anytime without paying a dime.
One-Time Payment: Students can pay a one-time fee to access your course. You are also free to set an enrollment duration. That way, your students will have limited time to access your course.
Subscription: Here, you get to charge your students a recurring monthly, quarterly, or yearly fee for your course. This option works well for membership websites or longer and drip courses.
Payment Plan: If your course price is high, you can split the price over several monthly payments, making the course more affordable and increasing sales. For example, if students opt-in to three months' plans on 13th May, they will be charged on 13th June, 13th July, and 13th August.
Additional Pricing: Thinkific allows you to add more prices to your course, giving students the choice to pick the one that they can afford.

Though these pricing options are great for your marketing strategies, their availability depends on the Thinkific plan you are subscribed to. For example, the Subscription and Payment Plans are only available on the Pro Plan and above.
After setting your course price, you can then add your upsells if any are available and customize the default "Thank you" message for your students.
That means, after each purchase, your students are redirected to similar courses they can purchase, the course player, or a custom URL.
If you don't customize this page, students will be taken to the default thank you page after their purchase. However, this feature is only available on Thinkific's Pro Plan and higher plans.

Coupons
Offering discounts is one of the effective ways to market your online course and generate more sales. People love it when they can get things at a cheaper price.
Thinkific's coupon feature allows you to choose the type and duration of the discount as well as the quantity, and specific courses the discount applies to.

You can create as many coupons as you wish, each applying to different courses. Also, you can always come back and edit your coupon or delete it.
If you are unsure about your students applying the coupon at the checkout, you can automatically add the coupon links to either the course or bundle landing page or the checkout page.
Redirecting your students to any of these pages makes it easier for them to apply the coupon code during their purchase. There is no need to type in the code at checkout.
If you want your coupons and promotion to be more visible and stand out, you should check out Promos Kit on Thinkific App Store. The application offers a powerful set of sales and marketing widgets like countdown timers, sticky bars, popups, and more.

These widgets will come in handy whenever you are running promotions like Black Fridays, Christmas, New Year sales, and even your company birthday.
Sales Widgets
Thinkific allows online course creators to create and customize widgets to improve their course promotion and sales.
Sales widgets are simply buttons or cards completely customized to your brand and easily embedded on your website or blog. It's a great way to market and sell your courses on other platforms.
People don't need to visit your website to purchase your course; they can do that from anywhere as long as you pasted your widget code on the platform.

And, you don't need any design or technical experience. All, you need to do to choose your preferred widget style, background color, text, and where the widget will lead customers to. It could be the landing page or the checkout page.
However, Thinkific does not allow you to embed the sales widgets on Facebook. The only way to market your course on Facebook is by sharing your course or site link, to give prospects a peek into your product.
Thinkific Affiliates
Affiliate marketing is a good way to extend your online course reach; an option Thinkific offers if you are on any of the paid plans.
When set up, affiliates will earn a portion of your course revenue anytime they bring a student who purchases your course. You are free to choose how much commission they should get.

The affiliate role can be assigned to any user on your Thinkific account. Once assigned, they will have access to their affiliate links which they can use to draw traffic to your online course site.
When setting up your course, you can either include current affiliates or exclude them from marketing the course. Also, if you do not want new affiliates to have the course included in their referral links, you can exclude them before publishing your course.
You also have full control over approved payments, payout policies, and schedules. Commissions remain pending until you have approved or denied them.

However, Thinkific only permits you to designate affiliate roles and monitor their sales, they do not manage your payouts.
You can make your payments outside Thinkific and then manually record them on the affiliate dashboard. That is the only way to keep track of the amounts you are owing.
Thinkific Payments
There are two major ways to accept payment on Thinkific - Direct Bank Deposit and Third-party Payment Integration (Stripe or Paypal).
Recently, Thinkific has adopted its payment system.
Instead of using the usual 3rd party payment processing platforms, all you need to do is to connect your bank account to Thinkific and accept payments, manage orders, refunds, and payouts to your bank account.

That means you can track all student payments, and refund those who paid using Thinkific Payments while getting detailed information about the status of your payouts directly on your dashboard.
In addition to that, you can always update your bank account and business information.
This centralized payment method is a welcome development. However, the service is currently ONLY available to course creators with businesses in the United States and Canada.
If you are not located in the United States or Canada, then you can use third-party payment platforms like Stripe, PayPal, or Stripe Atlas.
Alternatively, you can download and install CheckoutJoy from the Thinkific app store. The application helps you to accept payment from different 3rd party payment providers.

Also, bear in mind that you can not charge multiple currencies when setting your course price as Stripe only allows you to deal with one currency.
Though by default, your currency will automatically correspond with your selected country when first creating your account.
Thinkific Sales and Marketing - Final Verdict
Thinkific has the necessary features to help you market and sell your online courses. You have four pricing options to choose from when setting your course price.
You can either make the course free, or charge them a one-time fee, or a recurring monthly, quarterly, or yearly fee. Alternatively, if the course price is high, you can split the price over several monthly payments. That way, it becomes more affordable.
You can also have multiple prices for a course, offer the course at a discounted price as well as create and customize sales widgets. These features help boost your course sales.
The only downside here is that Thinkific does not allow you to embed sales widgets on Facebook. You can only promote your courses by sharing the course or site link.
While it is great that Thinkific allows course creators to assign affiliate roles, their unavailability to manage the payouts becomes an extra task for creators.
Imagine that you have more than 50 affiliates working for you. It is your responsibility to pay them and then manually record the payment on the affiliate dashboard. This would certainly consume a lot of time, right?
Thinkific provides two options to accept payments from students. You can either use the Direct Bank Deposit if you are in the United States or Canada or you can use Third-party Payment platforms like Stripe and PayPal.
The good thing about Thinkific payment is that it caters to course creators all around the world. If you are not located in the United States or Canada, you can always use Stripe to receive payments and if Stripe is not available in your country, you can use PayPal.
On the other hand, you can download and install CheckoutJoy from the Thinkific app store to help you with payment processing.
Thinkific Customer Support
Thinkific presents different ways to support online course creators who are signed up on their platform.
If at any point, you get stuck while navigating the platform, you can either search for a guideline on the Help Center or reach out to Thinkific via a phone call, live chat, or email address.
There are more than 100o articles on the help center. Each of them covers different areas of the platform. You will surely find a relevant or helpful guide to help you sort out a problem.
Also, Thinkific's live chat is available from 9 am - 3 pm every Monday to Friday PST. In addition to that, you can always ask questions and interact with other course creators on Thinkific's Facebook group. The group has over 31,000 members who are readily available to support each other.
There is also an Expert Marketplace made up of professionals in all facets of online course creation.
Whether you need help with building your course, designing your website, or marketing your course, you can always reach out to any of the experts for help.

Thinkific also has a training center where creators can access tons of free courses on online course creation. However, this feature is only available to paid users.
Thinkific Customer Support - Final Verdict
Thinkific's customer support is responsive, fast, and pleasant. From my experience with them, they usually replied to email inquiries within 24 hours.
I also love that there is a live chat on their website. You can easily type in your inquiries, and have a customer representative walk you through any problems you might be having.
Their Expert Marketplace is also another great feature. As a newbie in the online course creation industry, you can always reach out to any of the experts for more guidance.
Thinkific training center is helpful for both new and established online course creators. However, the courses are only available if you are under any of their paid plans.
Thinkific Security
When it comes to your site's security, Thinkific has taken the necessary precaution to ensure that your website and all the information provided through it are safe.
To this end, the platform automatically includes integrates a free Secure Sockets Layer (SSL) certificate to your website.
This feature encrypts any confidential information supplied by your students. Details such as their password and credit card details are kept safe and can never be intercepted.
Aside from keeping your site safe, an SSL certificate also makes your website appear more professional and enhances trust with your students.

Thinkific App Store Review
Thinkific has taken the initiative to build an app ecosystem to improve the experience of online course creators.
It is the same way Android and iOS apps have made our digital lives easier. Different apps cater to almost all our basic needs and we can easily download and install them on our smart devices from either the Playstore or Apple Store.
However, in Thinkific's case, their apps are housed under the Thinkific App Store. As long as you are a registered user on the platform, you can access the store.
There, you will find applications that cater to all aspects of your online course creation; from site design to course marketing, engagement, assessment, and site administration.
For example, if you need extra help with your email and marketing, apps such as Mailchimp, ActiveCampaign, Apointo, ConvertKit, ConstantContact, Capture, and many more are available on the Thinkific store.

In the same vein, if you need help with increasing your online course engagement, you will find apps like Mazetec, Beastnotes, Coursemap, Ding, and a lot more. They aim to improve learning outcomes for your students.

Every app on the store has its function. For example, if you want to motivate your students to take notes during your course delivery, Beastnotes will help with that.
While some of the apps are free, some will cost you a few bucks. You can download and install them on your Thinkific account. It's also easy to customize them to suit your needs.
Thinkific App Store Review - Final Verdict
The goal of every online course hosting platform is to maximize benefits for course creators. That's the dream.
However, there could be a few constraints that may not allow them to completely fulfill the dream.
Course creators have different needs and if these platforms decide to arrange these functions under different subscription plans, they will end up having endless lists of plans.
Thinkific thought it wise to put together an app store to meet all the needs of course creators signed up under the platform.
Whether you are subscribed to the free plan or paid plan, you can access the Thinkific App Store. You are also free to download and install any app you think would spice up your course creation business.
Thinkfic Pricing Plans
Thinkific pricing plans cater to all kinds of online course businesses. Whether you are a newbie in the industry desirous and you are still testing the waters or you are an established course creator, you will find a plan that matches your needs.
However, the question is, how much does it cost to create a course on Thinkific? or rather, how much does Thinkific cost?
Thinkific has six plans - one free and five paid plans. There is the Basic plan, Pro Plan, Pro+ Growth, Premier, and Thinkific Plus Plans.

All the plans give you access to unlimited students, an easy drop-and-drag course builder, website templates, email, and phone support as well as the Thinkific App Store.
However, if you need more than these features, you can subscribe to the Basic Plan. This plan is best suited for creators who want to start their online course business with just the basic tools.
With this plan, you can upload and manage unlimited courses, use Thinkific's Live Chat Support, have a custom domain, create coupons and promotions, release drip content, and send one-on-one student emails.
The Pro Plan which is the most popular and an upgrade of the Basic Plan allows you to have 2 site admins and you can host Live lessons.
In addition to that, you also get to issue completion certificates, make your online course either private or hidden and give your students an option to pay on on subscription basis.
If you need more advanced features while still under the Pro Plan, then, you can include the Thinkific Pro + Growth Package.
This package goes for $50 per month in addition to your Pro Plan which costs $79 if you are paying yearly and $99 if you are paying monthly.
However, you get access to high-end features like the freedom to remove Thinkific Branding from your website, sell your course to groups, import students from another platform, and send emails to multiple students at once. You also get to build a more customized assignment and exam with Brillium.
Thinkific's Premier Plan is the next available for big corporations or advanced online course creators. The plan allows you to have 5 admin accounts, 15 group analysts, unlimited communities, Brillium exams integration, white labeling, and many more. It goes for $499 if you are paying monthly and $399 if you are paying yearly.
Below is a summary of Thinkific's Pricing Plans, both yearly and monthly:

The Plus Plan which is the biggest subscription plan on Thinkific requires that you contact Thinkific Support Team to purchase a subscription.
Though Thinkific Pricing Plans is on the high side, it at least caters to online course creators at any stage of their career.
Also, you might be wondering, "Does Thinkific take a cut?"
Thinkific does not charge any transaction fee on all the plans. That means that as a course creator, you are entitled to your full revenue after your course sales. Even if you are on the Free Plan, you are not entitled to pay any commission.
For a much more in-depth review of the Thinkific plans, read this.
Thinkific Review - Final Verdict
From the Thinkific review above you have seen that indeed it is an online course hosting platform with robust features that will support the growth of your online course business.
The site builder is easy to use, with six templates and 13+ themes and styles to choose from when uploading your courses and designing your website.
You can upload different course content, give quizzes, assignments, and surveys, and even issue completion certificates to your students.
Thinkific has also gone the extra mile to build an App Store for course creators signed up on their platform. The store has a variety of applications serving all the areas of course creation; from uploading the courses to marketing and sales.
These features are helpful for course creators at any stage of their careers. However, these tools come with a price.
Thinkific pricing is a bit on the high side and maybe you are still a newbie in the industry, without much revenue to go by.
Their Free Plan allows you to enjoy very few features and giving assignments is not one of them. Also, course creators eager to know how many courses are on Thinkific's free plan will be shocked to realize that they're just entitled to one course.
Their most affordable paid plan is $39/month but that is if you are paying annually, otherwise, the Basic Plan costs $49/month.
But the thing is, the Basic plan is really just a way to do your first-course launch, and lead you to the other higher-end plans.
In practice, you will be needing the Pro plan at least, or preferably the Pro+Growth plan where you will have essential features such as:
- completion certificates
- bulk email (newsletters)
- private and hidden courses
- subscriptions
And these are just to name a few. To get these features, that are essential to run your course business, you need the Pro+Growth plan which costs $149 a month.
But how about course creators who are on a tight budget?
How do we set up our website, create courses and make sales, and still get for example all of the above listed essential features, only available in the plan Pro+Growth?
I understand this dilemma because I’ve been there too. I’m a course creator myself, and I understand what it’s like to have to grow an audience from scratch.
It’s for this reason that I created an online course platform that both aspiring and established course creators can afford – OnlineCourseHost.com.
The platform is super easy to use and provides an awesome user experience for both you and your students. It comes with built-in email marketing, a custom domain name, free customer support, completion certificates, bulk emails, private and hidden courses, subscriptions, Facebook Ads Integration, and much more.
You can read more about the platform's features here.
But more than a platform, we want to give you all the information that you need to grow your online course business successfully.
That’s why we have created the Course Creator Academy where you can find everything you need to become a successful online course creator all in one place for free.
To get notified when new content is available here at the Academy, you can subscribe here to our weekly newsletter:
If you are looking to ask any questions on online course creation, you can reach me here on my Facebook group:
Join the Course Creator Academy Facebook Group
Ready to learn how to launch your first course on OnlineCourseHost.com? Here are the helpful guides for you to check out:
- Best Online Course Platforms (Ultimate Guide)
- How To Create An Online Course (In 15 Super-Practical Steps)
- How To Choose An Online Course Topic That Sells
- How To Record And Edit Your First Online Course
- Affordable Online Course Equipment - Complete Practical Guide
- How To Hire An Online Course Team
- The Ultimate Online Course Launch Checklist
- How To Create The Perfect Online Course Sales Page
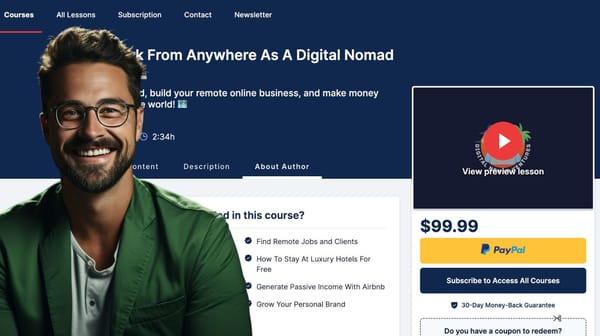
- Create A Powerful Brand For Your Online Courses (In 5 Steps)
- How To Sell Online Courses? The Ultimate Guide
- How To Promote Your Online Course - Complete Guide
I hope you found this post helpful, let me know in the comments below what other topics you would like me to cover, or any questions that you have.
Thanks for reading… and enjoying the course creation process! 😉
Vasco Cavalheiro
OnlineCourseHost.com Founder & Online Course Creator
LinkedIn Facebook Page Facebook Group Twitter
Frequently Asked Questions
To round up this article, let us look at the similarities as well the differences between Thinkific and other popular course creation platforms like Teachable, Kajabi, and Podia.
Thinkific Vs Teachable
Like Thinkific, Teachable is an online course hosting platform. Both of them have similar features such as free and paid pricing plans, advanced reporting, email support, live chat, affiliate marketing, and an integrated payment system. However, they differ in some ways.
So, is Thinkific better than Teachable?
Thinkific has more to offer in terms of course sales, marketing, and engagement.
For example, a feature like Brillium which helps you to customize exam questions is not available on Teachable. On top of that, Thinkific has an App Store that all registered users can access, download and install apps to enhance their online course creation business.
Teachable's paid plans are a bit cheaper than Thinkific's. For example, Teachable Basic Plan costs $39 if you are paying monthly while Thinkific charges you $49.
However, as a way to cover up for their expensive subscription plans, Thinkific does not take any commission from your course sales. Both are free and paid plans, course creators are entitled to their full revenue.
For Teachable, you are charged $1 + 10% per every course sale if you are on the free plan, and 5% if you are on the Basic Plan.
All-in-all, Thinkific has better features than Teachable.
Thinkfic Vs. Kajabi
Aside from empowering creators to create and upload their online courses, Thinkific and Kajabi also help them to have other kinds of content like coaching programs on their websites.
Agreed, both platforms have strong and impressive tools for online course creation. However, when it comes to sales and marketing, Kajabi has better features than Thinkific. The platform prides itself in having better marketing tools for blogging, podcasts, funnel building, email marketing, and many more.
Thinkific on the other hand has better engagement and assessment tools. The platform allows course creators to issue completion certificates to their students. This feature is not available on Kajabi.
Also, while Thinkific permits users to have an unlimited number of students, Kajabi can only admit 20,000 active members.
Other features such as a free plan, built-in payment processor, Search Engine Optimization, and unlimited courses are not available on Kajabi.
However, with Kajabi, course creators can host more than one website under one account. The Pro Plan which goes for $399 per month allows creators to have up to 3 websites in the account.
In conclusion, Thinkific has better course creation features while Kajabi has better sales and marketing features.
Thinkific is also cheaper than Kajabi. The lowest-paid plan on Kajabi is the Basic Plan which goes for $149 per month and $119 when you are billed yearly.
Thinkific vs. Podia
Podia is an all-in-one platform that not only handles your online course creation but also helps you build and market other digital products, like membership sites and digital downloads.
Thinkific and Podia share a lot of features like unlimited courses, students, issuance of completion certificates, affiliate marketing, coupons, drip content, site builder, and many more.
However, unlike Thinkific, Podia does not have a free plan. The lowest plan on Podia is $39 whereas Thinkific's is $49.
Also, Podia does not have an app store. This gives Thinkific an edge over it.