


How to Create an Online Course For Free (Complete Guide)
 Platform Review

Step-by-step guide for creating your online course website for free (with a free URL). Sell your courses on your own website, with no marketplace middleman (no design or technical skills required).
This article is a step-by-step guide on how to create an online course website for free and is aimed at both aspiring and established online course creators looking to sell their courses on their website with no middleman.
Here is a live example of what your course page will look like. Your course page will have a very modern, responsive, and, dare I say, gorgeous design 😉 that will stand out:
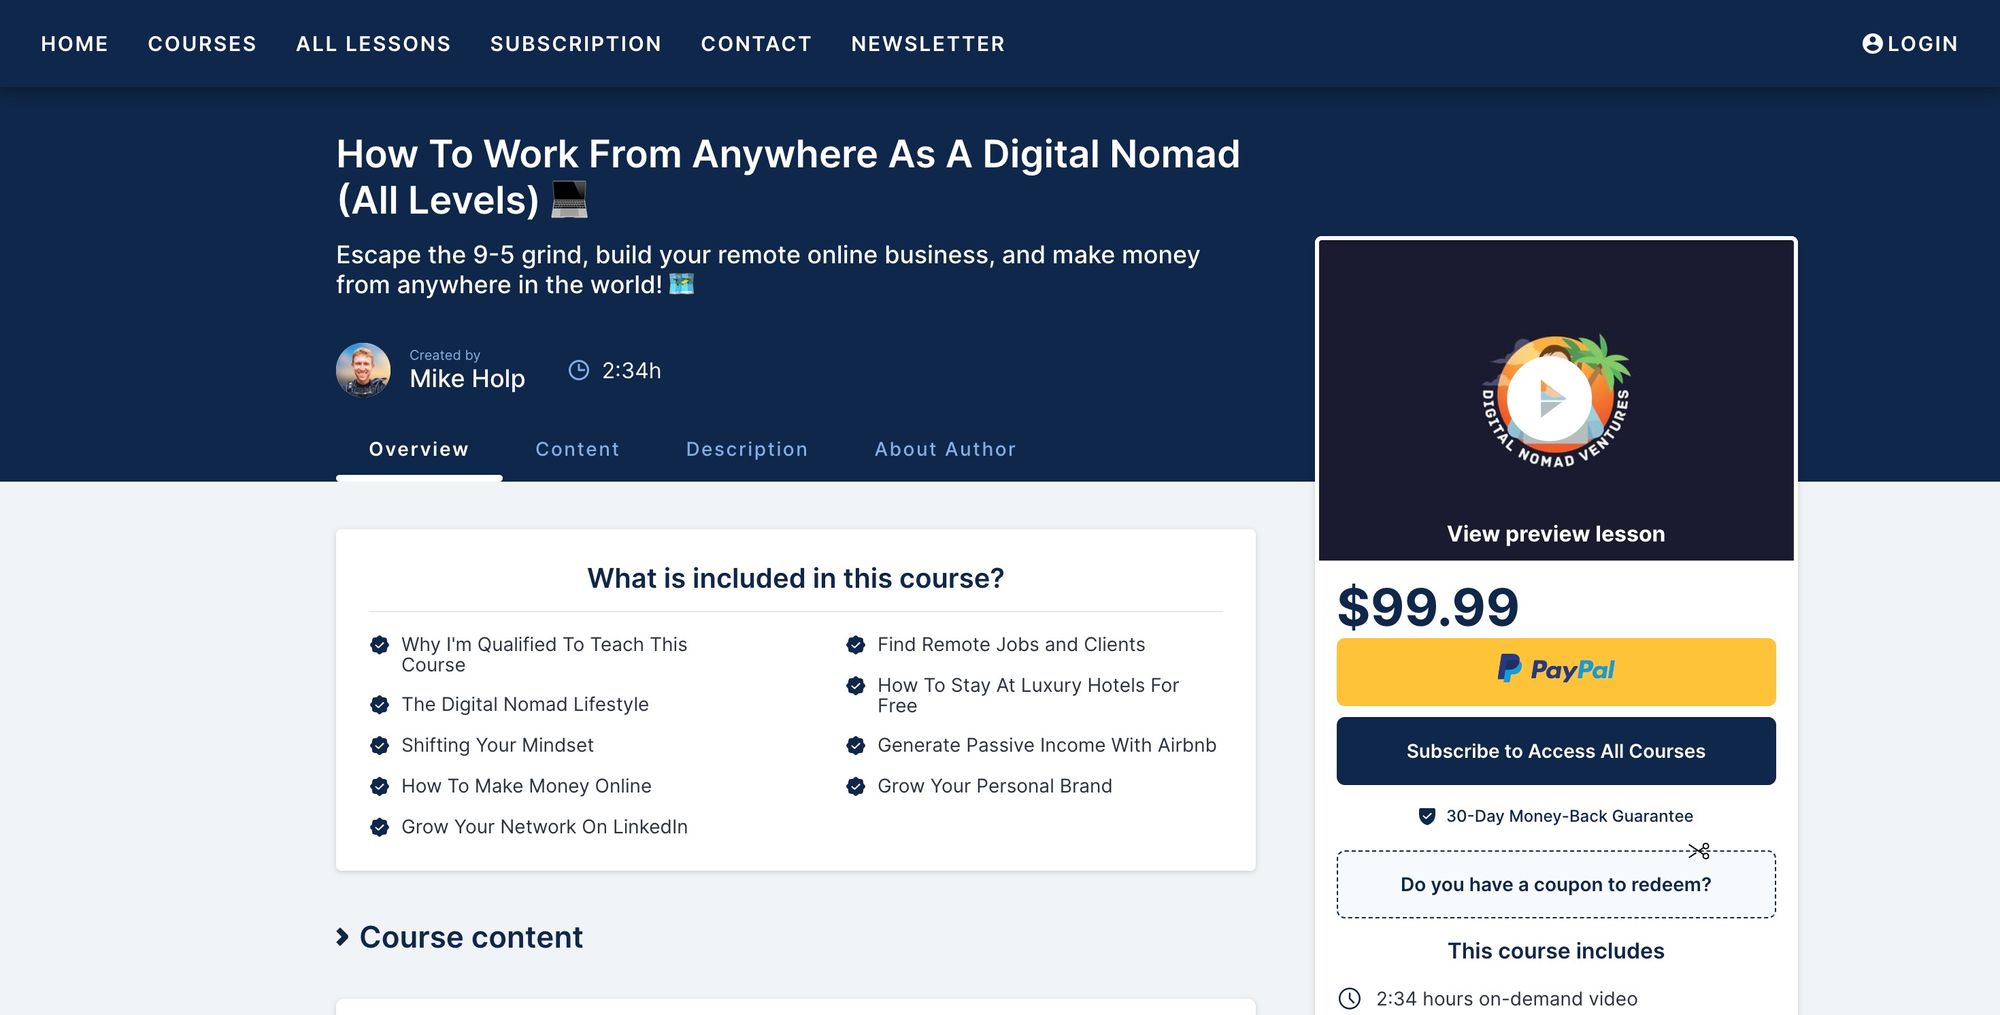
Note that you can also host your courses in your custom domain.
As an example, let's say that you own the custom domain yourdomain.com. You can then publish your online courses in the following domains:
- yourdomain.com
- courses.yourdomain.com
- academy.yourdomain.com
- learn.yourdomain.com
- etc.
As you can see, you can publish both in the top root domain or in a subdomain like courses, academy, learn, etc. It's up to you!
So how do you create an online course for free?
Follow these steps for creating your online course:
- Create a free account in an easy-to-use online course platform
- Get a custom domain, or set up a free URL
- Choose the brand colors for your online course website
- Setup your course website home page
- Create your first online course using a course builder tool
- Structure your course in sections and lessons
- Upload your video lessons, E-books, and text lessons
- Create a Stripe or Paypal account
- Connect your Stripe or Paypal account to the course platform
- Choose the right price for your course
- Publish your course
- Activate subscription plans, lifetime, and enterprise deals
- Create promotional coupons for one-time sales
- Create recurring subscription coupons
- Set up email marketing and start collecting student emails
- Activate your custom domain, if needed
In this guide, we are going to dive into the exact details of each step.
If you want to know all the other details surrounding course creation, you should also check out our full guide on this topic: The Proven Formula For Creating a Best-Selling Online Course (in 10 Steps)
Table of contents
If you are looking to learn how to become an online course creator and start creating your online courses, you can check out our series of sequential guides on the Course Creator Academy homepage, always reachable via the "Academy" button on the top menu.
So without further ado, let's get started learning everything that you need to know on how to set up an online course for free and from scratch.
Should I buy a custom URL or use a free one?
We always recommend getting your web domain so that you can fully brand your courses. For example, if you are a yoga instructor, then you could purchase the domain my-yoga-classes.com and host your courses there.
A web domain (which is a unique web URL) might cost you around $20 to $50 or less, and this cost needs to be paid yearly to the domain registrar as a subscription.
If you are just getting started creating online courses and have never hosted a website before, then you might be hesitant to make this purchase upfront.
It's OK, you can always purchase your web domain later. Right now, to get things started, you can already set up a free URL on OnlineCourseHost.com, for example, my-school.onlinecoursehost.com, and take it from there.
How to Set Up Your Own Online Course Website (with a free URL)
To set up your free online course website, simply log in to the OnlineCourseHost.com platform:
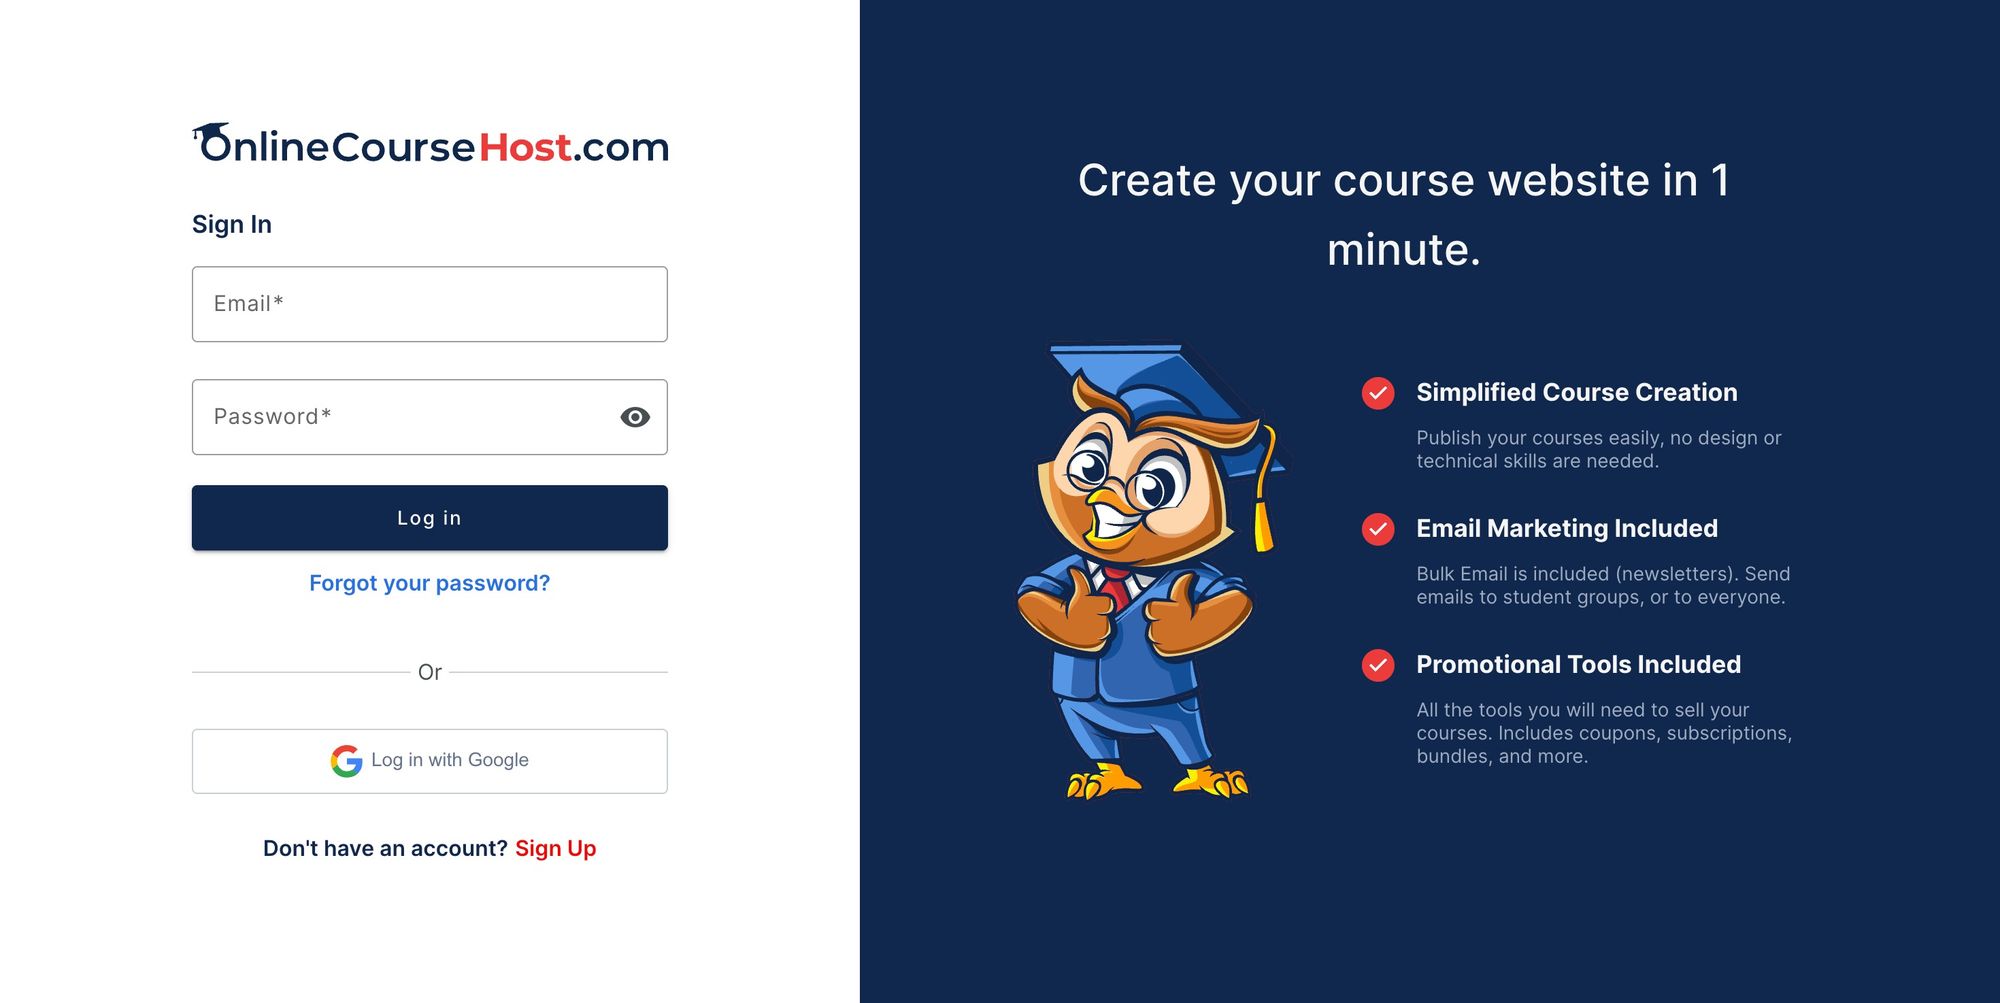
You can create an account for free by following this link:
Sign in and create your course creator account
The account creation process is free; no credit cards are required. There is no trial period for your account, and you can access all the platform features from the beginning (more on this later).
The first thing that you are going to be asked before you can create a course for free is to set up your free URL:
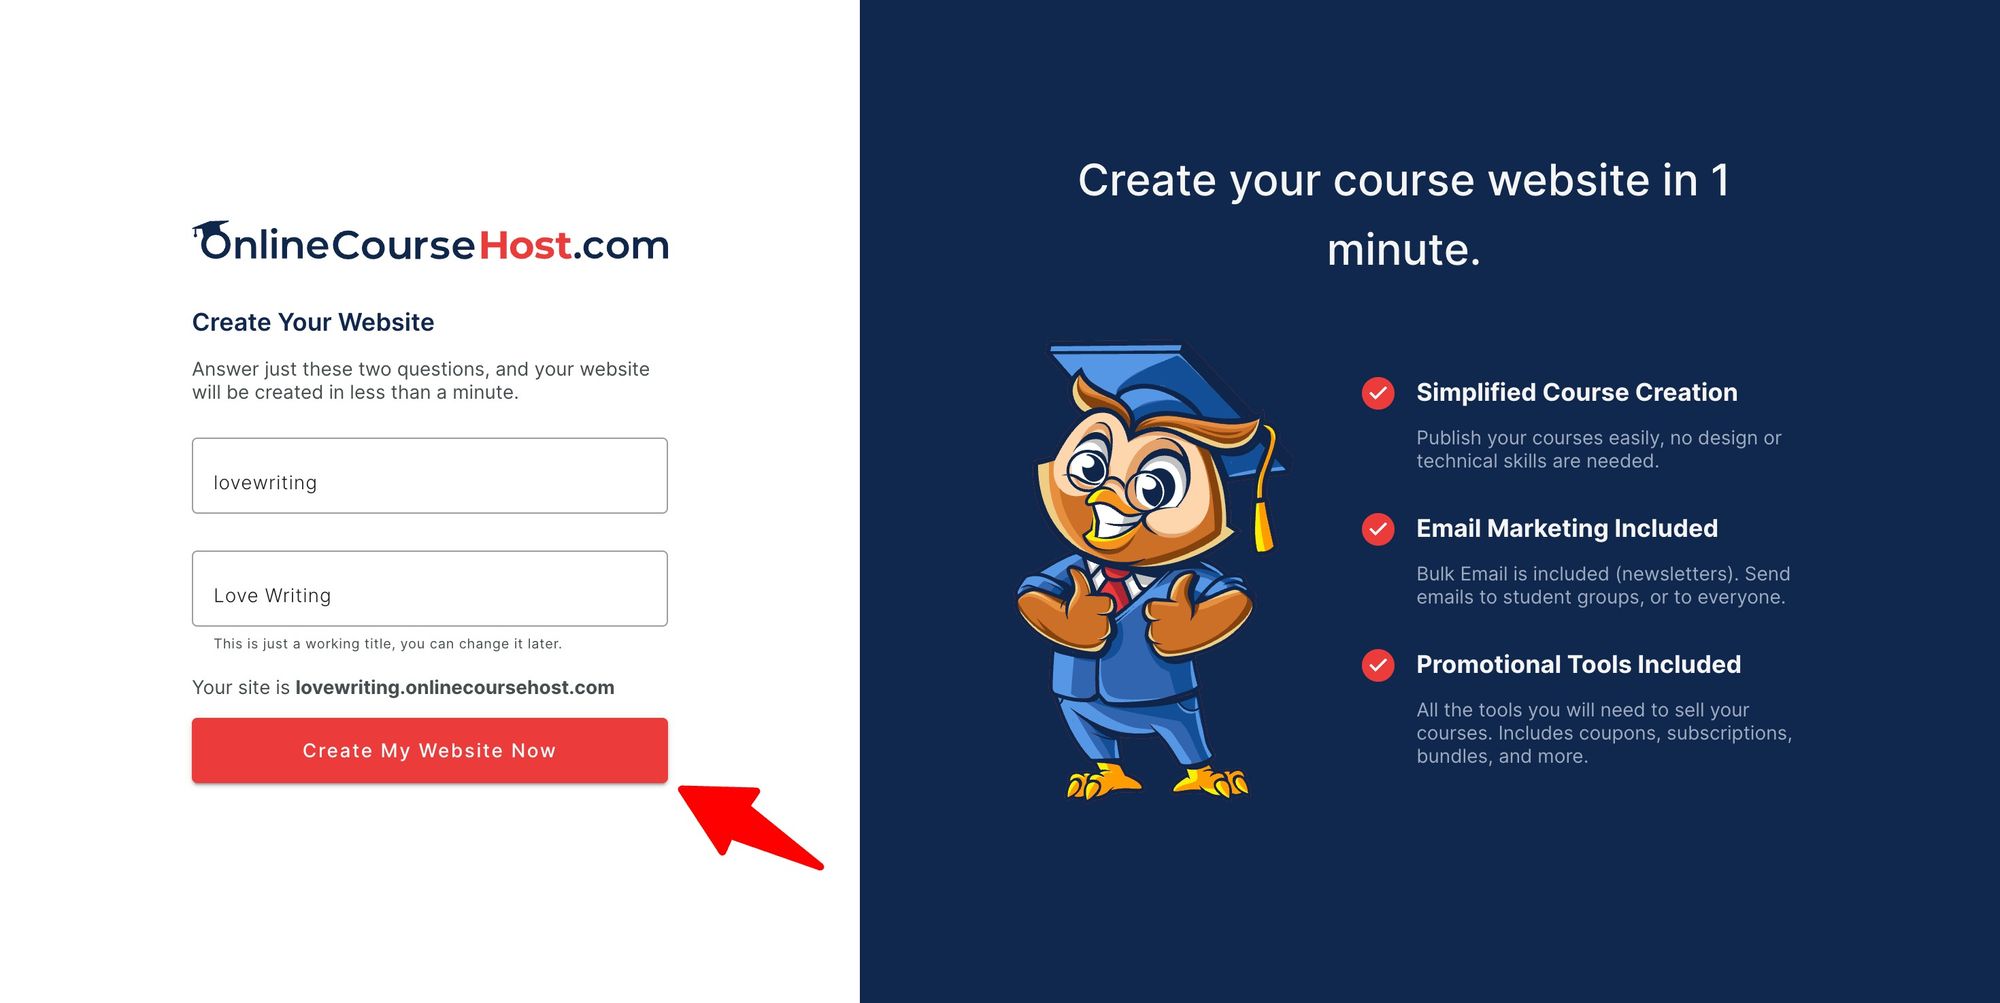
In this case, we have typed in the address box the text "lovewriting", so after clicking on the "Create My Website Now" button, your website will be immediately available at the URL lovewriting.onlinecoursehost.com.
After you activate your free trial, your online course website is ready to be used. Here's what your dashboard will look like:
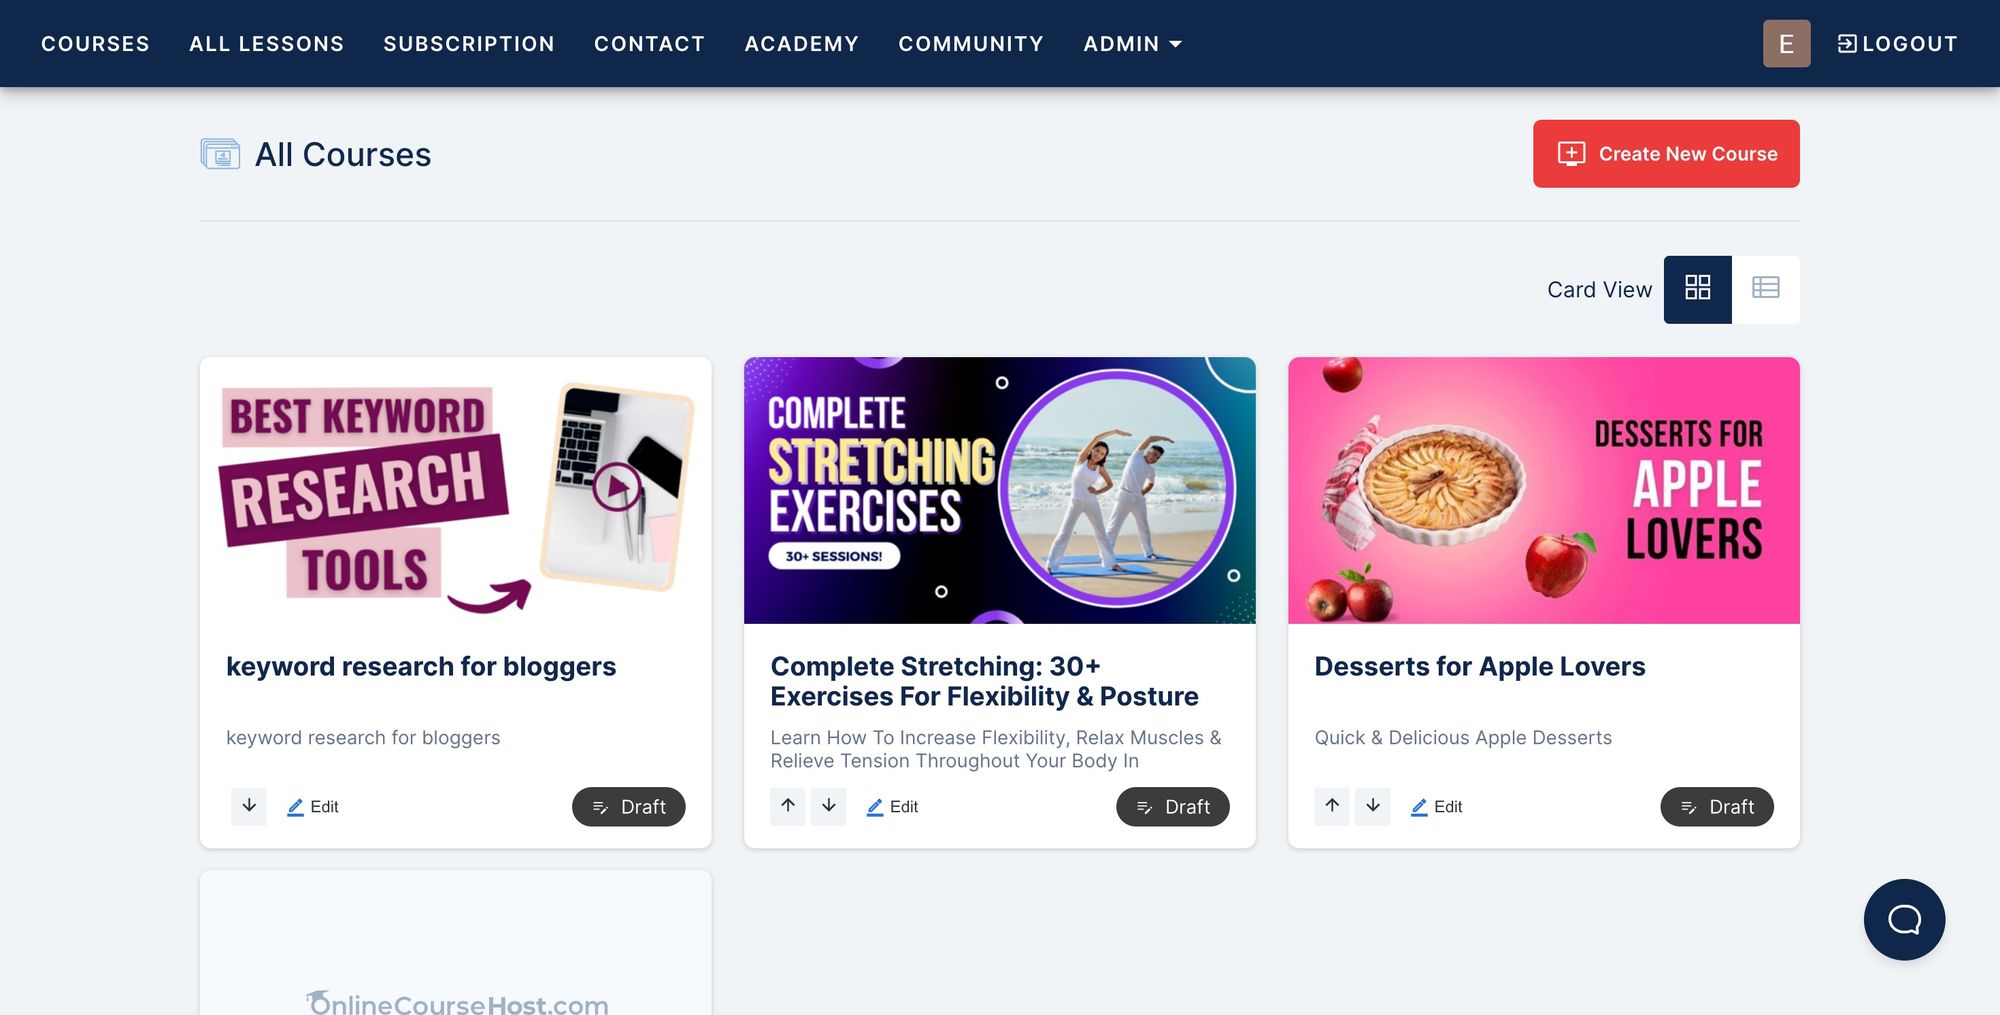
This is the Courses screen, where you can create new courses for free, as well as view existing ones. You can always reach this screen by clicking on the "Courses" button on the top menu from anywhere in the application.
How to Create Your First Online Course
Now, all we have to do is create a couple of online courses and start selling them.
To create your first course, click on the big "Create New Course" button. You'll be asked which type of online course you want to create.
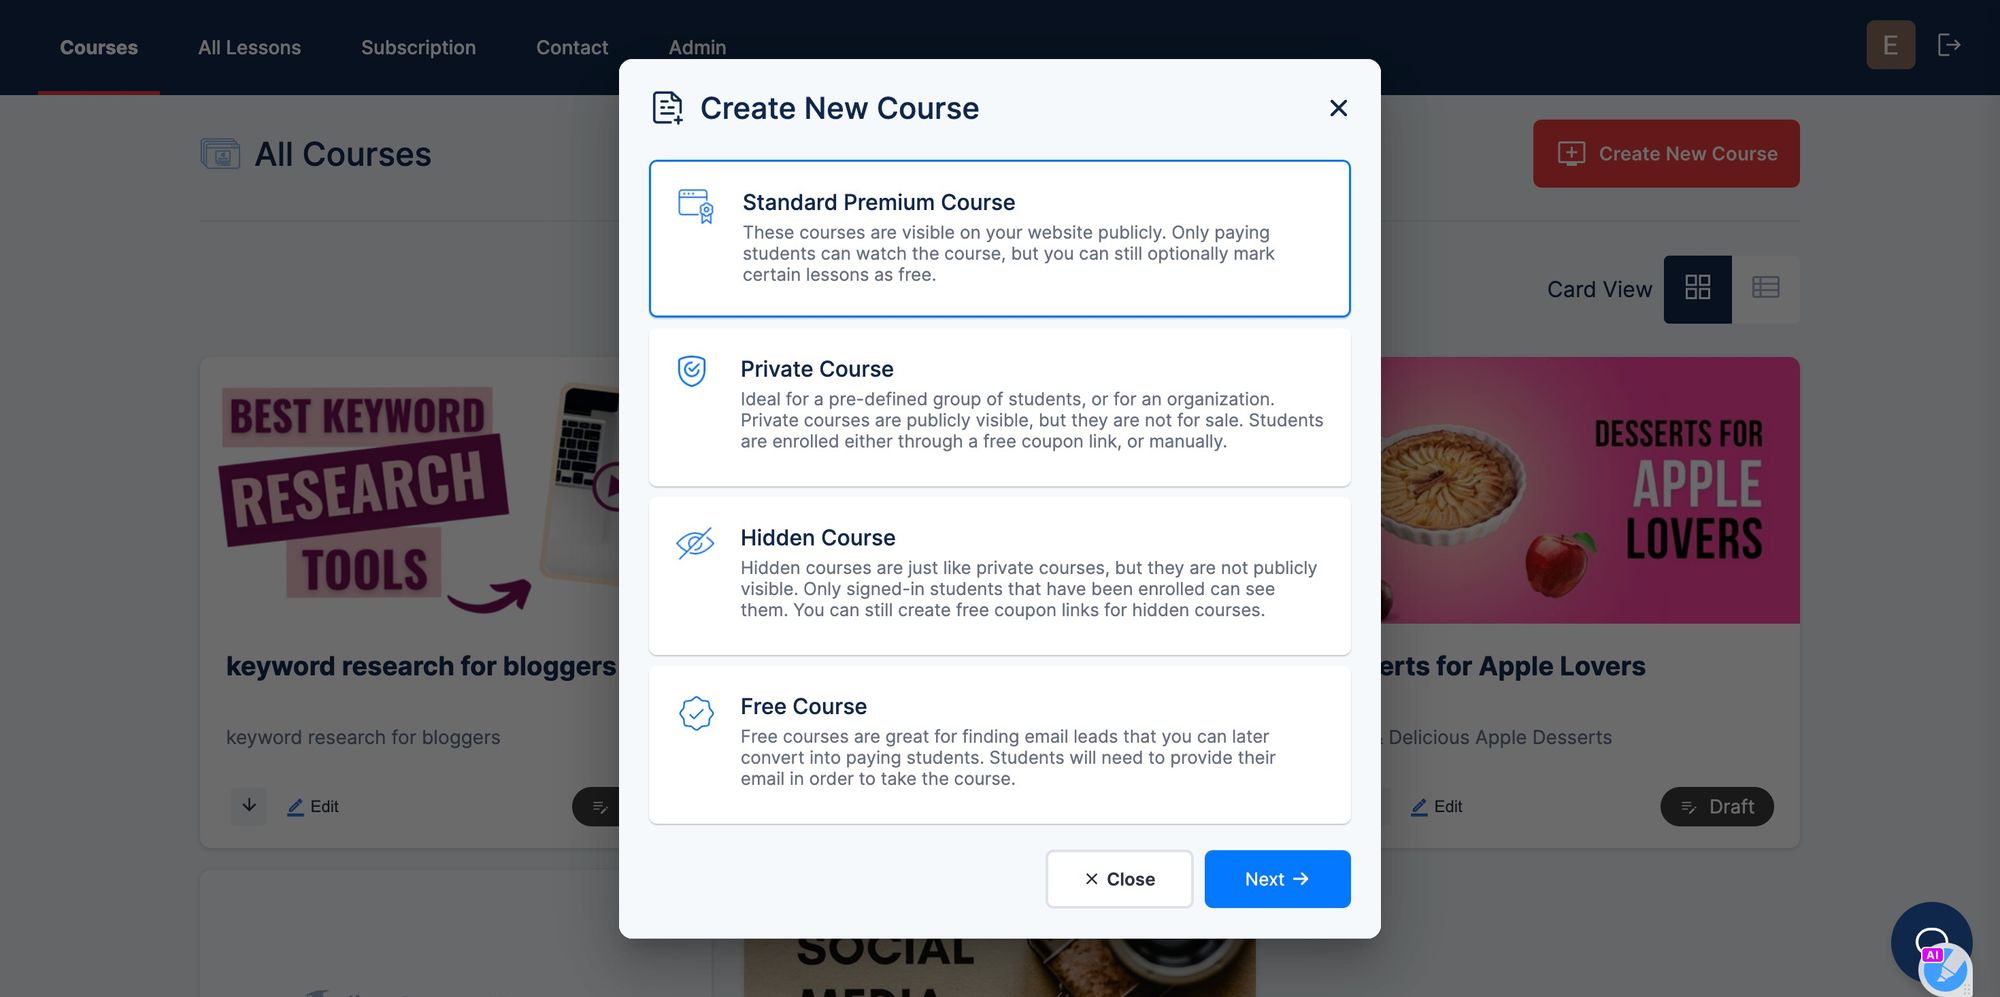
Once you pick one, give a title to the new course (that can be changed later) and a short description:
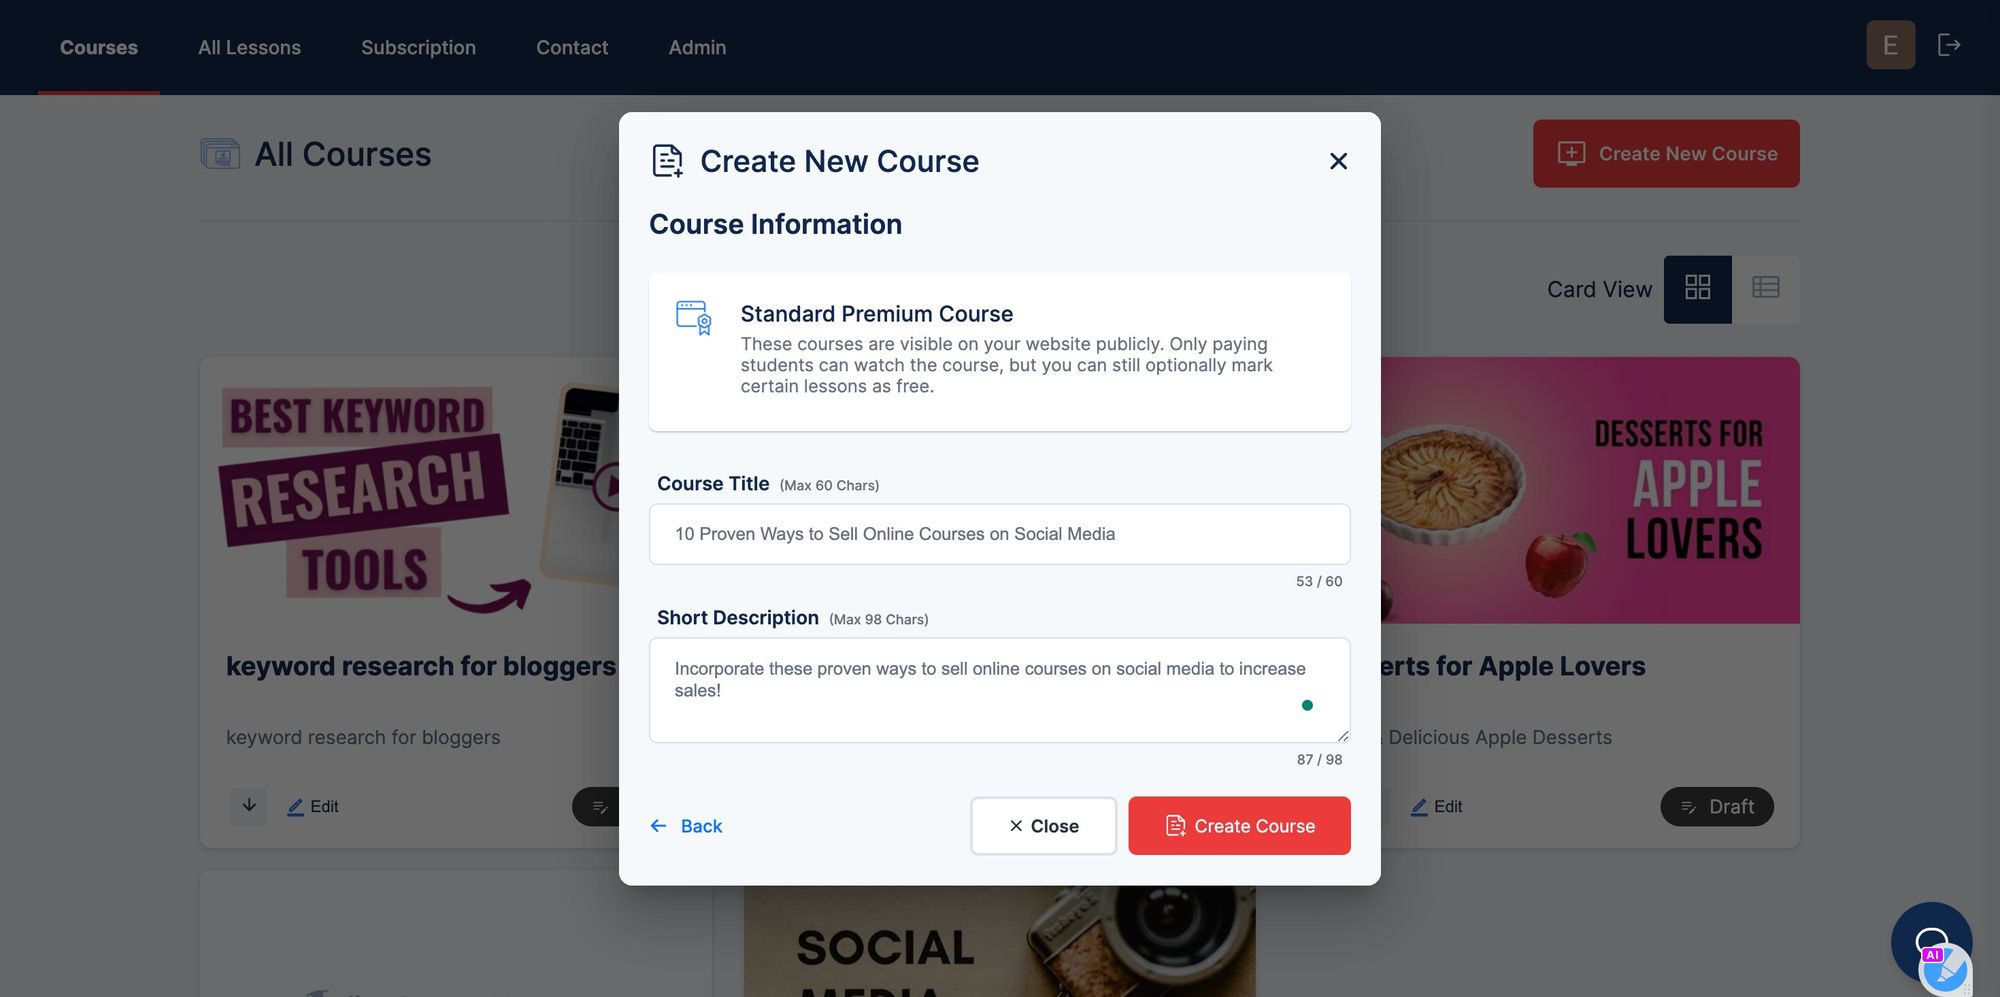
After clicking on "Create Course", we are going to land on the Edit Course screen, which looks like this:

You can always reach the Edit Course screen by choosing the Courses page and clicking on the Edit button of the course you want to modify.
This screen will be used to perform the following course creation tasks:
- Create new sections and lessons
- Upload video lessons, downloadable resource lessons (like e-books), and text-only lessons
- Set up the course landing page, including the course description and thumbnail
- Integrate with the Stripe and/or Paypal payment processors
- Create promotional coupons for your course for one-time sales
- Publish and unpublish your course
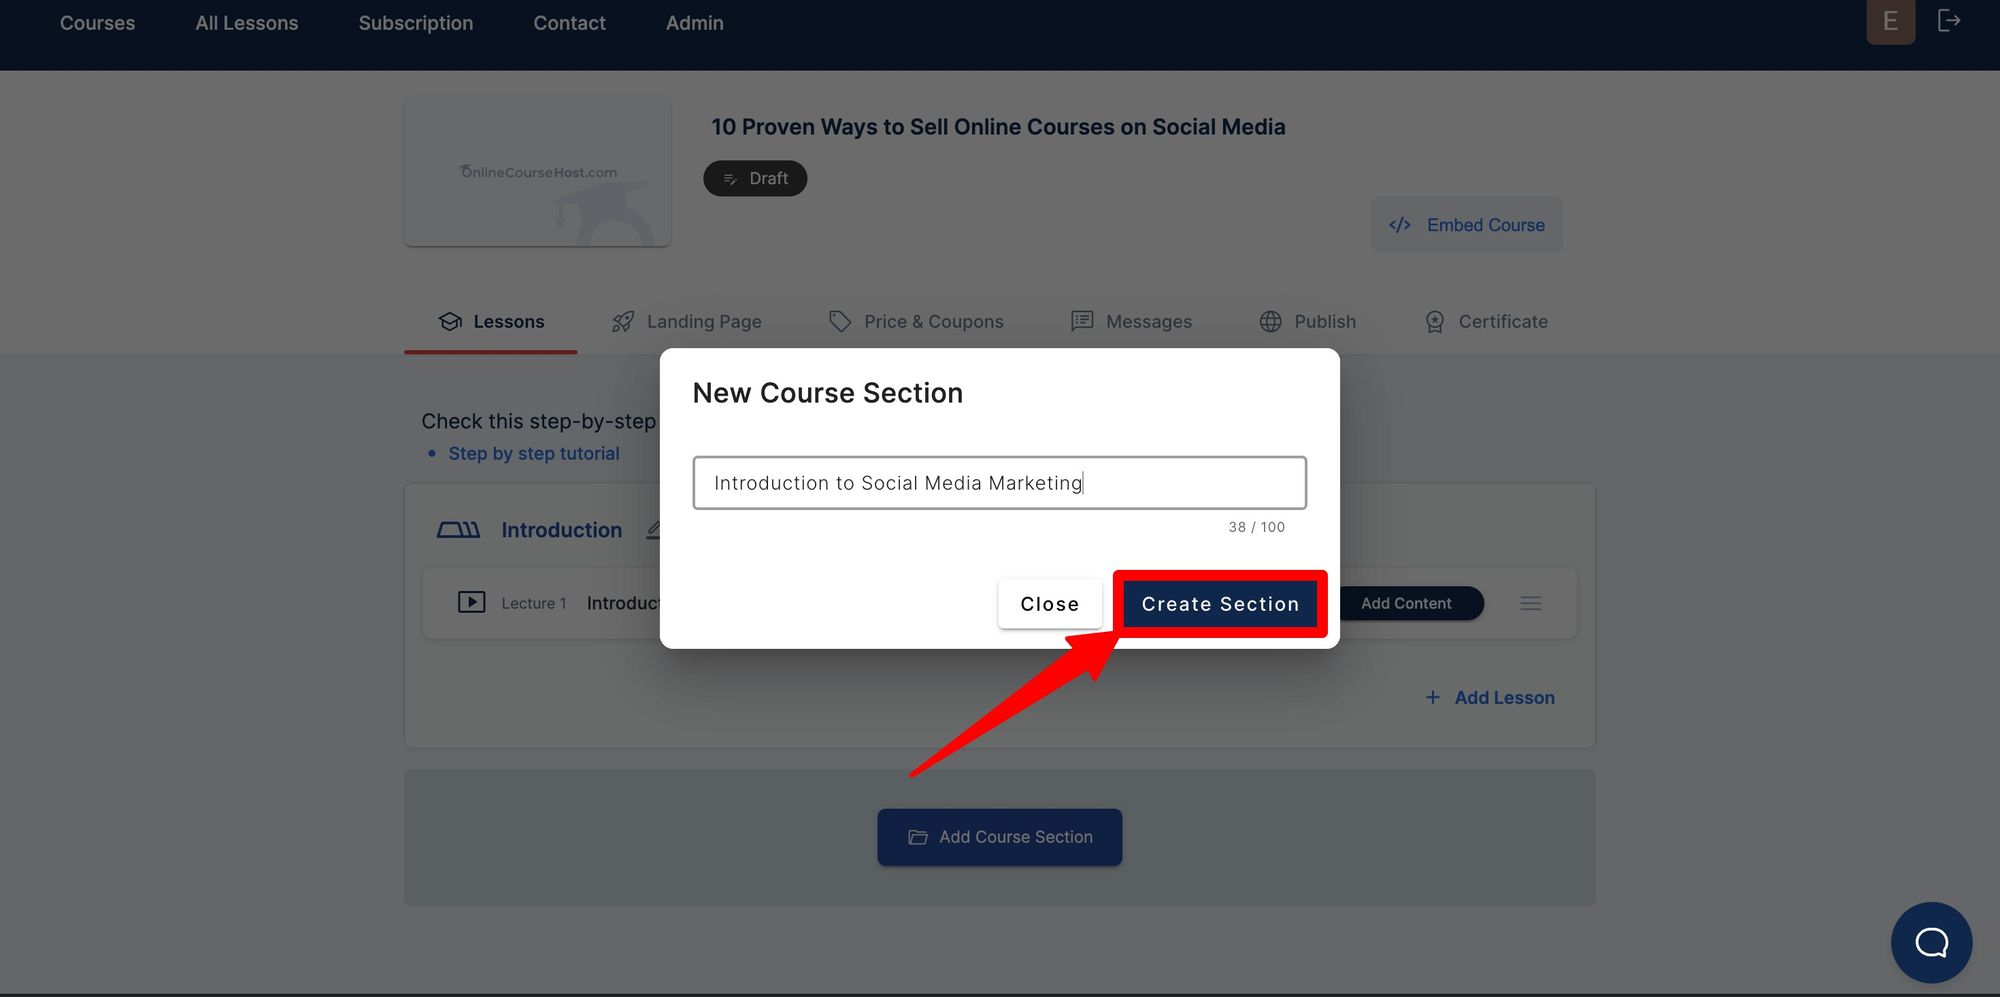
How to Create Course Sections and Lessons
By using the "Add Course Section" button, you can create the first section of your course:
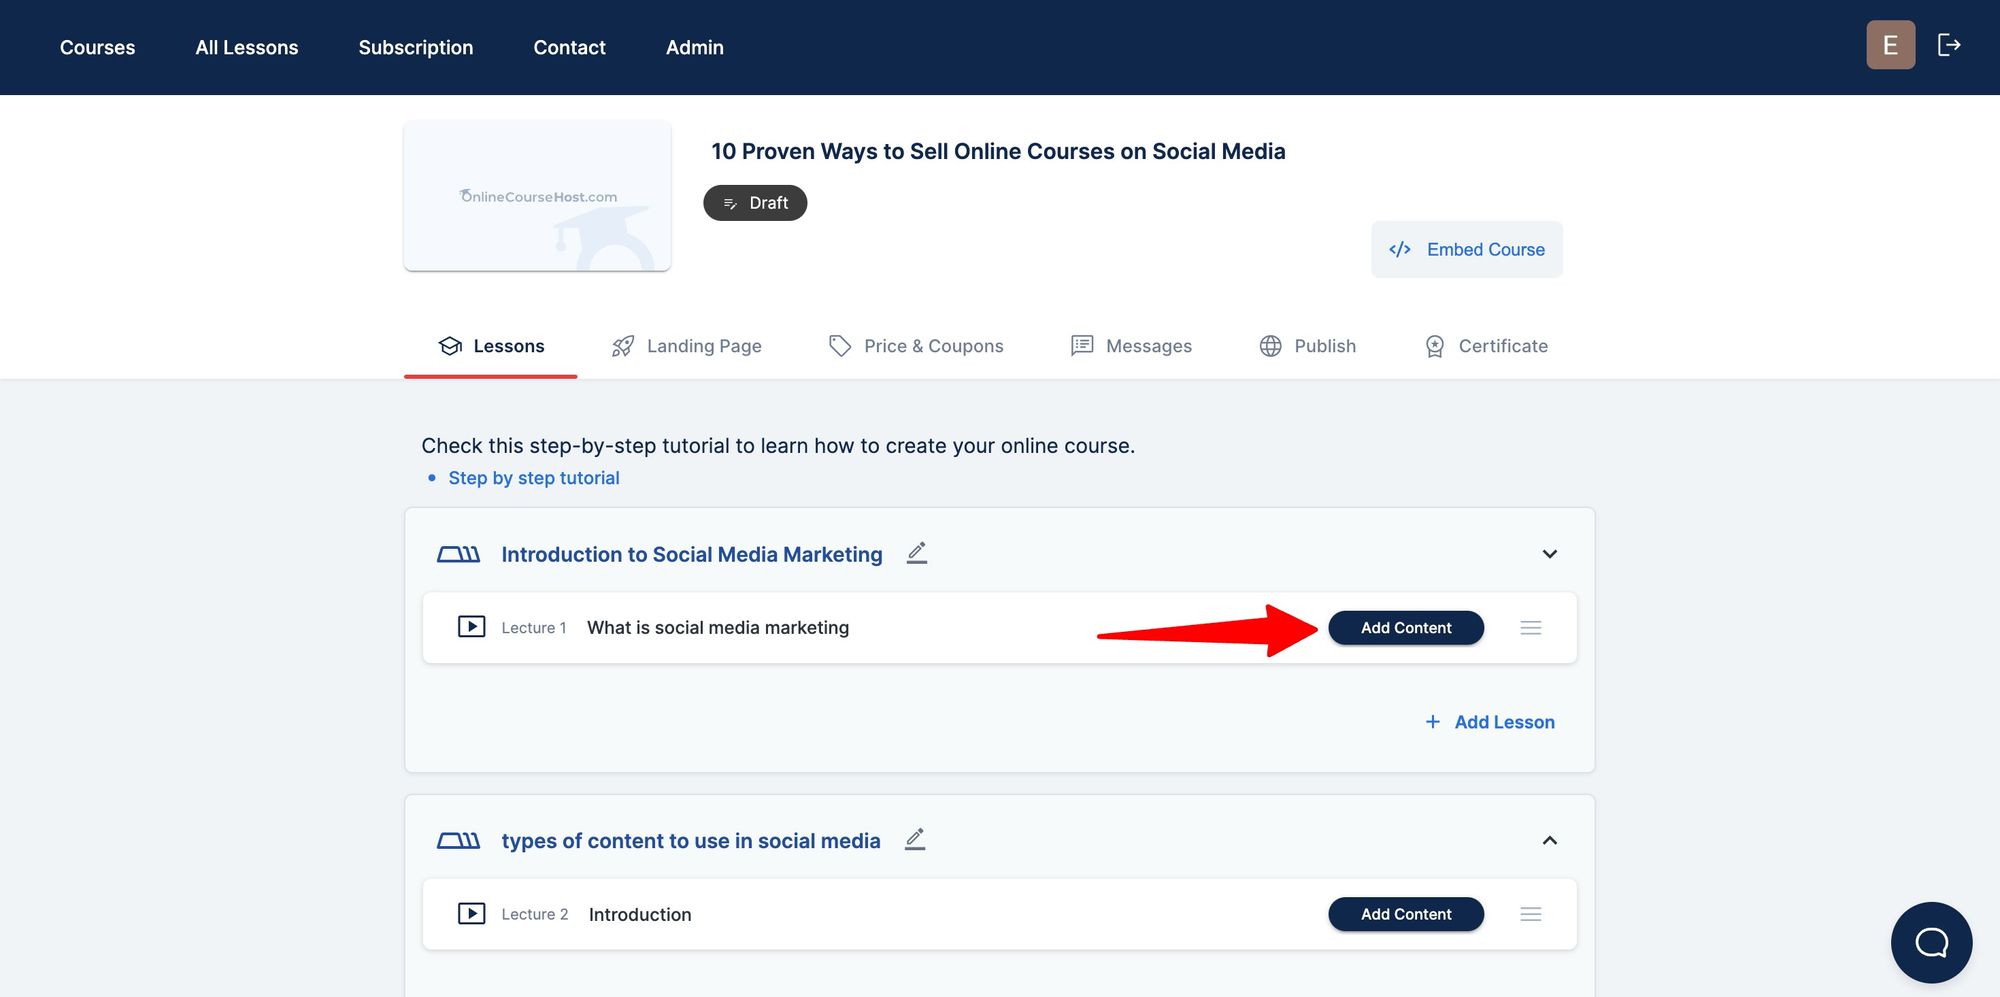
Once we have created one or more sections, we can then start creating new course lessons by clicking on the "Add Lesson" button:

We can choose from various content types to create lessons. Most of the lessons will usually be video lessons, so let's choose that for our first example and click on "Create Lesson".
Once the lesson is created, we can edit it by clicking on the "Add Content" button and using the Edit Lesson Panel:
Let's now go ahead and upload a video lesson. After the upload is finished, the video will usually take only a couple of seconds to be processed on the server.
The video thumbnail and duration will then be displayed once the video is ready:
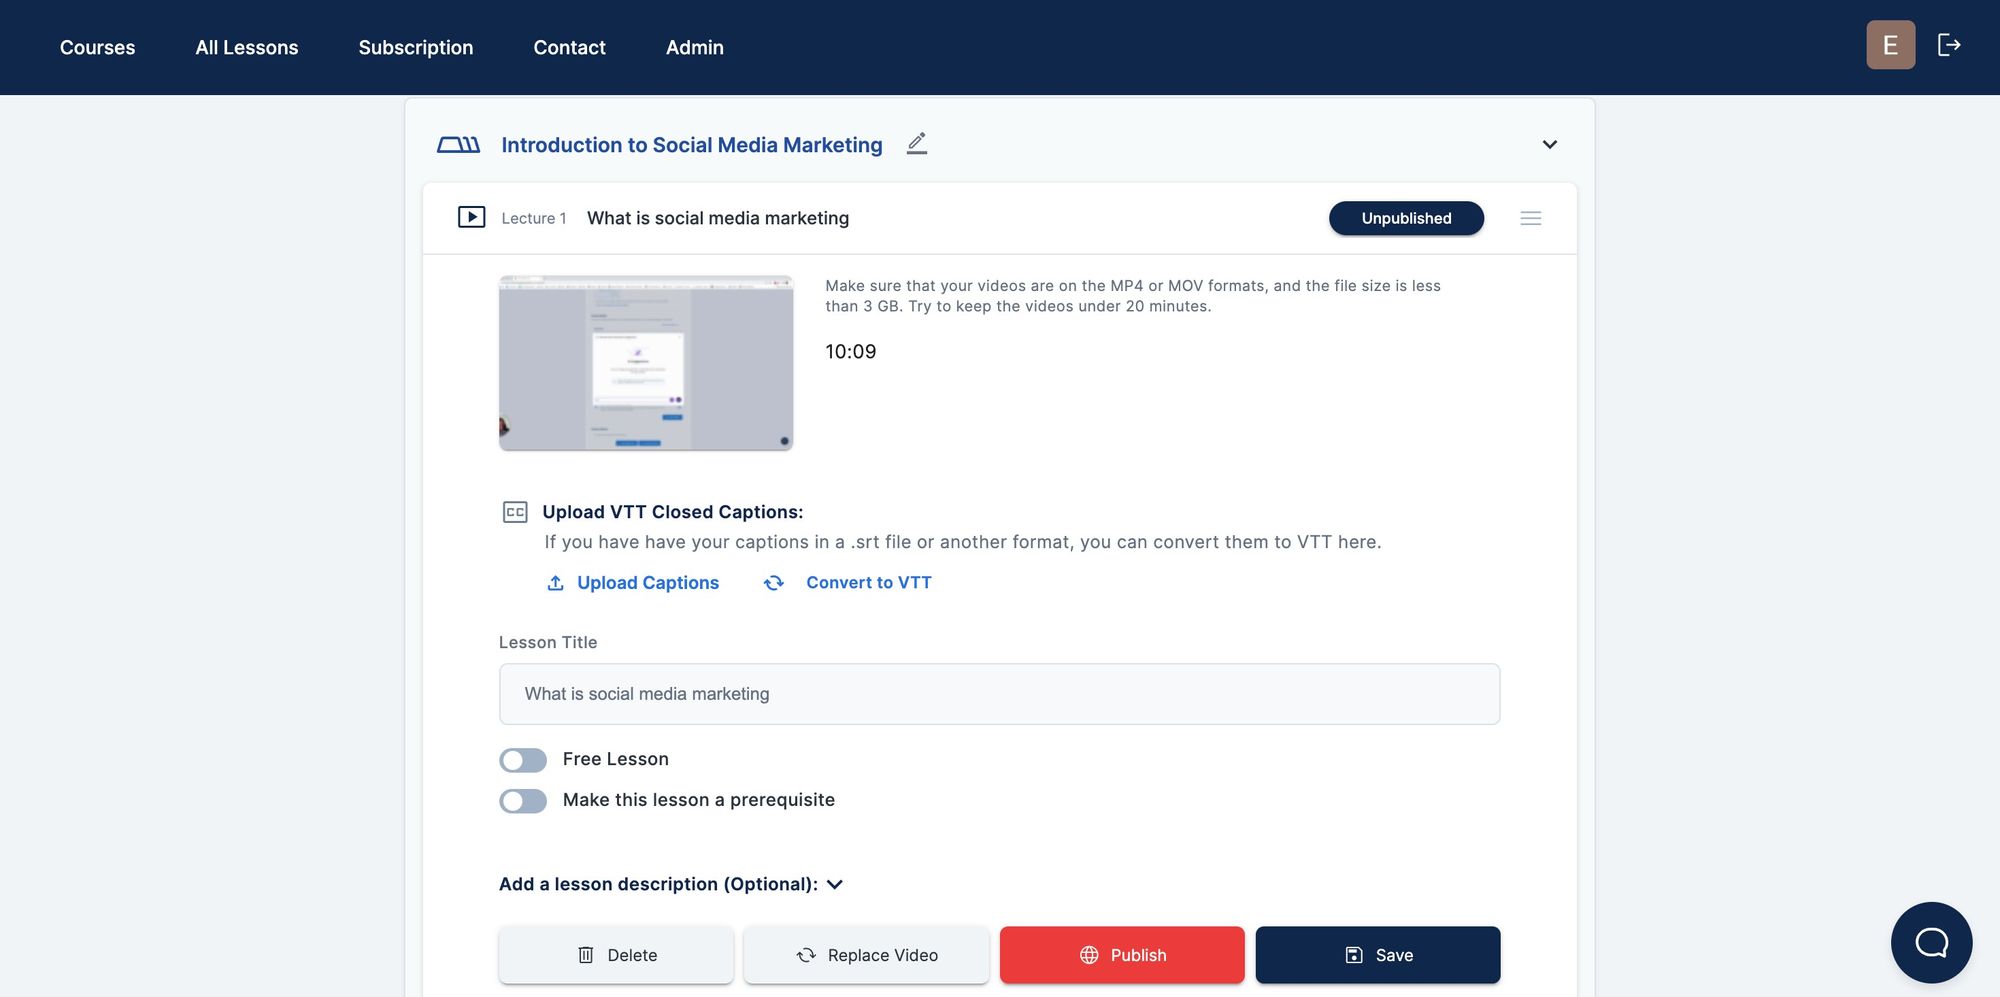
Once you think the lesson is ready, you can go ahead and publish it by clicking on the "Publish" button. Note that the lesson will only be visible to your students once the full course is published.
You can now go ahead and create new sections of lessons until the course is completed.
Note that you don't have to wait for the upload of a lesson to be completed before continuing to edit the course and create new lessons.
Notice that this course is still on draft status, meaning that the visitors to the website won't be able to see the course yet. Before that, we need to create a course landing page, set up your Stripe or Paypal account, and publish the course.
How to Create Your Course Landing Page
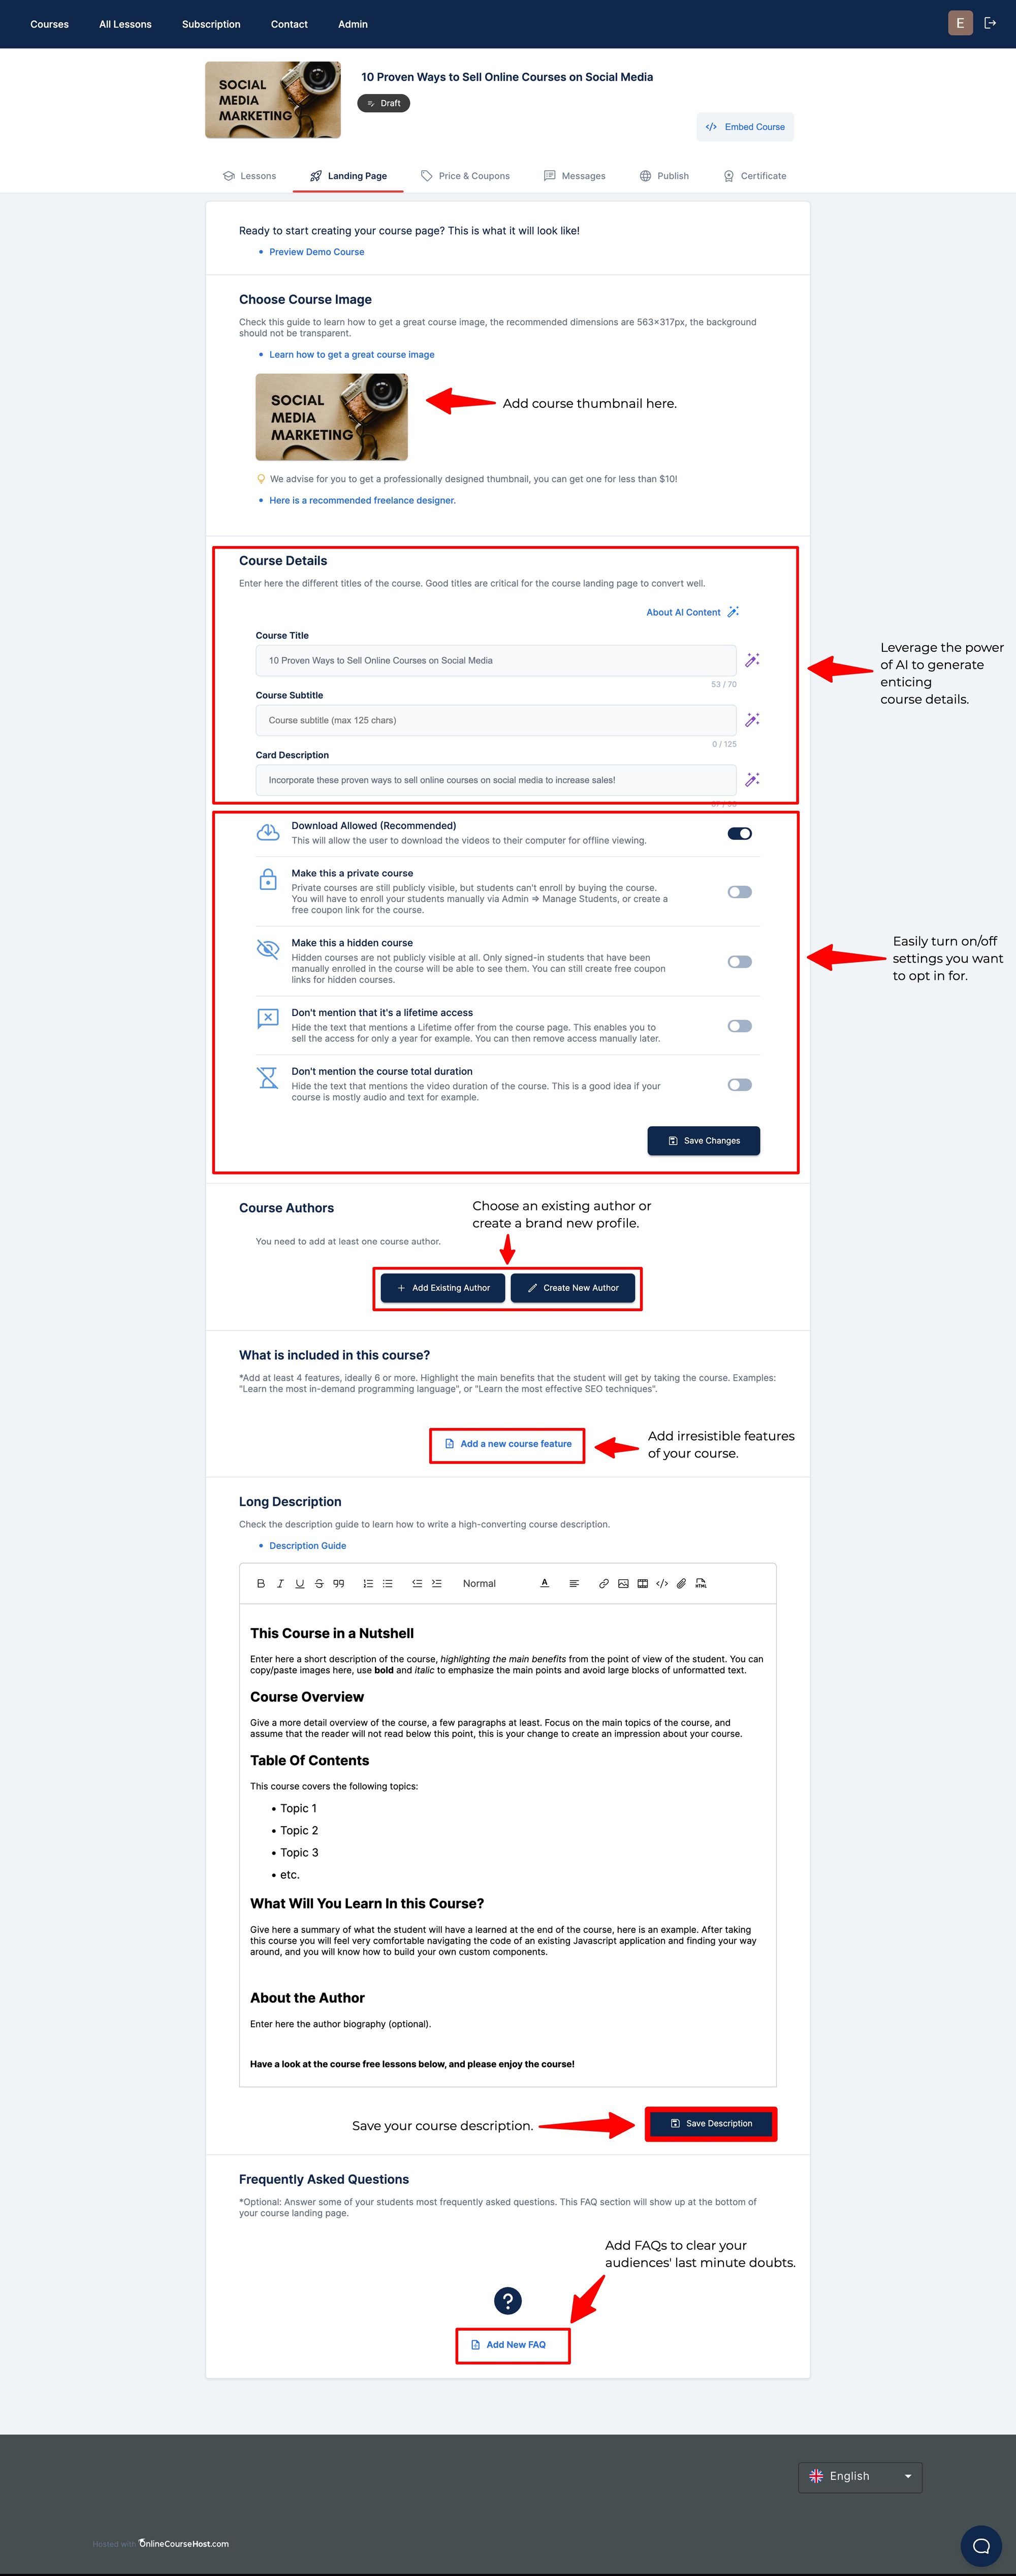
To create your course landing page, click on the Landing Page tab of the Edit Course screen.
From there, you will be able to create the landing page by completing the following items:
- upload your course thumbnail image
- add the course authors
- add some benefits that the student will get by taking the course
- add a long-form description of the course
- answer some frequently asked questions (optional)
You must take your time to fill in all of these items. Otherwise, your course landing page will look incomplete without this information, and that will affect your sales negatively.
This is also why you will be asked for a minimal amount of information before being able to preview the course landing page or publish it. Here are some tips to fill in this information correctly:
- add a great title and a longer subtitle to your course
- fill in ideally at least 5 or 6 features benefits to fill in the course header with some content
- take your time to create a great course description, as this is the important marketing copy that will influence conversions. For that, check out our guide on how to write a high-converting online course description
- try to anticipate some of the students' questions in the FAQ section, and add new questions later
Here is the Landing Page editing tab, with some of the required fields already filled in:
Once you have a great landing page in place, the next step is to set up your online payment system.
How to Activate a Stripe Account (and price your course)
It's one thing to create an online course for free, it's also another to set up means to sell and receive payment from your potential students.
To be able to sell your online course, you will need to register yourself as a merchant in a credit card processing company.
The process is seamless, you just have to fill in a form, and your account is usually automatically approved, and you are ready to start taking online payments.
At OnlineCourseHost.com, we support both Stripe and Paypal, and you're free to integrate any third-party payment-accepting apps through Zapier or Pabbly. You might have heard about Stripe, as it's one of the fastest-growing companies in the world.
Both payment processors provide a great user experience, but Stripe provides a nice monitoring dashboard that allows you to better monitor your online business, so that is one of the reasons why I prefer it.
Let's then start by showing you how to set up Stripe, we will cover Paypal later on.
You can start collecting payments in two simple steps:
- create a Stripe account and activate it
- Link your Stripe account to OnlineCourseHost.com
To start the Stripe account creation process, go to the Price & Coupons tab of the Edit Course screen, and click on the "Connect with Stripe" button:
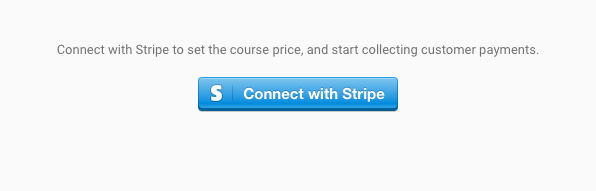
Once you click on this button, you will be redirected to the following Stripe account activation page:
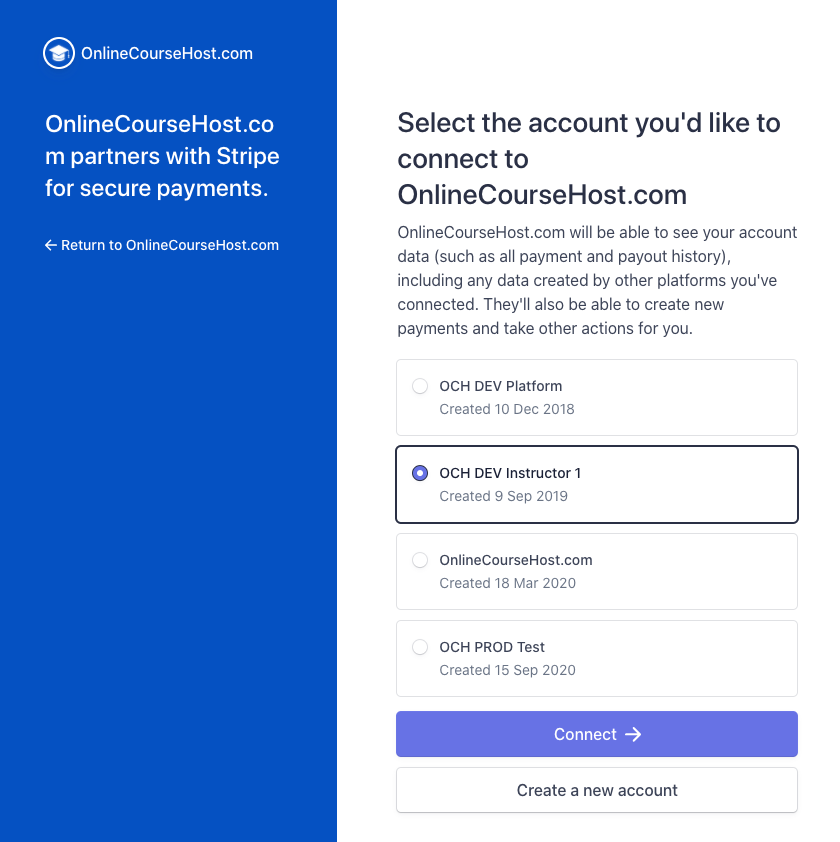
From here, you can either create a new Stripe account or, if you have done so already, link to an existing one.
Creating an account will require you to enter a few personal details, including your bank account, so that Stripe can send you your earnings every month or even every day if you prefer.
Depending on your country, the Stripe account might take a day or so to activate, this is usually quite fast and an automatic approval. Remember, Stripe has no incentive not to take you as a merchant.
Once you select your Stripe account, you will be redirected back to your website, and you will see the message: "Stripe connection successful; you are ready to start taking payments".
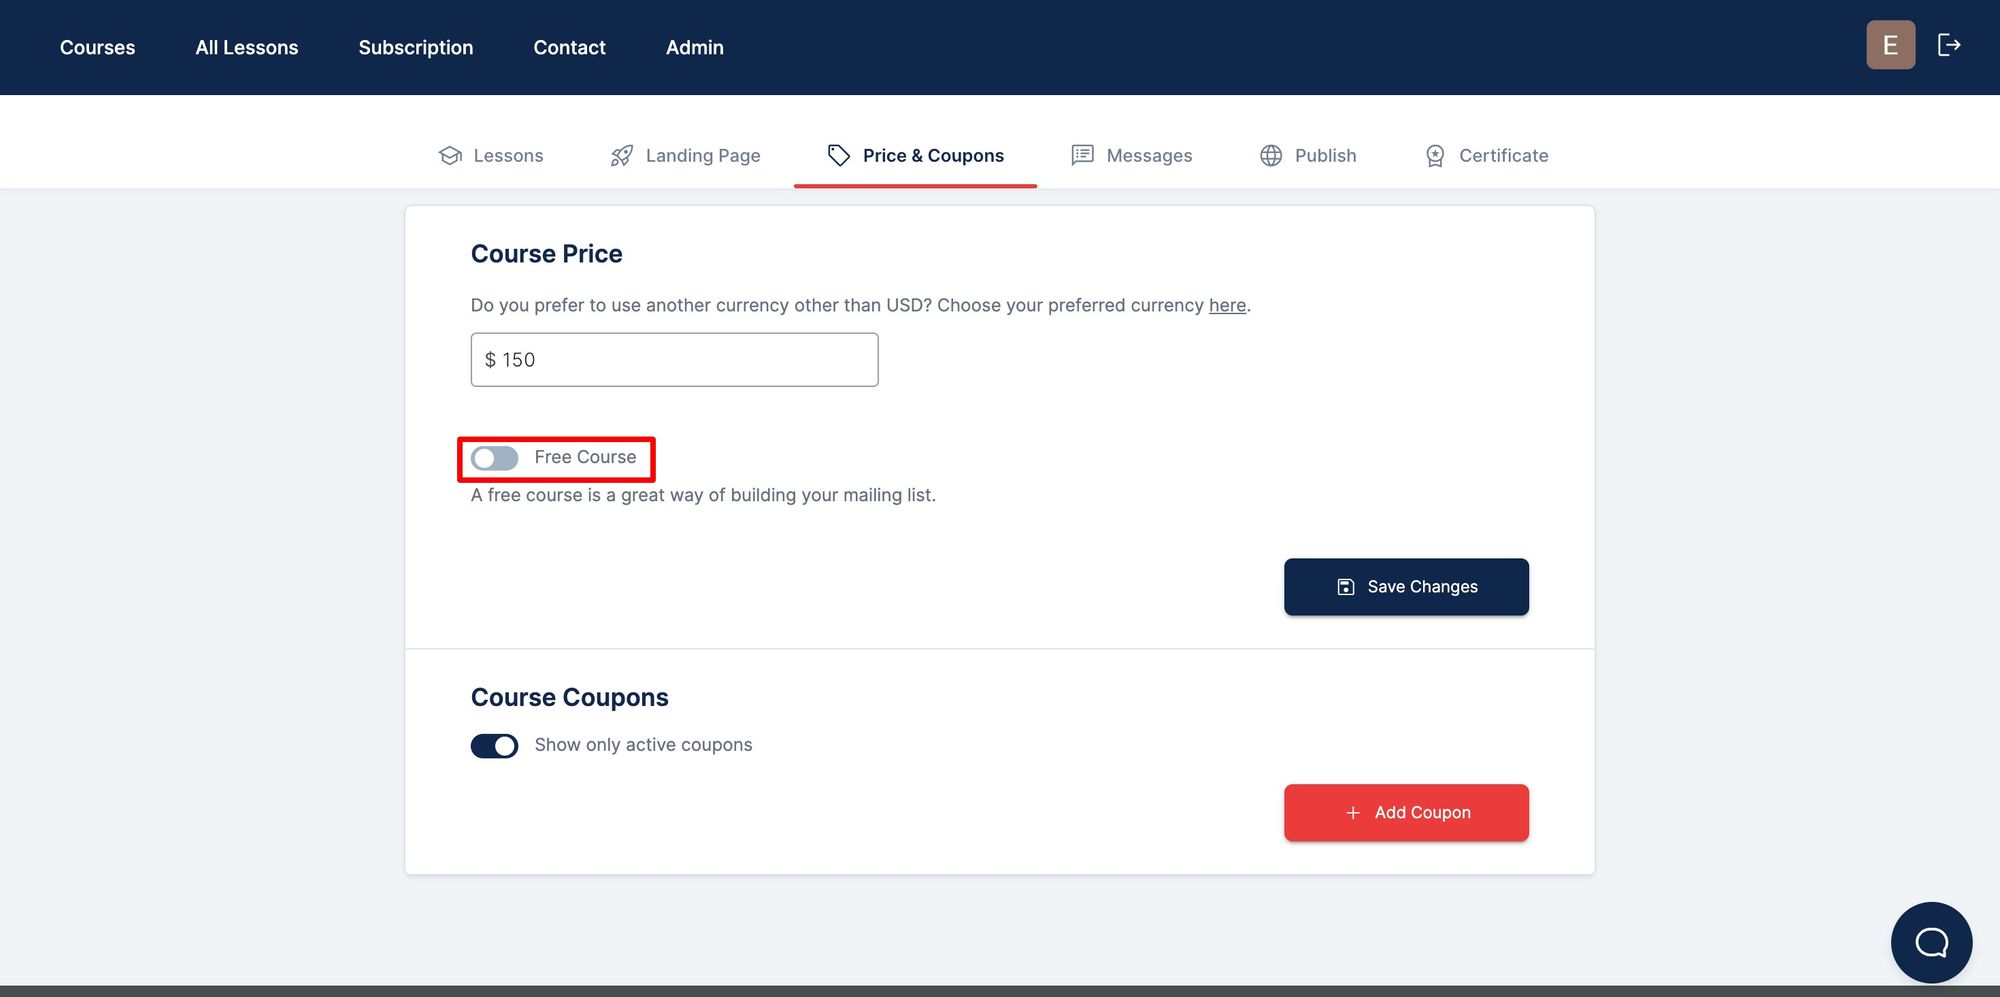
You can now head over to the Price & Coupons tab on the Edit Course screen and set the price for your course:
How to Activate a Paypal Account
If you prefer using Paypal, this is also supported. For this, you simply have to create a Paypal account.
If you already have a personal Paypal account, I recommend creating a separate Paypal account for your business to avoid mixing things up.
In either case, you need to make sure that your Paypal account is a business account.
You can always take an initial non-business account and upgrade it to a business account.
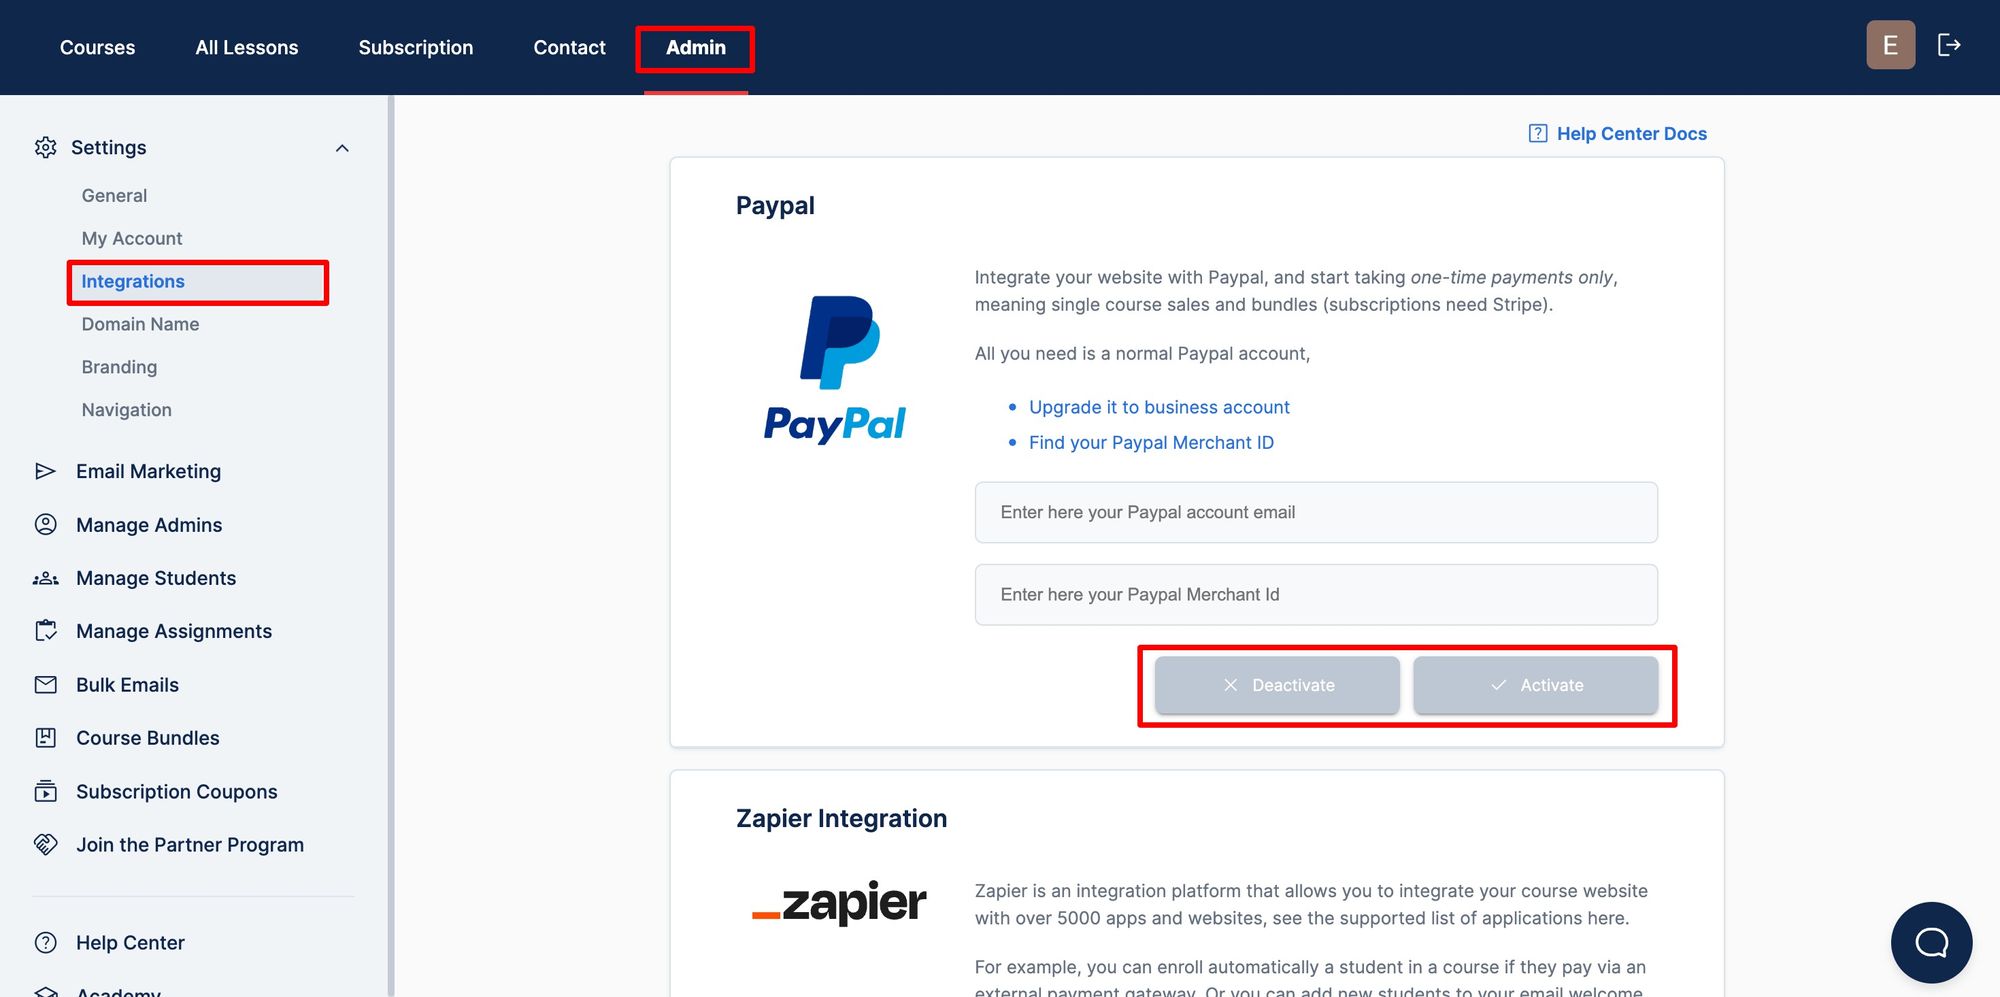
After that, all you need to do is find your Paypal Merchant Id, and you are ready to integrate with Paypal. Simply head over to the Admin => Admin Settings menu, and open the Integration tab.
For there, simply enter your Paypal email and merchant Id, and your integration is active; it's that simple 😉
How to Publish Your Online Course
Once you set a price for your course, upload a few lessons, and set all the details needed for the landing page, you can now publish your online course for free.
You can do so in the Publish tab of the Edit Course screen:
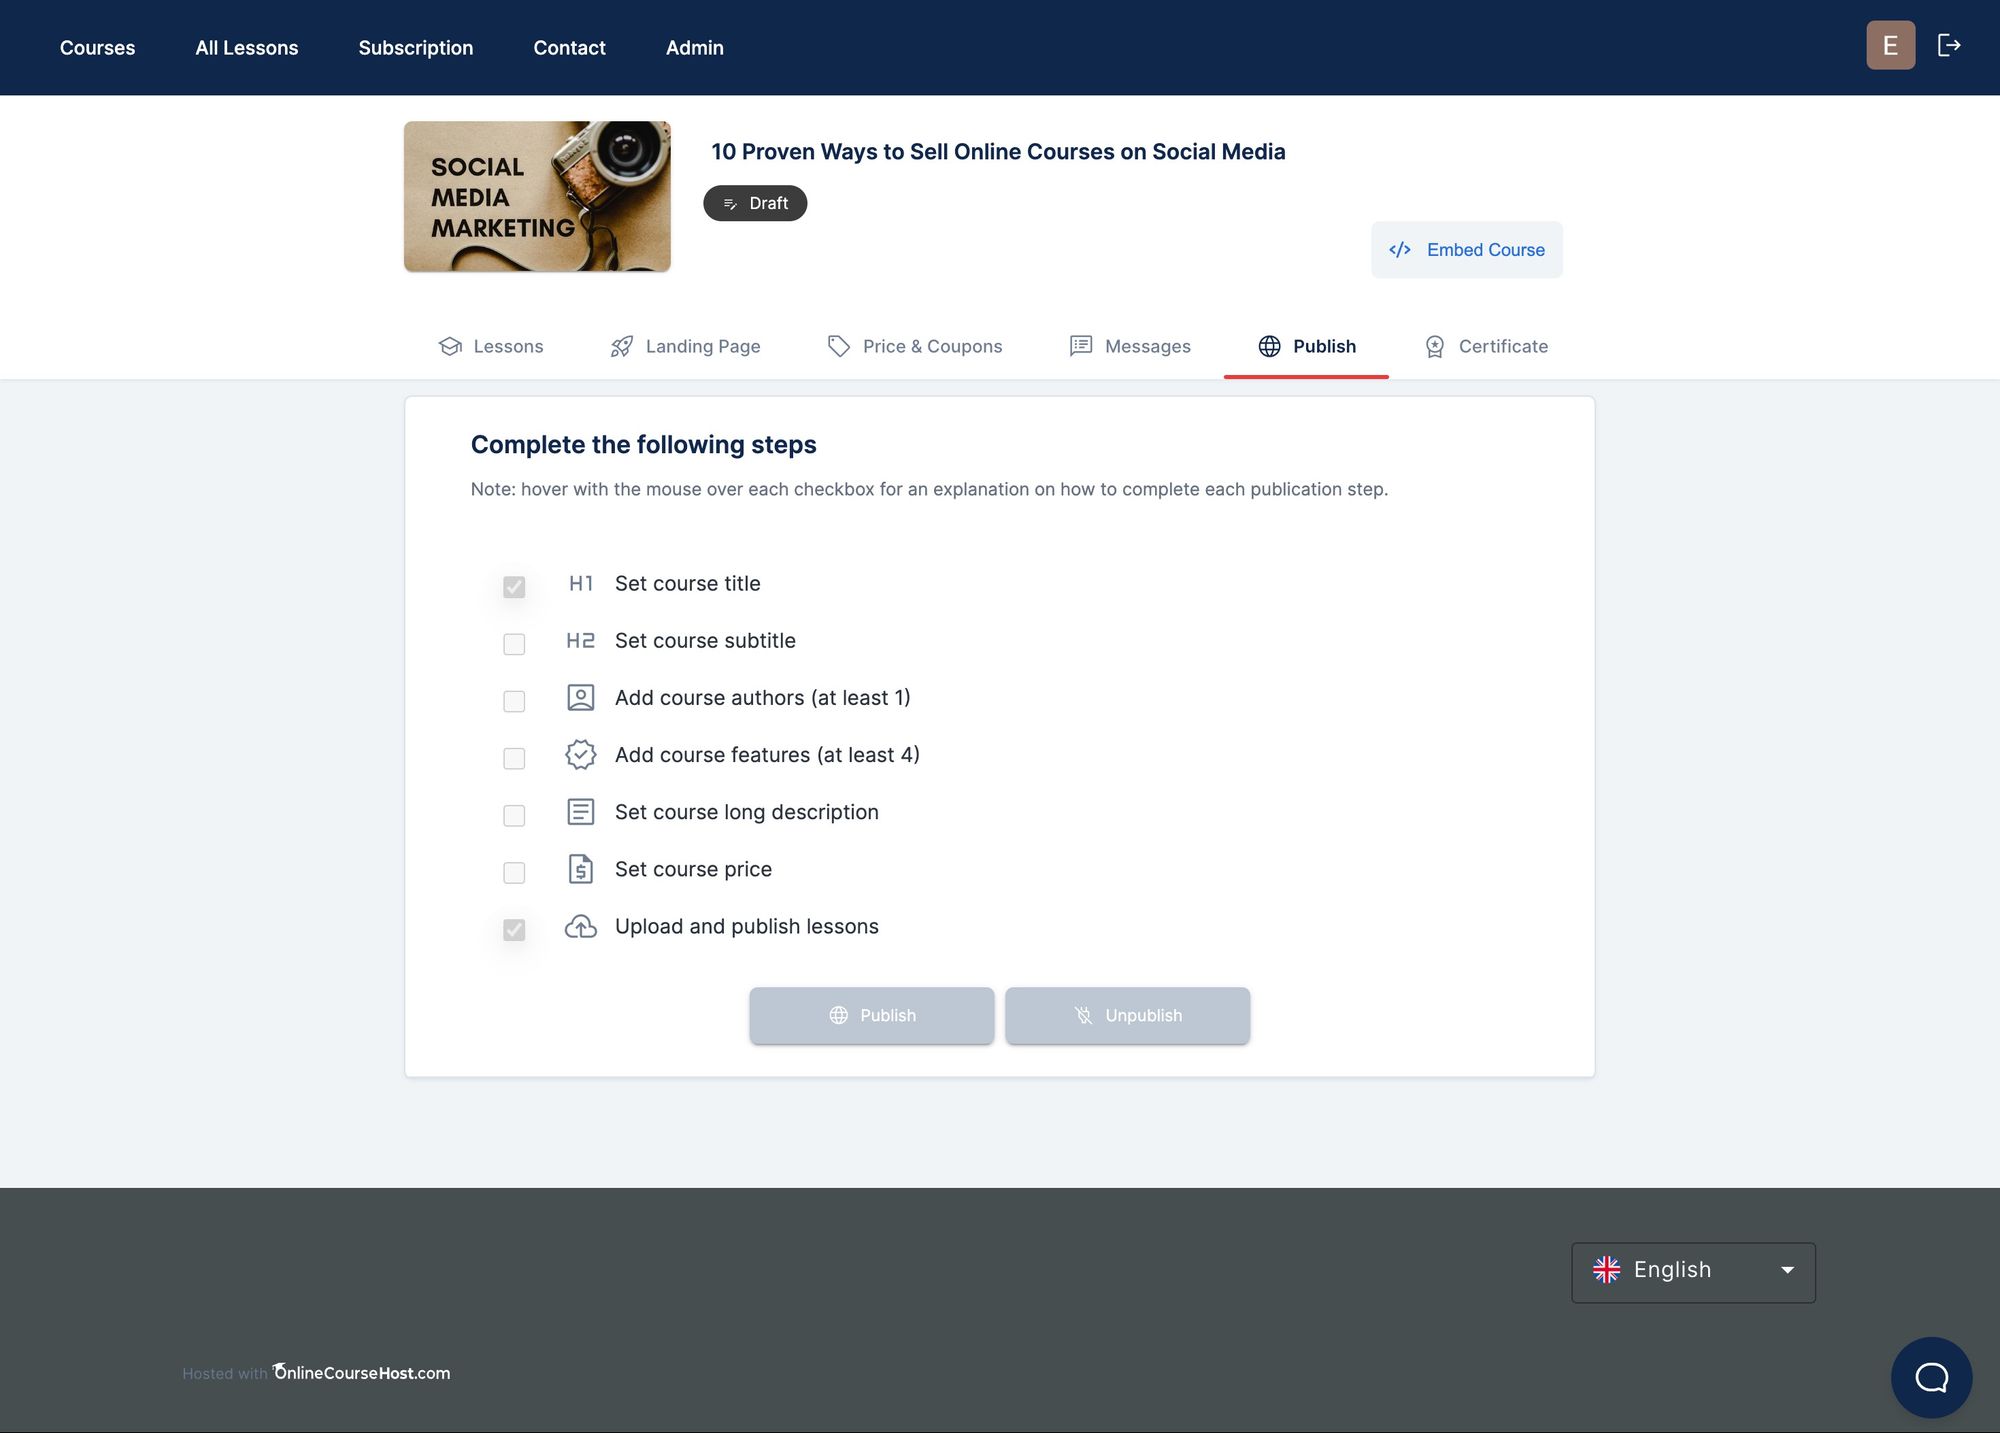
Once you complete all tasks and they're all ticked, you'll be able to press the "Publish" button. Congratulations, you have just published your first course and started an online course business! 😉
You can now start selling your courses to an unlimited number of students.
In the rest of this guide, we will cover just some of the many features that you have available in our paid plan; check out the features of each plan here.
How to Brand Your Website
The default colors for things like buttons and headings are blue and red. These are the colors that everyone starts with. However, if you want to use your own brand colors instead, you can do that too.
To change the default colors to your own brand colors, you need to follow these steps: First, go to the Admin menu. Then, select the option called "branding".
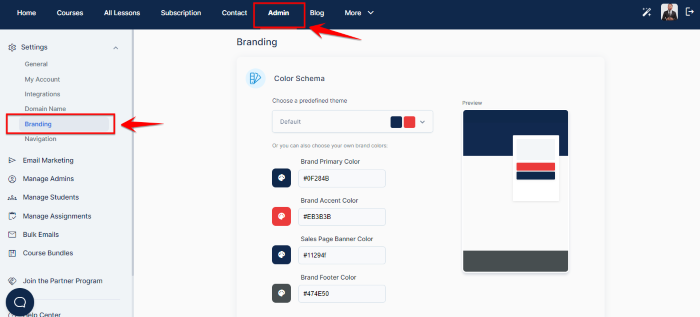
Once you're in the branding settings, you'll see a list of different pre-designed color schemes to choose from. These are ready-made combinations of colors that you can use if you like them. But remember, you're not limited to just these options!
If you want to use your own colors, click on the drop-down menu. You'll see a list of pre-designed color schemes there.
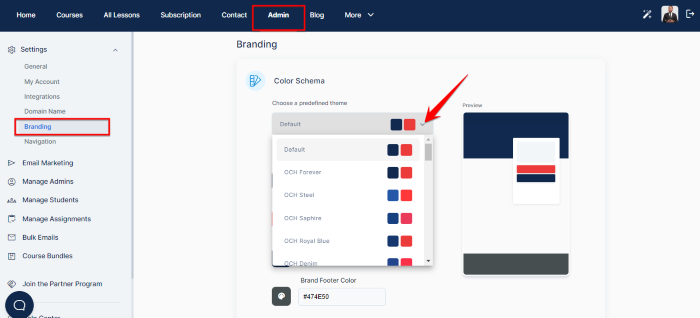
But what's important is that you can also choose your own colors. This means you can pick the exact colors that match your brand.
After you've chosen your colors, they will be applied to your course pages. Just refresh the pages to see the changes in action.
Using this screen, you can set up your website's primary and accent colors,
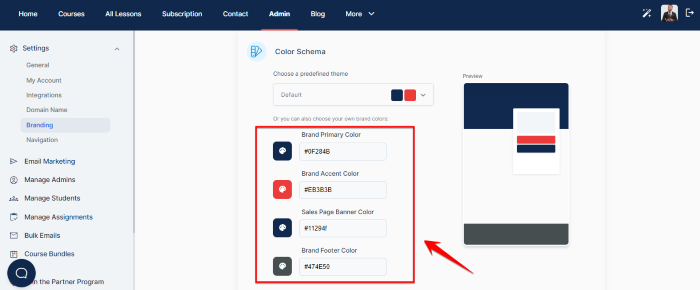
company logo:
Font details and custom CSS for extra styles:
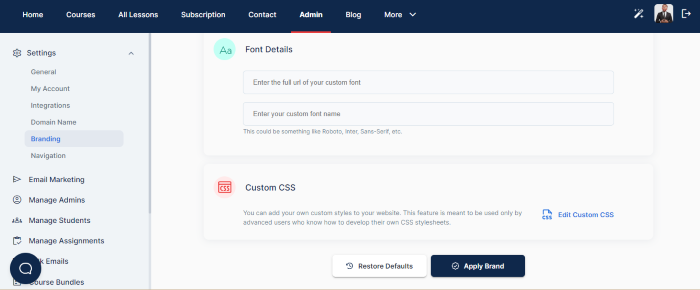
You can also use the Settings screen to change your website name, set up a support email, and set up other useful options for your website.
If you don't know which brand colors to choose, then simply use the default ones for now. Either way, you are now ready to customize your website homepage.
How to Set Up Your Website Homepage
By clicking on the "Home" button on the top menu, you are going to reach the homepage of your website.
This web page has a layout optimized for conversions, meaning student sign-ups and newsletter subscriptions.
All you have to do is to upload your brand logo and banner image, add some marketing copy, and the homepage will be ready in minutes!
The first thing to do is to upload your brand images. The only mandatory image is a branded background banner. This will be displayed as the background banner image of your homepage. A variation of this image is usually also used as a banner in your social media profiles.
Besides a branded background, you can also upload your main brand logo, if you have one. This will be displayed prominently in the center of the homepage. This image will usually also be used as the profile picture of your brand on social media.
What if you don't have a brand image yet?
If you don't have a brand logo and banner yet, you can check out our guide on how to create an online course thumbnail, to learn how to get these images created for you.
In summary, you can easily hire a freelancer on platforms like fiverr.com and order these images for a very affordable price, around $10 to $20 or so.
If you want the images to look great in all sizes, you can even order an SVG (Scalable Vector Graphic) version.
And if you want to try to create the branded logo yourself, you can do so using, for example, the Wix Logo Maker free software, which will generate many logos for you to choose from.
Quick disclaimer: we do not have any commercial affiliation with the services that we recommend in these guides. All links are non-sponsored and for your convenience only.
You can also choose your brand images from an online catalog, but you risk not making it unique enough, and it could also be seen on other websites. You can always order one of these images from a catalog, and then hire a designer, and tell them to base themselves on the original image and modify it.
Either way, we assure you that it's extremely simple to get a great set of branded images that look exactly like you want for a very affordable price.
Again, check out our course thumbnail creation guide for learning how to get these images.
How to Customize Your Homepage Header
Once you have your branded images, you can upload them by using the "Edit Header" button on the homepage. This button and other website modification elements are visible only to you, the website owner.
Using the Edit Header button, you can also customize the page title and color if needed.
And by hovering over the marketing text that says, "Hover with the mouse to edit this benefit", you can type in some of the main reasons why a student would like to buy your courses.
And that's it: just a few images and a little bit of text, and you have a fully branded homepage for your website.
This is just an example, as you can see, the main ingredients for a great-looking home page are simply a great background banner and some compelling benefits for the student.
How to Activate Your Subscription Plans (including enterprise and lifetime plans)
Once you start having multiple courses on your website, you should consider adopting a subscription-based model in complement to one-time sales.
These two sales models are especially useful when combined. You can learn more about subscription models and how to price your online course plans by reading How to sell online courses? A complete marketing strategy
To activate your subscription pricing plans, you can head over to the Subscription screen, which you can reach via the Subscription button on the top menu.
You will be asked to fill in the prices for your monthly, yearly, and lifetime plans:
Your enterprise plans will have the same price as your monthly and yearly plans, but the enterprise customer will be able to set a team size quantity to request access to a large number of users.
You should think carefully about these prices, again have a look at the marketing guide for some guidance on how to best price these plans.
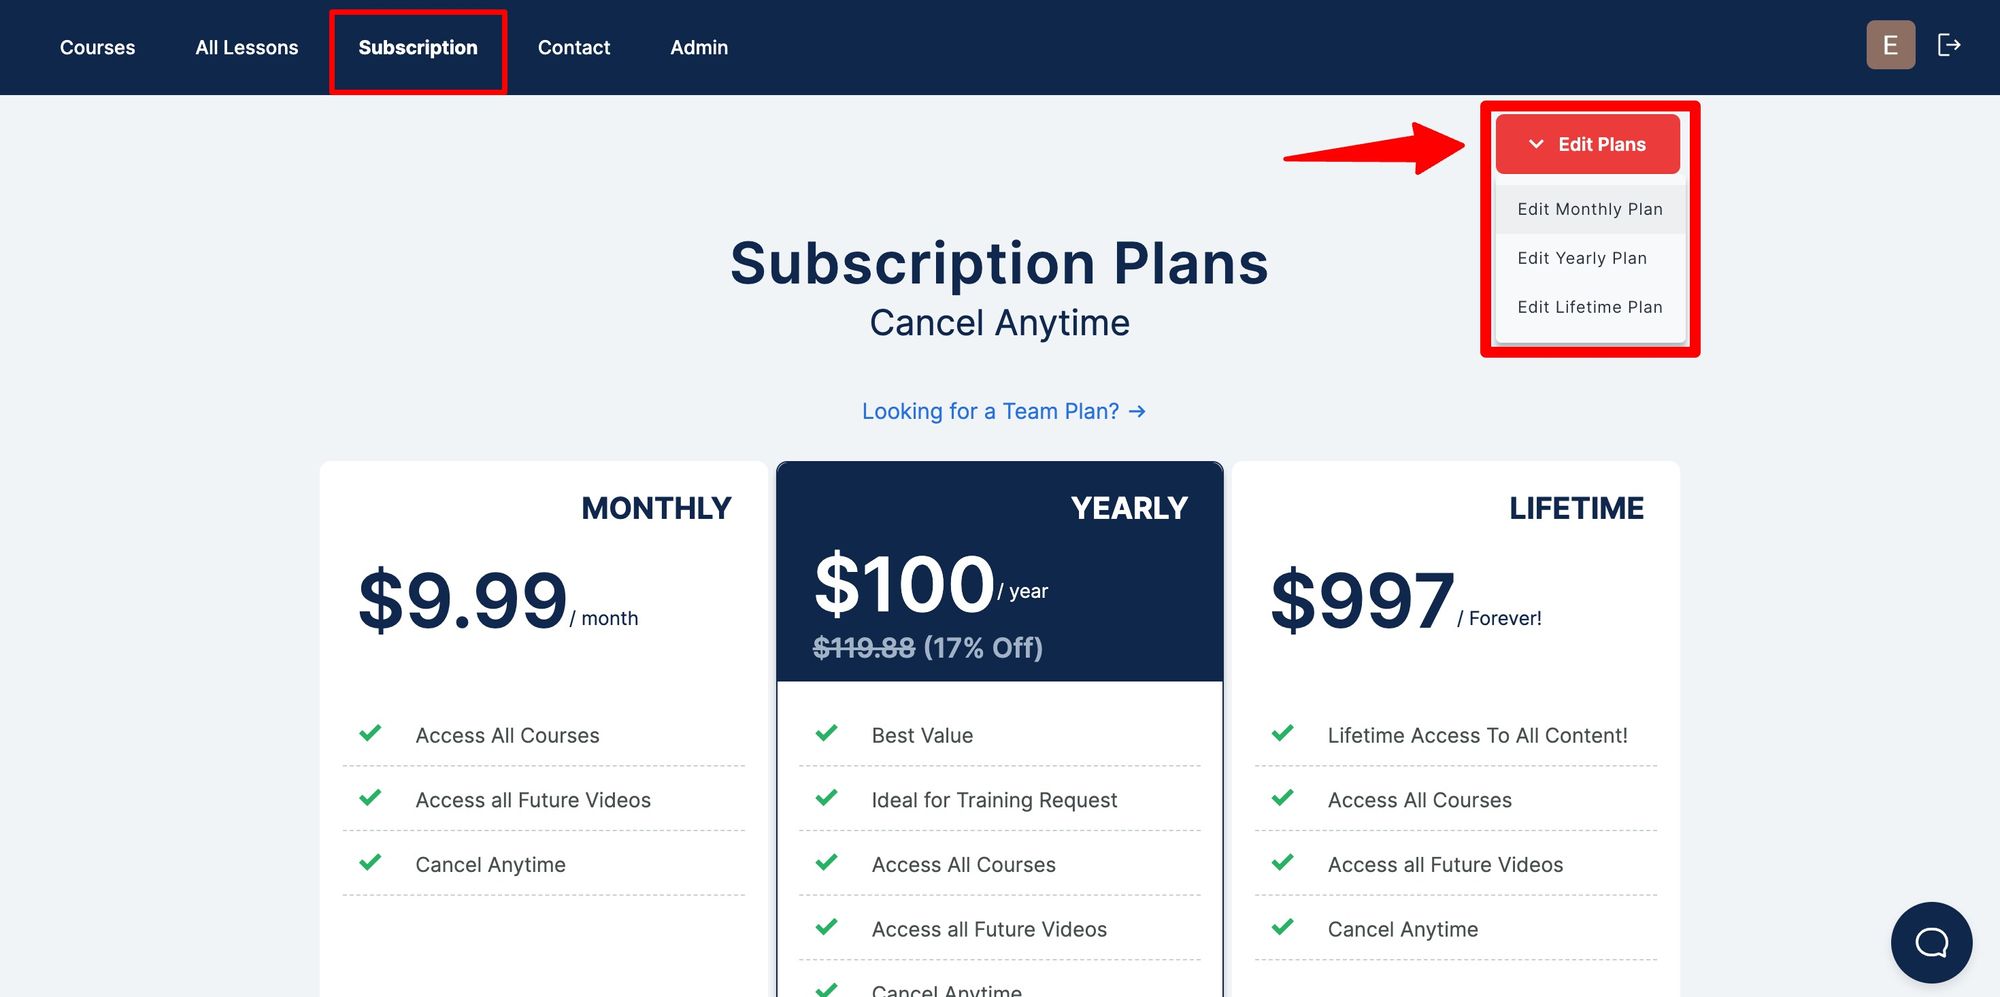
Once you choose a price, you can always change it later. After you activate the pricing plans, you will see the default pricing screen that your students will see:
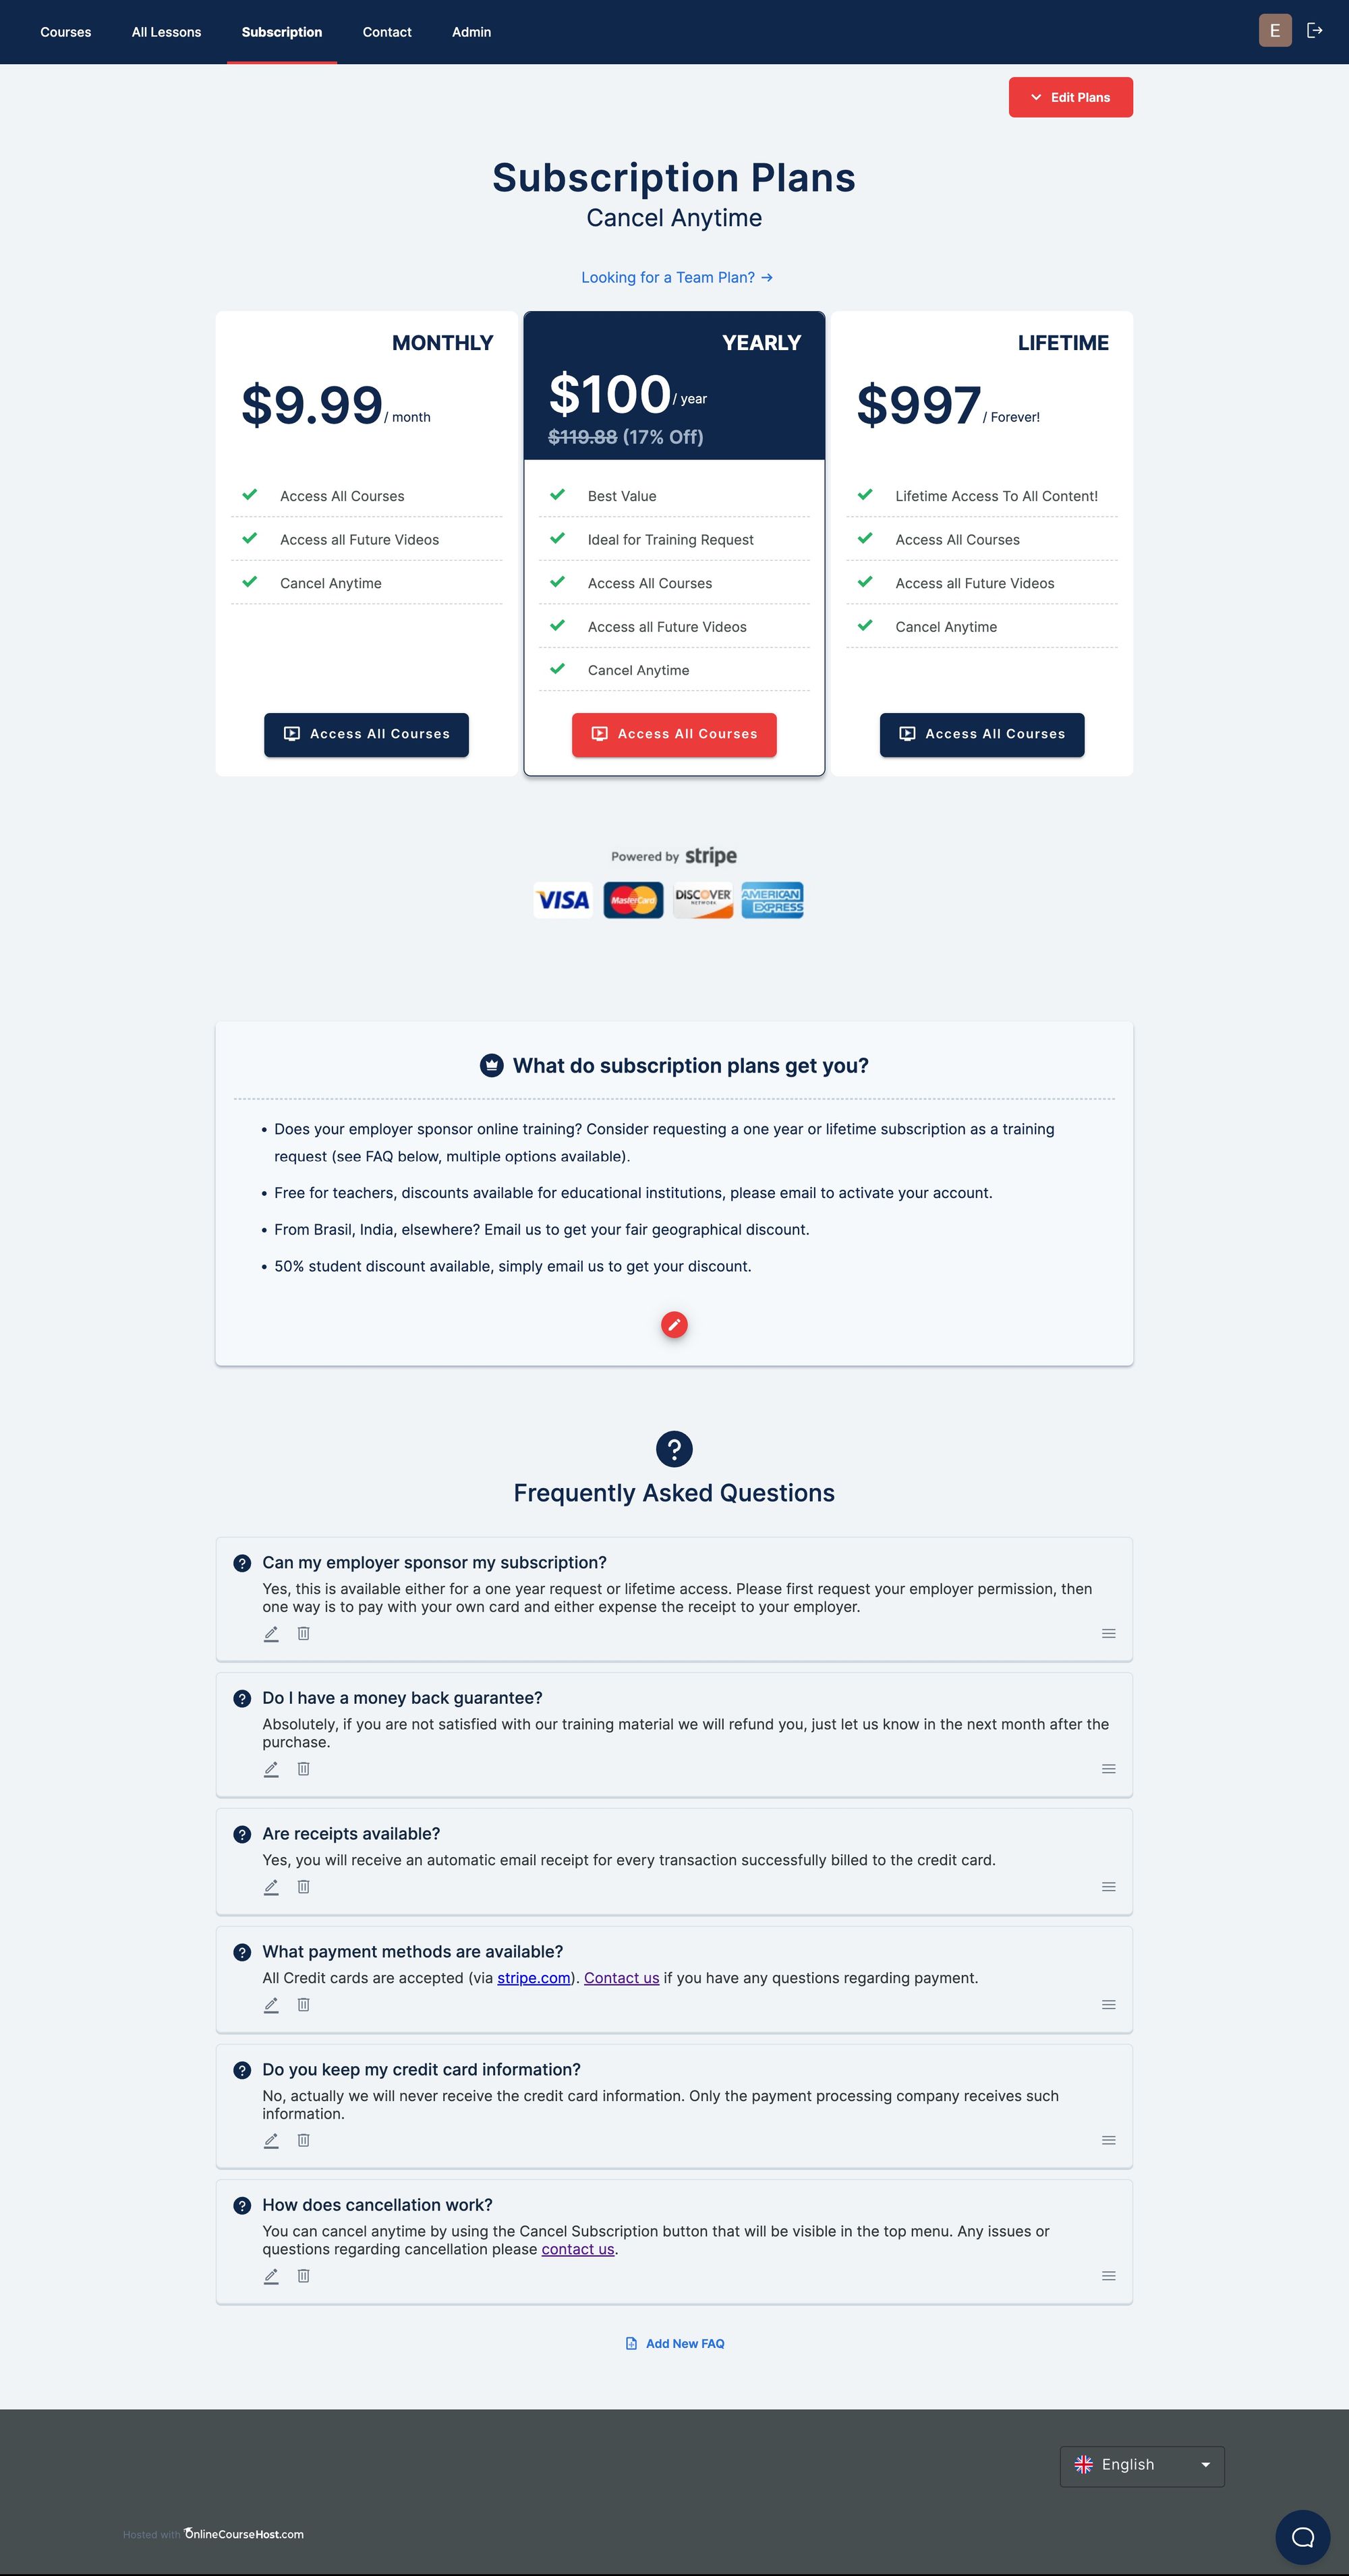
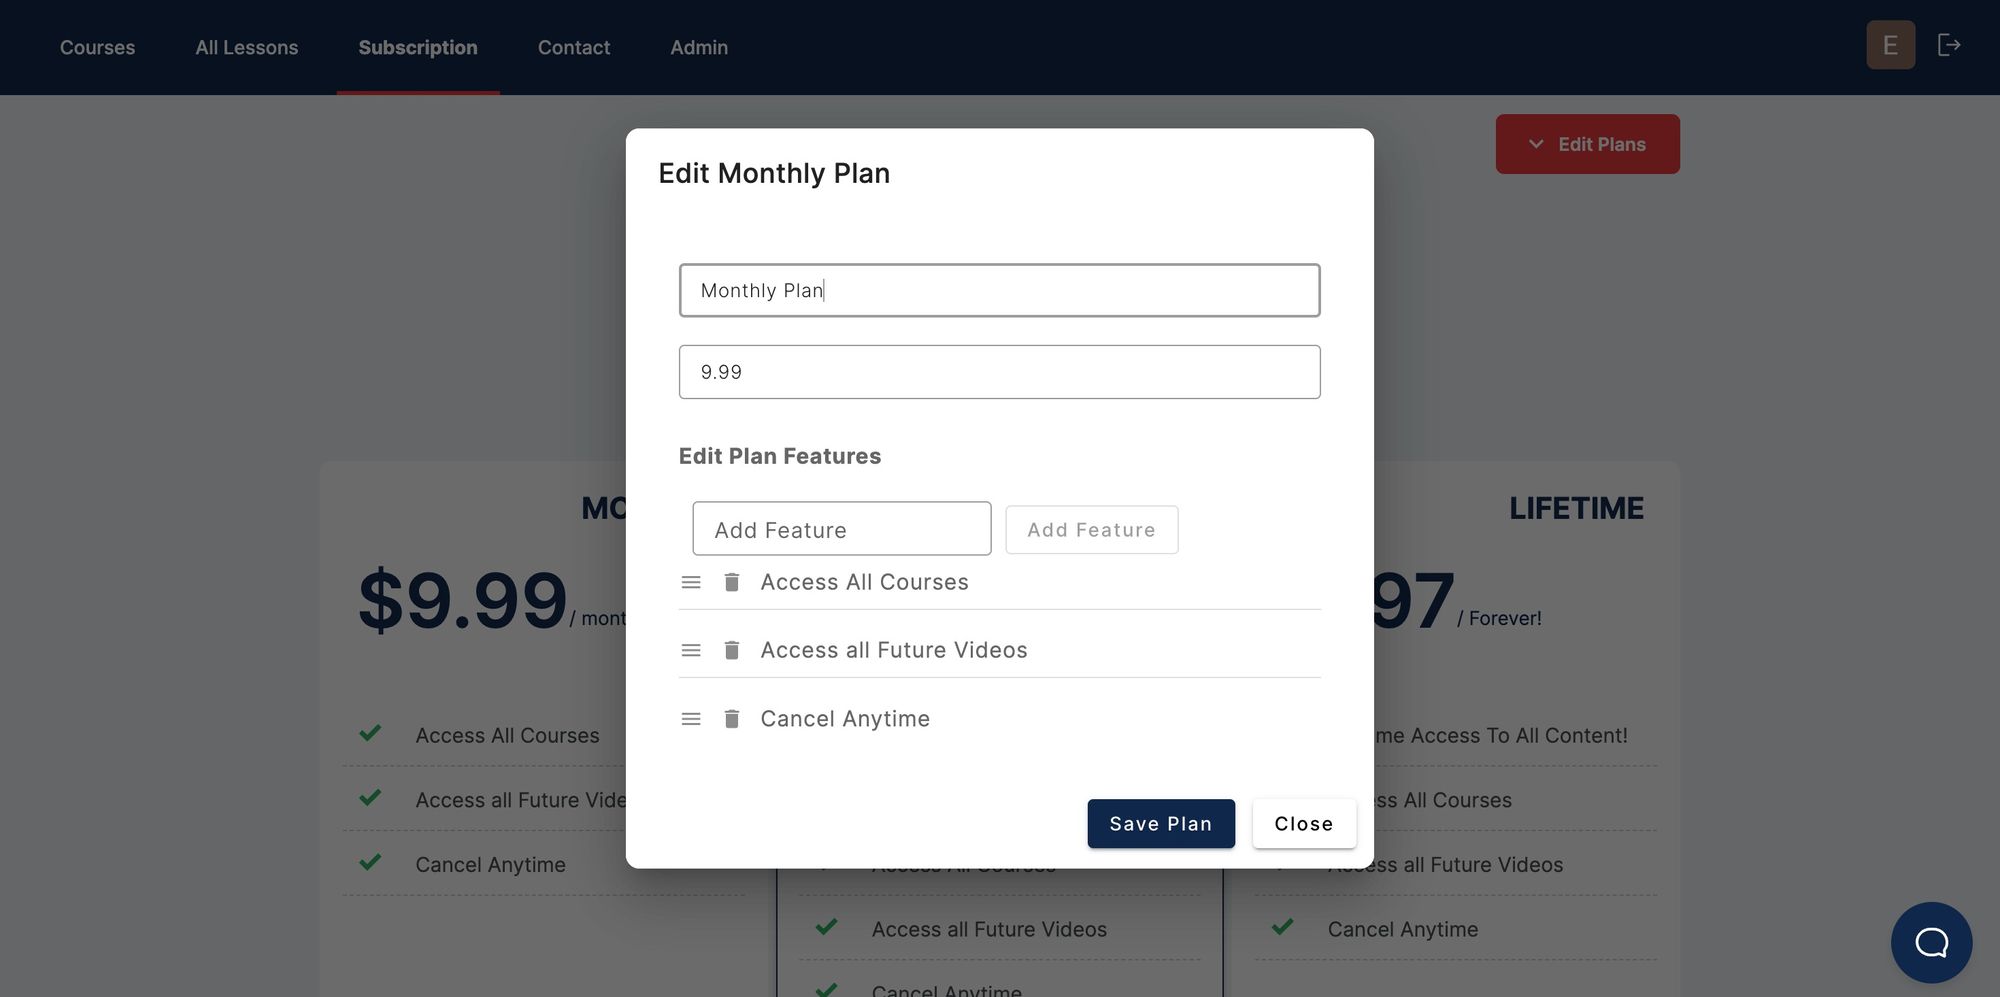
You can edit many of the details on this screen. For example, you can edit the price and the benefits listed on each card by using the Edit Plans dropdown button.
You can also edit the content of the highlighted text box and the FAQ list at the bottom of the page.
How to Create Promotional Coupons (for one-time sales)
Now that you have some courses available on your website, you can start thinking about how to promote them. Check the Course Creator Academy for some ideas on how to promote your courses.
One great way of promoting a course is to create temporary coupons that your students can use to get the course at a discounted price. There are different types of coupons available:
- one-time sales coupons
- recurring subscription coupons
You can create course-specific coupons by using the Edit Course / Price & Coupons tab and clicking on the Create New Coupon button:
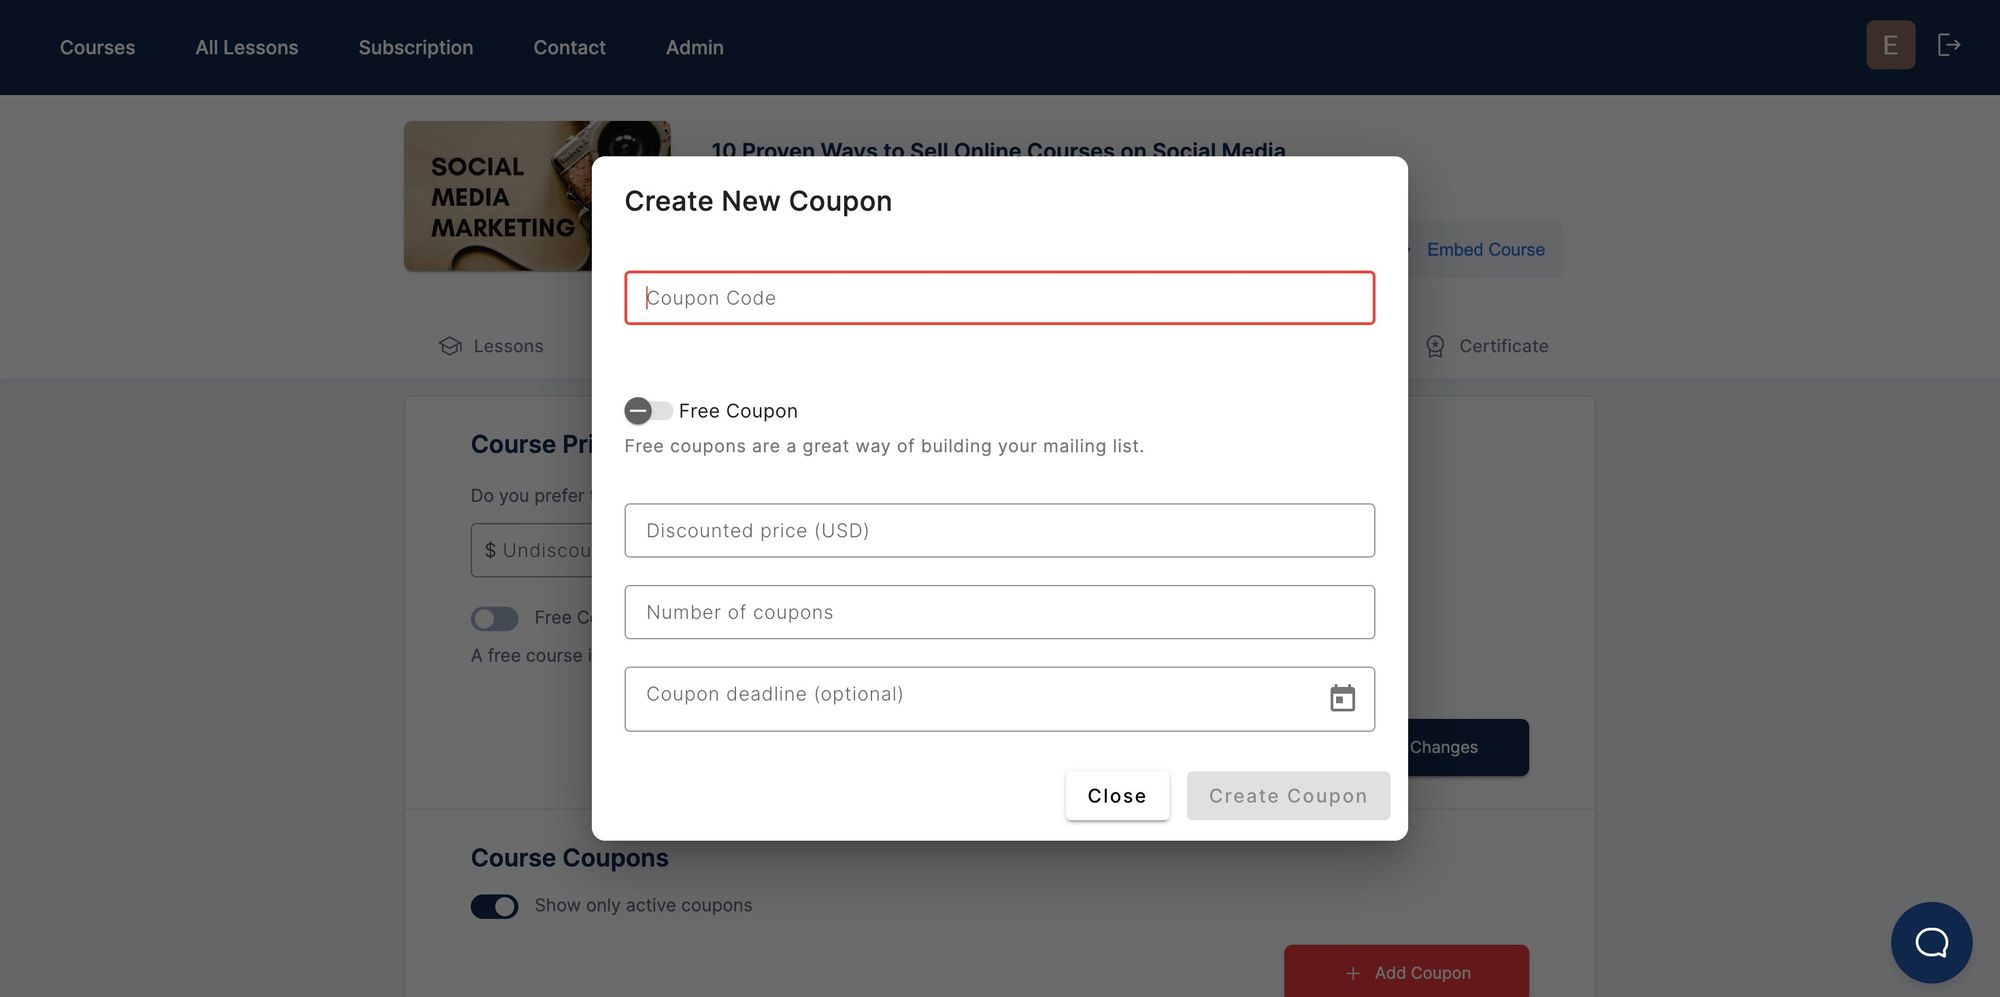
After creating the coupon, you get the link to the discounted course by choosing the Get Link button on the coupons table.
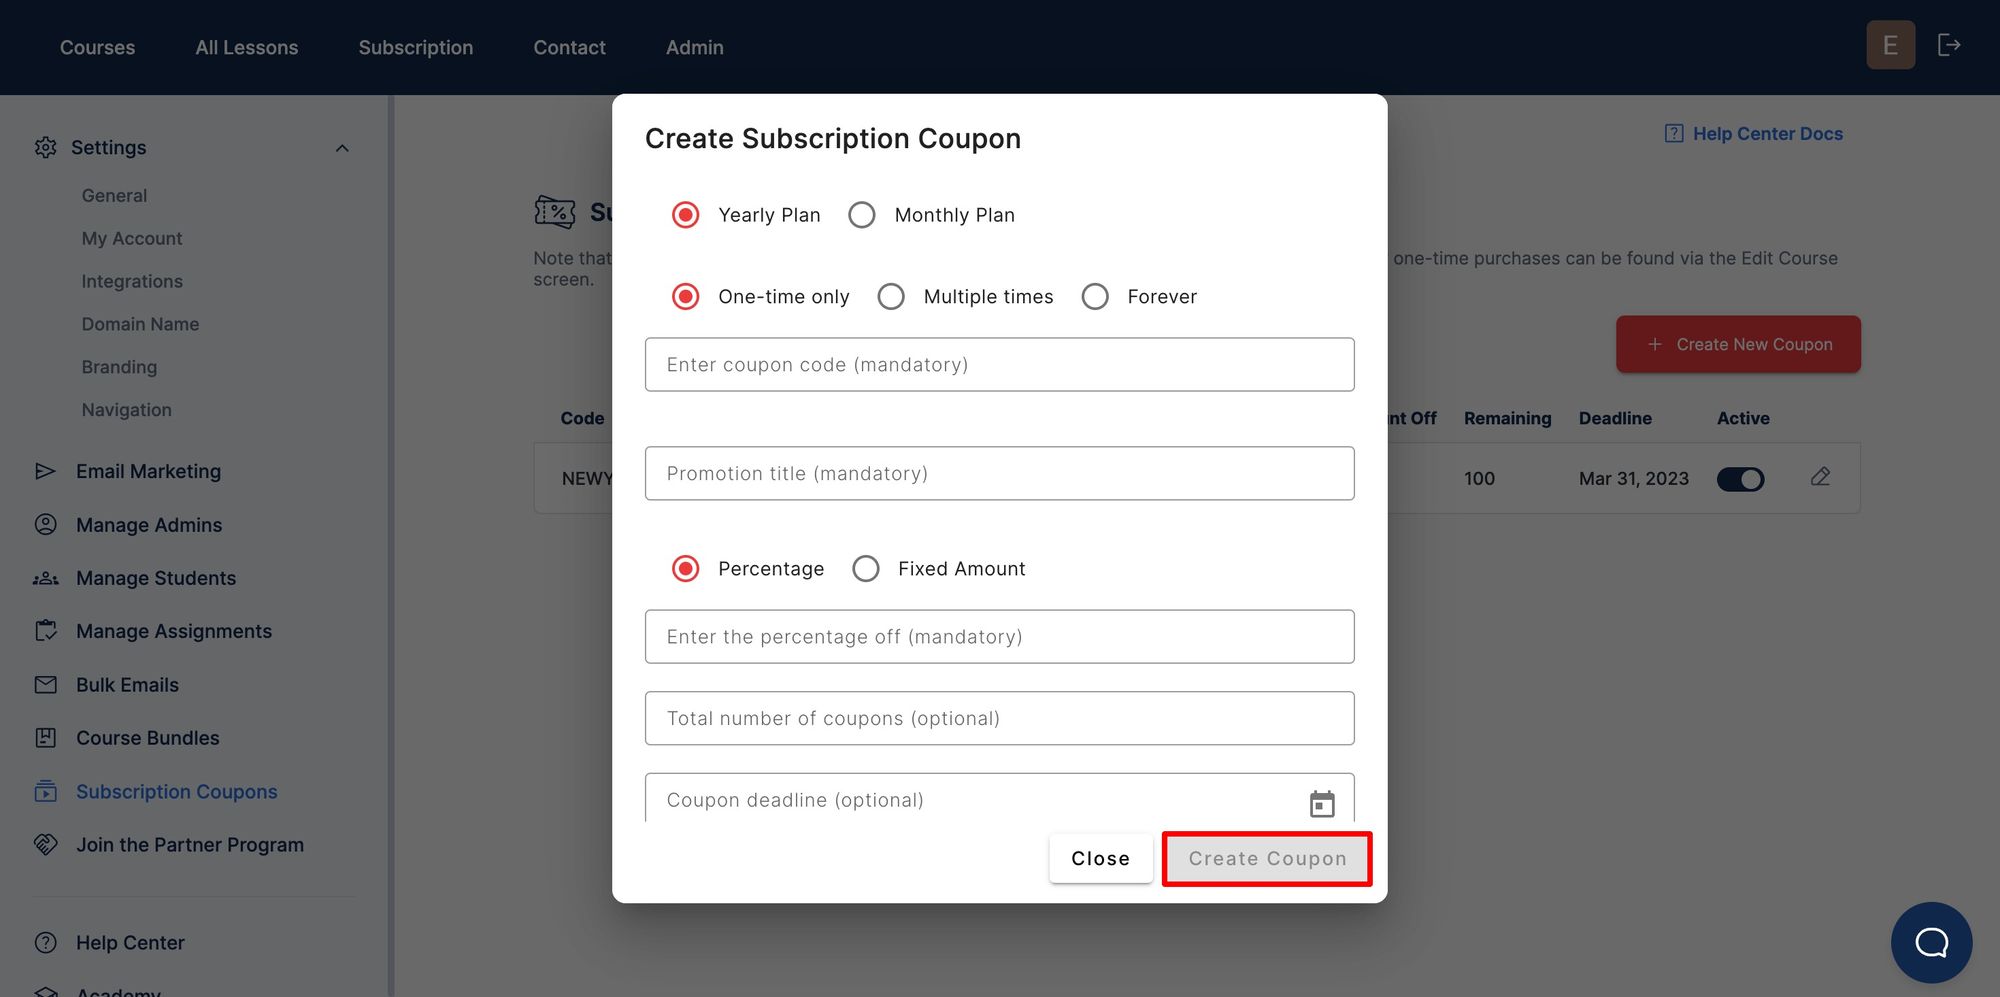
How to Create Recurring Subscription Coupons
Besides coupons for one-time sales of a single course, you can also create coupons for your recurring subscriptions.
You can do so via the Admin => Subscription Coupons screen:
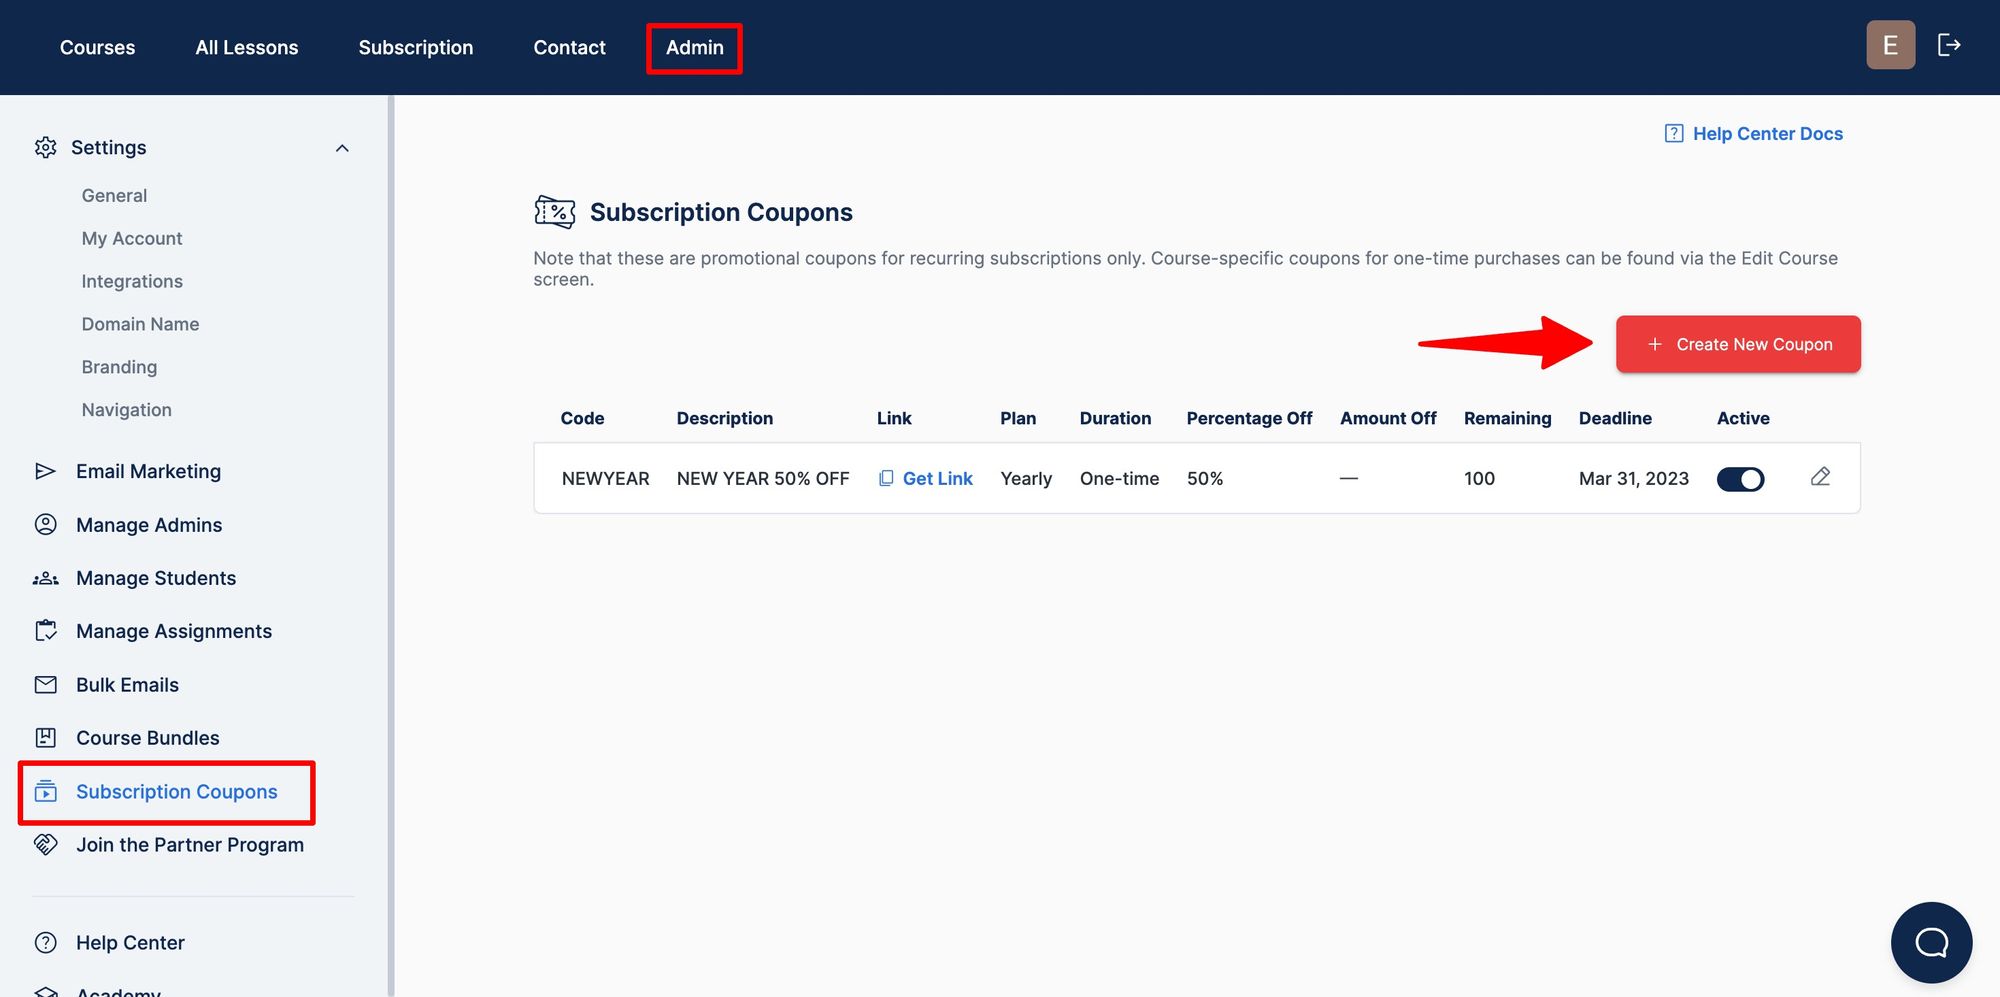
You can then create different types of recurring subscription coupons. Here is an example of a 50% discount coupon:
How to Set Up Email Marketing (and start collecting student emails)
The best way to create an audience is to start getting student emails and store them in a mailing list.
You can then email them weekly all sorts of useful content and occasionally send a few coupon links as well.
Your website already has email collection forms in several places to get the emails of users that browse the website but haven't logged in yet.
You can configure the content of those embedded email collection forms by using the Admin => Email Marketing screen:
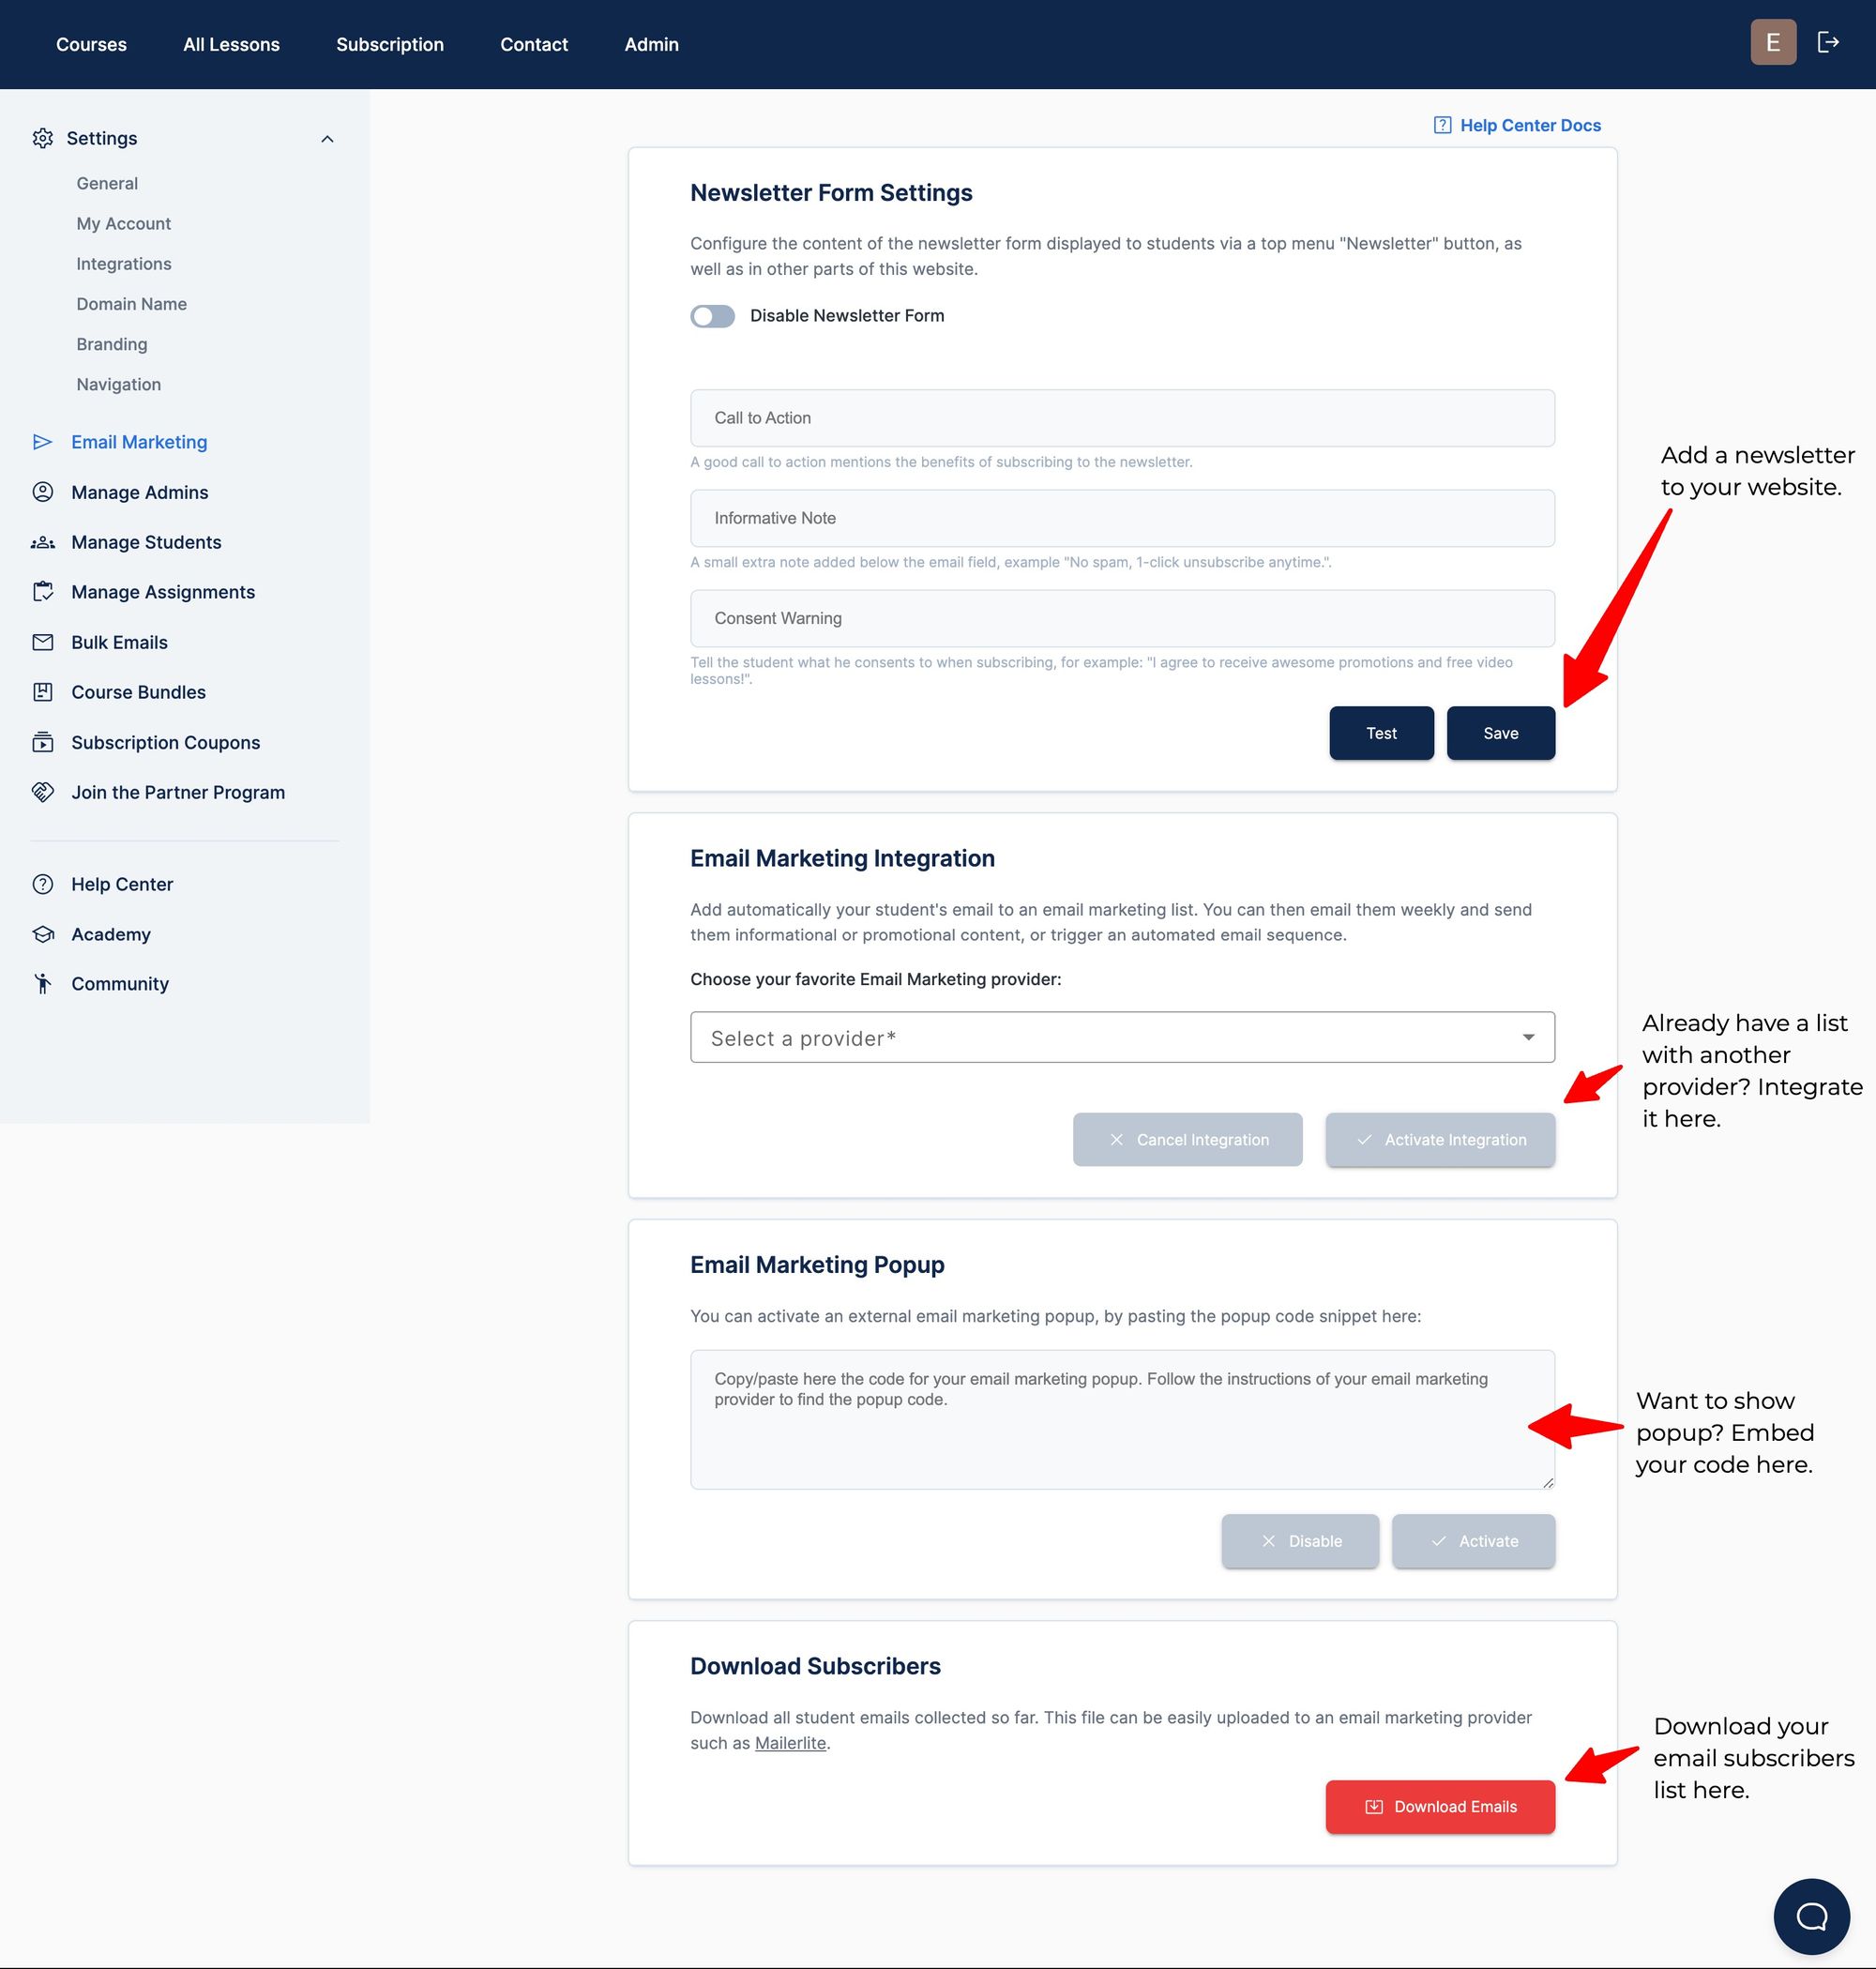
You can always download a complete list of all your student emails by using the Download Subscribers section.
And if you are using an external email provider like Mailerlite, ConvertKit, Mailchimp, and others, you can automatically update your email list with new emails by activating an integration from the Email Marketing Integration section.
If you are thinking of an email integration to choose from, I think that Mailerlite is ideal for online course creators due to its reduced price and ease of use, and that is the one I use (no commercial affiliation with them of any kind).
Mailerlite supports scheduled emails, so you will be able to set up a welcome email campaign that triggers a sequence of emails when the user joins your mailing list.
Again, you can find more about online course email marketing on the Academy homepage.
How to Set Up Your Url (or custom domain)
So far, you have been using the free my-school.onlinecoursehost.com, which works great and is especially useful to get started.
You can even run your whole business using your free URL and link to it from your website. However, you might also want to buy a web domain like my-javascript-school.com and use that instead.
You might even already have a domain and would prefer to make your courses available in a subdomain like courses.my-javascript-school.com.
All these scenarios are supported by the OnlineCourseHost.com platform.
Once you have purchased your custom domain, we can activate it for free on our platform. You can request the activation of your custom domain by using the Admin => School Settings => Domain Name tab:
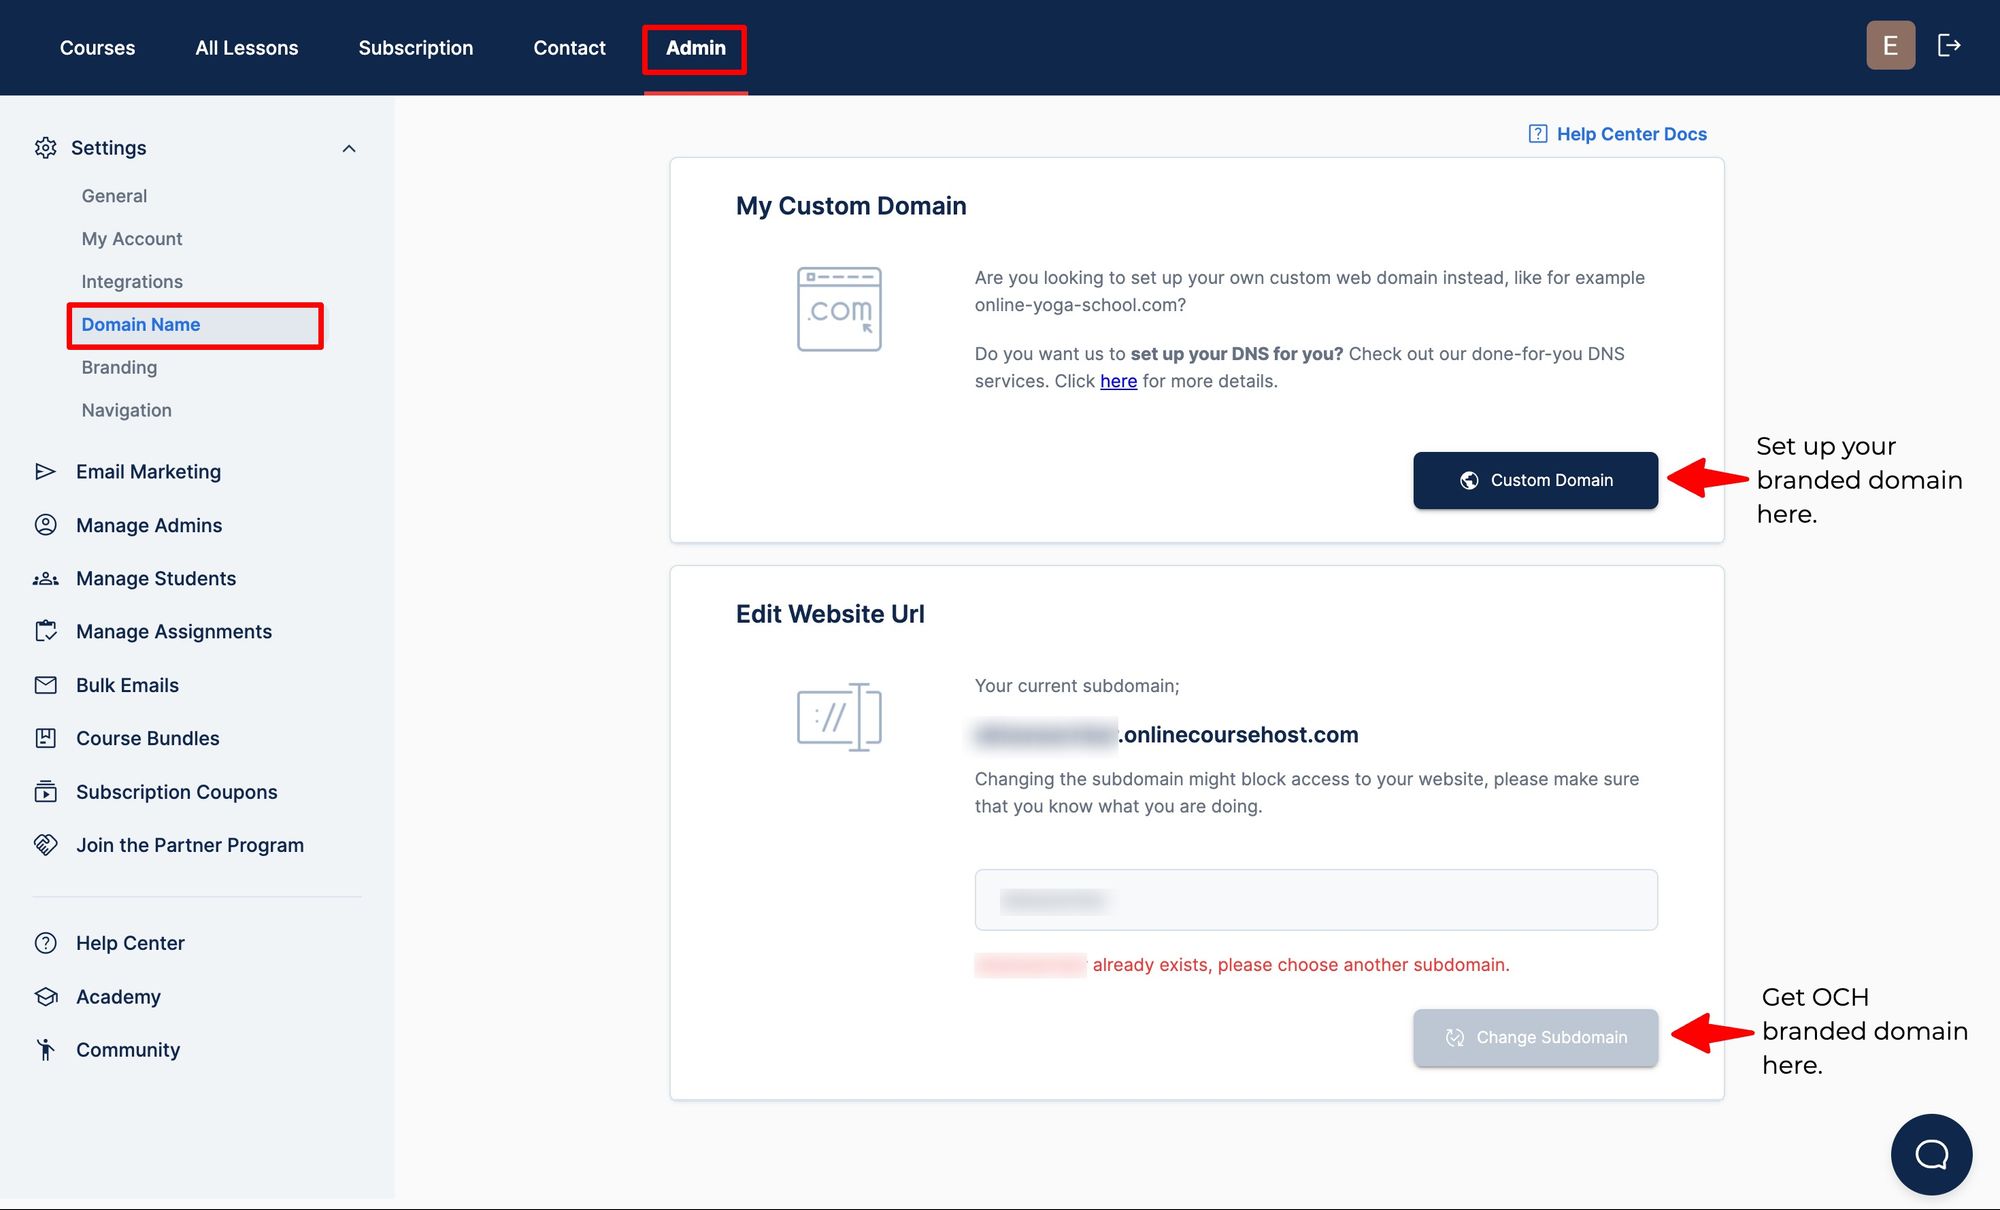
Once you fill in the activation form, we will do the necessary on our side to set up your custom domain with a free SSL certificate and get back to you as soon as the domain is ready. This should only take a day or so at most.
At this point, you now have a fully functional online course website that you can use to launch your online course business!
So how does this platform work exactly?
How Does OnlineCourseHost.com Work?
As you can see, with this platform, you get access to a very powerful free trial.
You can start uploading and selling online courses immediately, benefiting from a ton of features.
Safe to say, this is the best platform to create online courses for free. In the beginning, while you develop your online course business, we want you to be able to have no fixed platform costs upfront as your business scales.
With our platform, there are no platform fees, meaning that you will get the full value of each sale on your Stripe or Paypal account, minus the small commissions that those companies charge.
This will allow your business to scale gradually as you build your audience, with minimal upfront fees.
Once your business starts growing, and you want to access some more advanced features like Email Marketing integration, Bundles, Subscriptions, etc., you can then upgrade to one of our super affordable paid plans.
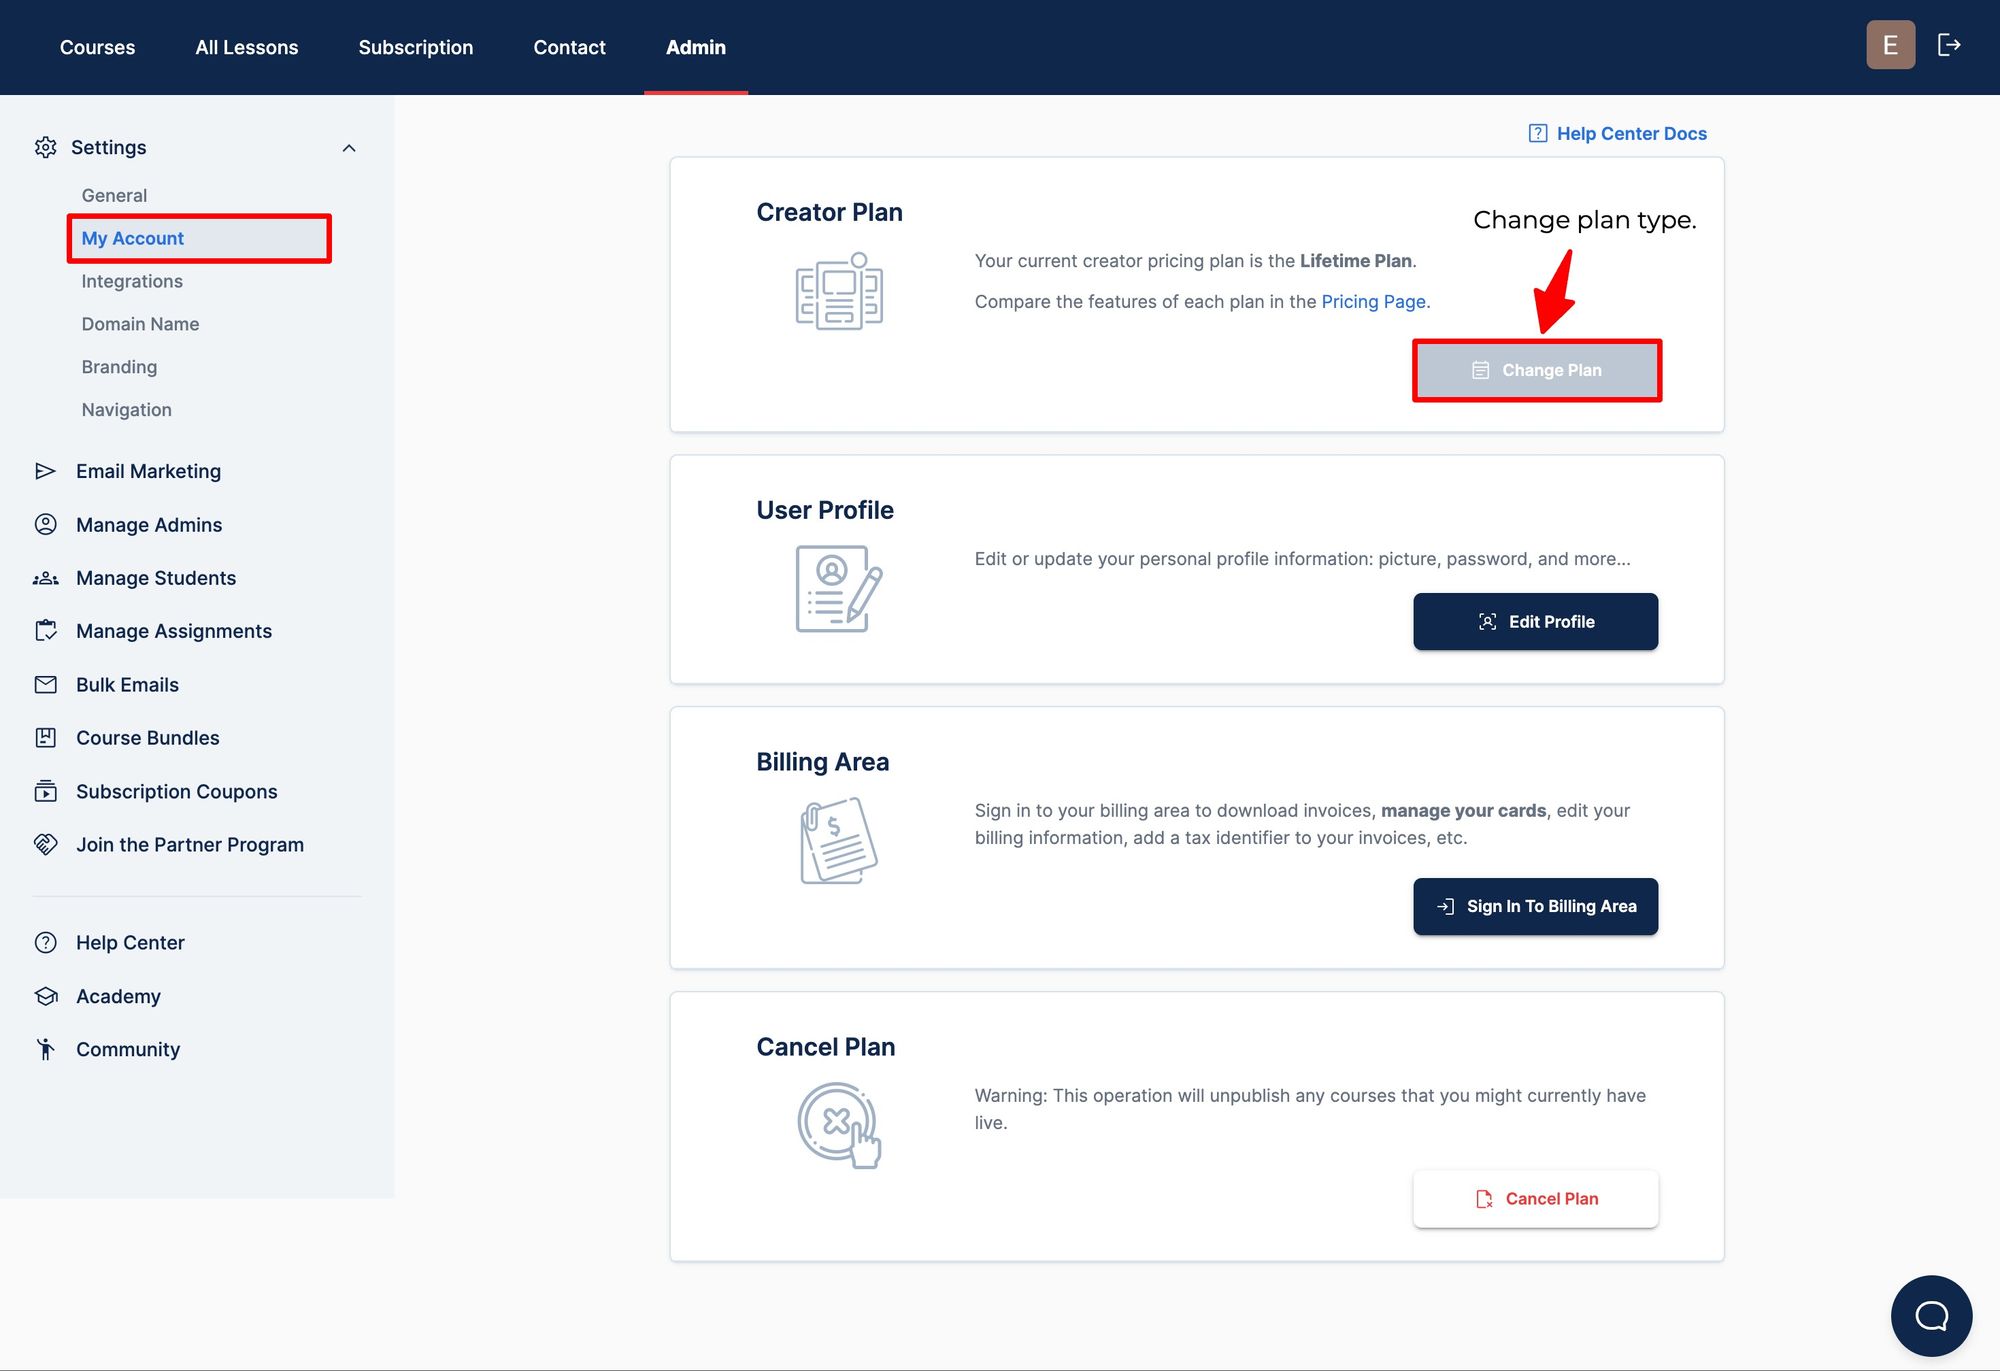
You can change or cancel your instructor plan at all times by using the Course Creator Account tab of the Admin => Settings => Billing screen:
Summary
Now, to answer your question, How to create an online course for free?
The OnlineCourseHost.com platform allows you to create a fully functional online course website in no time.
All you need for that is:
- some branded images to brand your homepage
- course thumbnails
- the marketing text for the homepage and the course landing pages
- a Stripe or Paypal account
You can use all platform features using the free trial to get started and create your first online course for free!
More than a platform, we want to also give you all the information that you need to succeed in your online course creation journey.
That is why we have created the Course Creator Academy so that you can find the information that you need to become a successful online course creator all in one place for free.
And if you are looking for a platform to host your online courses, create an account at OnlineCourseHost.com and start creating your courses today!
To get notified when new content is available here at the Academy, you can subscribe here to our weekly newsletter:
Next recommended guides
The next guide that we recommend that you read is: How to promote your online course - complete guide
Related Posts
Check out these other posts in the blog that will help you promote your new course:
Any further questions?
If you have any other questions on online course creation, please post them in the comment section below or on our Course Creator Academy Facebook Group.
Either way, our team of course creation experts is happy to help you out.
Vasco Cavalheiro
OnlineCourseHost.com Founder & Online Course Creator
LinkedIn Facebook Page Facebook Group Twitter
You are welcome to ask me any questions in the comments below: 👇👇👇👇

 Start Here
 Course Creation Journey Step by Step
  Course Creation Software Reviews
 Online Course Marketing
 Course Creation Tips & Tricks
 Course Equipment
 Online Course Marketplaces
 Revenue Reports
 Best Practices
 Frequently Asked Questions
 Platform Reviews