


How to Record and Edit Your First Online Course
 Platform Review

Learn all the video recording and editing techniques that you will need to know in order to produce your first online course video lesson.
At this point in your online course creation journey, you have already identified a course topic, created a course outline, and purchased the necessary equipment.
So congratulations, you are now ready to record your very first online course!
The question now is: what is the best way to record online course content? How do you edit an online class? What are the pitfalls to avoid, and what is the most efficient way of producing online courses?
That is what we will be explaining in detail in this guide, assuming no prior experience recording and editing any type of video, we will explain everything from scratch from first principles.
Don't worry, as it's a lot simpler than it might sound at this stage. We will teach the simplest and most effective technique of recording and editing great video course lessons.
This video producing and editing guide is specifically meant for online course creators that want to create great video lessons without having to become video editing wizards.
Table of contents
Notice that there is a lot to know about video editing, it's a profession after all. But the truth is that most online course creators are not professional video editors.
So how do they make videos for their online classes? The key is to focus on learning only the video recording and editing skills that you need specifically for recording educational videos, and not much more.
And it's in those essential skills and those skills only that we will be focusing on in this guide.
If you are looking to learn more about online teaching in general, you can find all of our guides on the Academy home page, in the recommended reading order.
The previous article in this series is: affordable online course equipment: complete practical guide.
So without further ado, let's get started learning everything that you need to know to record and edit your very first online course!
What computer do you need for recording and editing online courses?
You don't have to purchase an especially powerful computer for recording and editing your online course videos, just about any modern computer will do.
We use a relatively old iMac model with a 21 inches screen that we have used to create our online courses business:
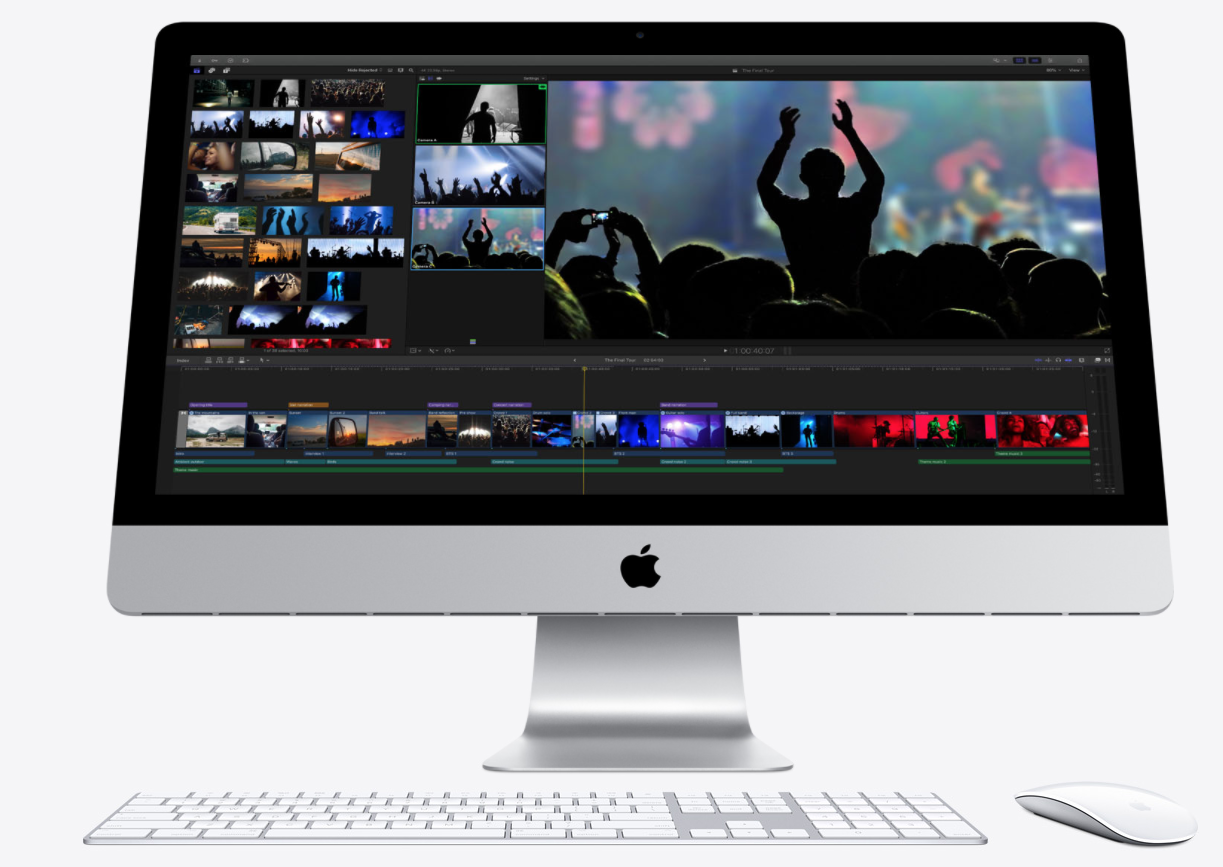
The reason why we haven't changed it yet is that it still works as fast as the day that we bought it, over 8 years ago!
If you are thinking of purchasing a new computer with the production of online courses in mind, then this is a great choice, as it just works for years at a time without any problems.
But having said this, there is no need to get a new computer for doing the recording and video editing.
The truth is that almost any modern computer will work just fine, so don't worry and try things out with the computer that you already have first, and only then consider getting a new one.
What software do you need for recording online courses?
For producing online courses, you will need some sort of video recording and editing software. There are many different brands of software available, so our advice is to simply choose one and if you like it, stick to it.
In our case, because we work on a Mac we have always used Screenflow, which is a paid commercial product with a trial version that will allow you to learn how to use it and produce as many video samples as you need, while you learn.
Note: many of the examples that we will be providing in this guide are in Screenflow, but the knowledge that you will get is applicable to any other similar software, as they all work in a very similar way
Notice that when we recommend a paid product it's because we use it ourselves and like it, but we don't have any commercial affiliation with any software product or equipment brand, including Screenflow.
All links provided are non-sponsored, and for your convenience only.
Introduction to Online Course Video Recording and Editing
So how does video recording software like Screenflow work? There are two main features: recording and editing.
Although you can record your videos with a completely separate camera and then transfer the videos and edit them later, it's much simpler to just record everything straight from your video editing software directly.
So go ahead and plug in your microphone to your computer, and if you don't have one yet make sure to check out our online course equipment guide first.
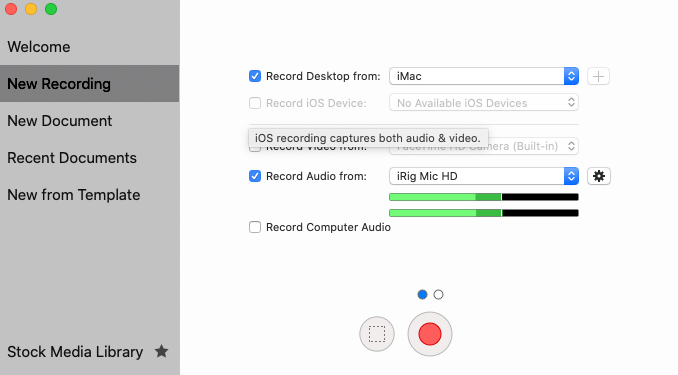
When you first start Screenflow, you will see a screen similar to this one:

Using this dialog, you can start the recording of your first video lesson by choosing among several possible options:
- Desktop recording: If you tick the checkbox "Record desktop", you will be able to do a recording of your full screen. This is great for filming a full-screen PowerPoint, or some sort of software like Excel for example that takes up the full screen. You can choose which monitor you want to record, in case that you have several available.
- Webcam recording: If you tick the "Record video from" checkbox, you will be able to choose a web camera to record you. This can be a built-in camera or an external camera.
- Audio recording: If you have plugged your microphone correctly, you should be able to select it from the "Record audio from" list.
- Record computer audio: This allows you to record for example a song that you are playing on your computer, and listen via the computer speakers. This would allow you for example to record the sounds of a game. This is usually not needed for the online course production.
If you record from several of these sources at the same time, the multiple recordings will be in sync, so you will never run into any synchronization issues (like the voice not matching the video, etc.).
Let's now see how we can combine the multiple recording options available in order to record a video course.
What is the best way to record online course content?
By far the simplest and best instructional videos that you can produce and edit, are video lessons where you film just your desktop and record your voice using the microphone, and nothing more.
To record such a video, check the following recording boxes and leave the rest unchecked:
- Record Desktop
- Record Audio
Just recording the desktop and your voice (without showing up on camera) makes it a lot easier to quickly produce video lessons.
And this is because as we don't show our faces, it's very easy to remove empty pauses from the recording as we will learn later.
You can record a sentence, wait 5 or 10 seconds until you think of the next thing that you want to say, and record that, repeat a sentence if it didn't come out right, etc.
Why is this simple technique so effective?
With this online course video recording technique, if you speak full sentences by clearly emphasizing the end of the sentence marked by the terminal point ".", it's extremely easy to take the raw recording and just clip away the empty pauses and the repeated sentences and produce a fluid recording that will sound just like you recorded everything in one go.
Your students won't be able to tell that the sentences of the video were glued together by editing, as they can't see you on screen. If you would film yourself at the same time as the voice recording, then the jump cuts would be clearly visible and very distracting to the student.
This means that recording yourself at the same time as your voice is a bit trickier: You need to speak a lot more fluidly for avoiding jump cuts, to the point that you might need to have to even prepare a script beforehand.
Even if you don't, and you manage to improvise and speak fluidly about your topic for several minutes in a row, you might still do some funny facial expression that ruins an otherwise perfectly good video.
Maybe you have the gift of fluent speech and manage to film yourself all the time with no problem, and that's awesome! But if you don't, you don't have to.
Recordings with only your desktop and your voice make some of the most useful and easy to produce educational videos, so if you want to get started creating online courses we recommend mastering this type of simple recording technique first, and only later trying more advanced techniques.
Do I need to show up on camera when recording my online classes?
If you want to greatly simplify the process of recording video lessons and make it almost trivial, then you should avoid filming yourself systematically.
However, not showing up when recording your courses at all might not be ideal either. You probably do want to show up in the videos at some point, to make them a bit more personal and unique.
A good solution that a lot of course creators use is to film themselves only at the introductory and conclusion lesson of the whole course, and maybe also at the beginning and end of each section.
For this type of recording, you might want to install a teleprompter app and even some extra equipment if you want the videos to sound more fluid, and this is one of the main reasons why they are a bit more complicated to pull off.
If you can record yourself talking for all lessons, then that is great, but know that some of the most successful online course creators don't even show up on camera ever, and instead use small animated videos for the introduction of their courses.
Personal recordings are a nice thing to have in a course, but if you want to keep things simple and make quick progress in your course recording, your bread-and-butter recording technique should be recording your computer desktop and your voice only.
How to record your first online course lesson
To start your first test recording, you want to make sure that you select your microphone and the desktop on the recording dialog, like this:
Notice the volume green bars below the Record Audio box. This allows you to test the microphone before starting the recording, to make sure that it's working.
Once you hit the red recording button on Screenflow, try to record a clip of your first lesson, and when you think you have a good video then hit stop using the Command + Shift + G command or the stop button.
You will then be shown a dialog asking you what you want to do with the recording:
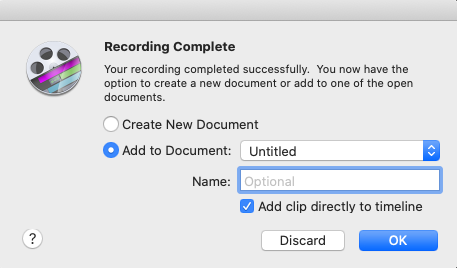
With this dialog, you can choose to add the recording to one of the multiple documents that you might have opened, and you can also add it directly to the video timeline (more on this later).
Once you click OK, you will be shown the Screenflow video editing screen:
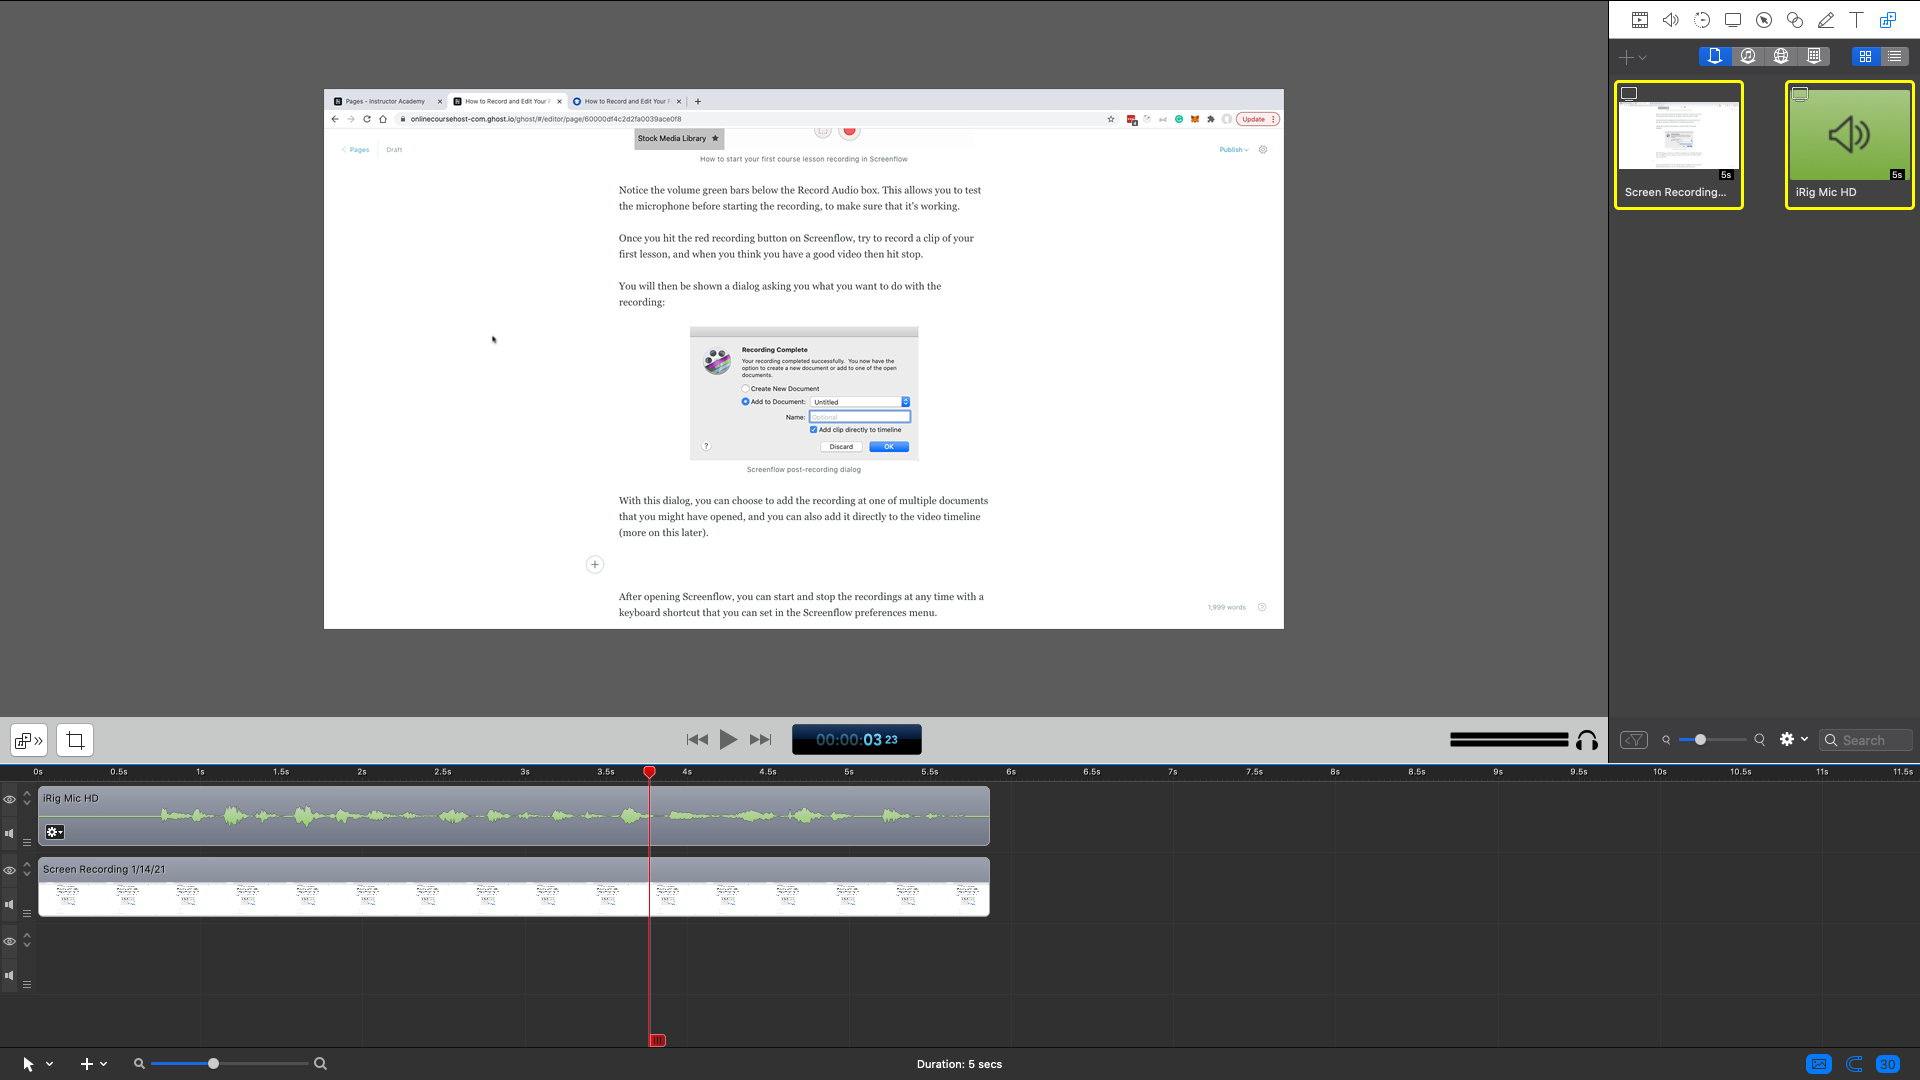
Congratulations, you have recorded the first clip of your first lesson! This is where all the fun begins, we are going to learn the main functionality of this screen, and everything that you need to know about it in practice to record video courses.
Understanding the main recording screen when producing your online course
The screenshot that you see here is for Screenflow, but every video editing software has a similar screen that is divided into 3 main areas.
The first is the central panel, this is where you can see the video clip currently being edited. You can play the video, together with the audio by hitting space. If you want to pause the video, hit space again.
Below the central panel, you have maybe the most important area of the recording screen, where you will be doing the bulk of your work: this is known as the timeline.
Notice the red slider on the timeline, you can slide it to select a given instant in time. The content of the central panel will show the video at the point in time where the slider is currently at.
Another important part of the recording screen is the media gallery, to the top right where you have a list of all the recordings that you made, both audio and video.
Besides recording straight from Screenflow, we can also manually add new videos, audio, and images straight to the media gallery from the filesystem, and add them to our final video.
Let's now focus on understanding how the timeline works. And the best way to understand it is to record a few more clips.
How to record more video clips
From the little you've read, it's quite obvious that it doesn't take much to understand how to make videos for online classes.
Going further, if you want to record a new video clip using Screenflow, you can do so in a convenient way by using a shortcut.
With Screenflow opened, you can start and stop the recordings at any time with a keyboard shortcut that you can set in the Screenflow preferences menu.
You can also start and stop recordings by using the dropdown on the top taskbar of your computer:
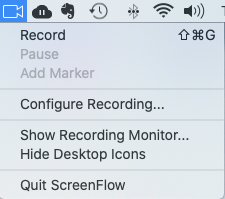
As you can see, the shortcut that we use is Cmd+Shift+G. This shortcut is used to start the recording, but also to stop it.
Once you finish recording your second clip, you can add it to the timeline directly by checking the checkbox "Add directly to timeline".
How does the Add directly to timeline checkbox work?
Here is how this checkbox works when recording your online course:
- if you don't check it, the recording will be added to the media gallery section, but not to the timeline.
- but if you do check it, the video will be directly added to the timeline section, starting at the point where you left your red slider.
To use the Add to timeline functionality correctly, make sure to position the red slider correctly at the point where you want to append the new clip even before starting the recording.
If you forget, no problem, simply don't tick the checkbox and the video will still be added to the media gallery.
Now that we know how to do recordings, let's learn how to edit them.
Essential video editing operations: Cut and Move
To answer your most pressing question, "How do I edit a video course?", you should first understand that cutting and moving clips around is one of the essential operations of sound and video editing.
Cutting consists of splitting a clip in two, and you can do it in the following way:
- select the video that you want to split by highlighting it
- position the red slider at the point where you want to split the video into two
- Hit the Shift + T shortcut
The selected video will then be split into two separate parts, like this:
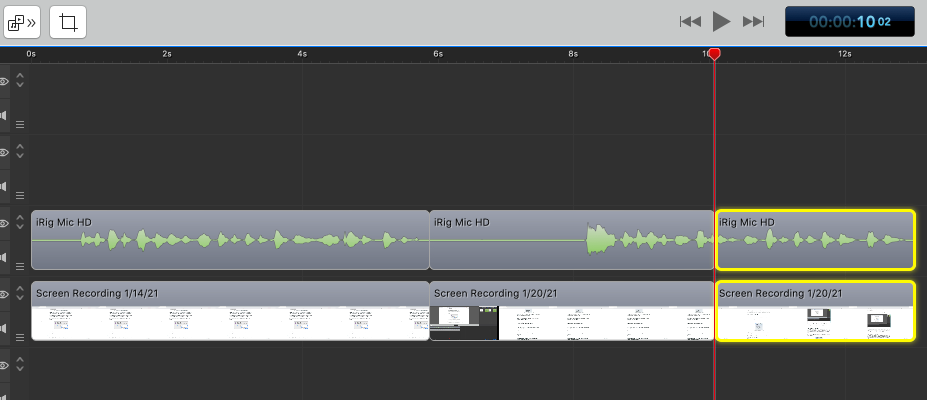
As we can see, our long clip is now split into two smaller ones. Both the sound and the video part were equally split at the same time.
We can now drag the clips around and reorder them, or simply delete them by selecting a clip and pressing the backspace key.
There are a lot more video editing techniques, but in practice, for the recording of desktop + audio clips, most of the time what we will be doing is deleting portions of our video clips.
Essential video editing operations for your online course: Ripple Delete
When editing your online course, one of the big advantages of not recording ourselves during production is that it's extremely simple during the editing phase.
It particularly helps to eliminate all empty pauses or repeated phrases that we have restarted for some reason.
We could do so by cutting the clips at the start and the end of the part that we want to delete, removing the cut clip, and dragging and dropping the remaining clips to remove the gap.
But that is a lot of manual editing, that will make the video editing process unnecessarily long.
There is a much simpler way to achieve the same result in a much simpler way that you will be using all the time, and this is your main editing technique: it's called ripple delete.
Here is how ripple delete works:
- place the red slider at the start of the section that you want to remove
- while holding the Shift key, drag the slider to the end of the section that you want to remove
This is what the highlighted section will look like:
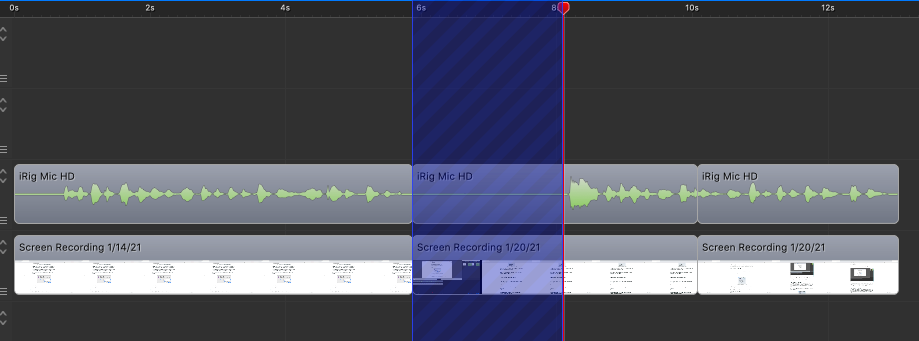
Now what we would like to do is remove the highlighted section, but without leaving a blank space in its place. We would like all clips to the right to be dragged left to fill in the blank space.
We can do so with the shortcut Cmd + Backspace (ripple delete):
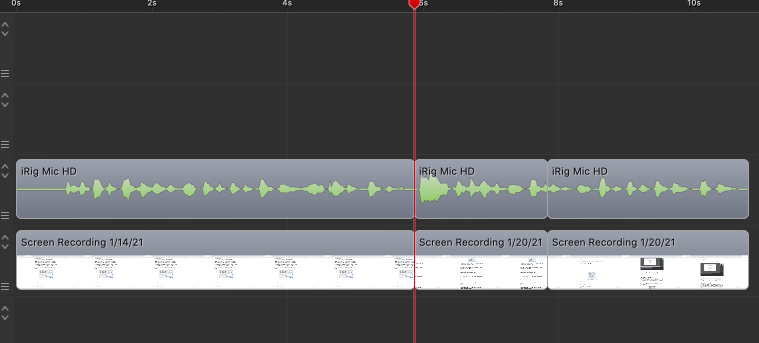
And with this, the highlighted section was removed! Notice that the total duration of the video is shorter. It used to be over 12 seconds, and now it's just over 10 seconds.
The 2 seconds of highlighted video were completely wiped out. If the correct amount of space is left between the videos, the audio transition will sound like the sentence was uninterrupted, without any pause.
If you were filming yourself while presenting your online course, then the jumpcut would be obvious and a bit distracting, but with desktop + audio videos the transition is unnoticeable.
This ripple delete technique is the key reason why desktop + audio videos are so much easier to record and edit than videos where you film yourself as well.
With this technique, we have a lot more margin for error during the recording, knowing that we can always restart a sentence, or make a pause to think better about what we are about to say.
Essential video editing operations: Transitions
Sometimes, the ripple delete technique in recording lessons for students will make the transition between the video clips seem noticeable.
This will only happen if there is a drastic change in the video image, such as example if you are filming a completely different screen in an application that you are teaching.
In that case, you might want to add a simple visual effect in order to make the transition much smoother. This can be done in the following way in Screenflow:
- select the video that you want to blend in into the next video
- hover with the mouse at the end of the video, until you see the mouse cursor turn into a drag handle
- drag the end of the video into the next video, or the beginning of the next video into the previous video
A transition will be added between the two videos automatically:
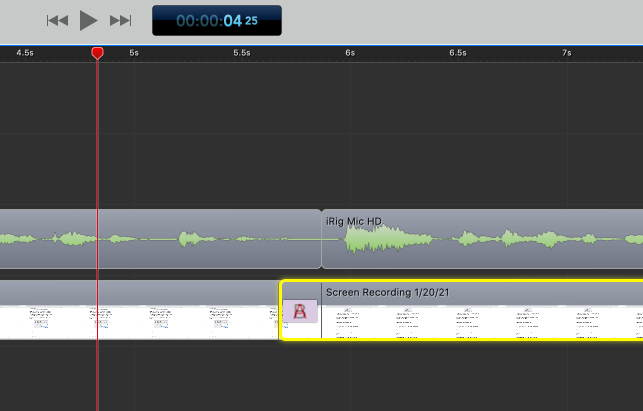
Notice the "A" in the timeline that was added, this stands for "Animation". This means that during the duration of the animation, the first video will fade out slowly while the new video fades in, making the transition between the two videos much less abrupt, and much more pleasant to the student.
It's important to understand that this transition technique should be used sparingly and only as a backup to smooth out context switching. Ideally, this should not even be necessary for most videos.
How to create an introduction for your online course video lessons
To brand your videos and make them easily recognizable, you can add an intro or a splash screen to them.
You can then copy or import the intro clip to the beginning of each edited video, by using the Media Library Add button.
There are a couple of different ways of creating an intro. The simplest is to use an inexpensive online platform.
Simply upload your logo and provide some text, and your intro will be generated automatically based on a template.
This can be done using for example the introchamp.com platform, which has a lot of affordable templates around the $5 to $10 price tag:

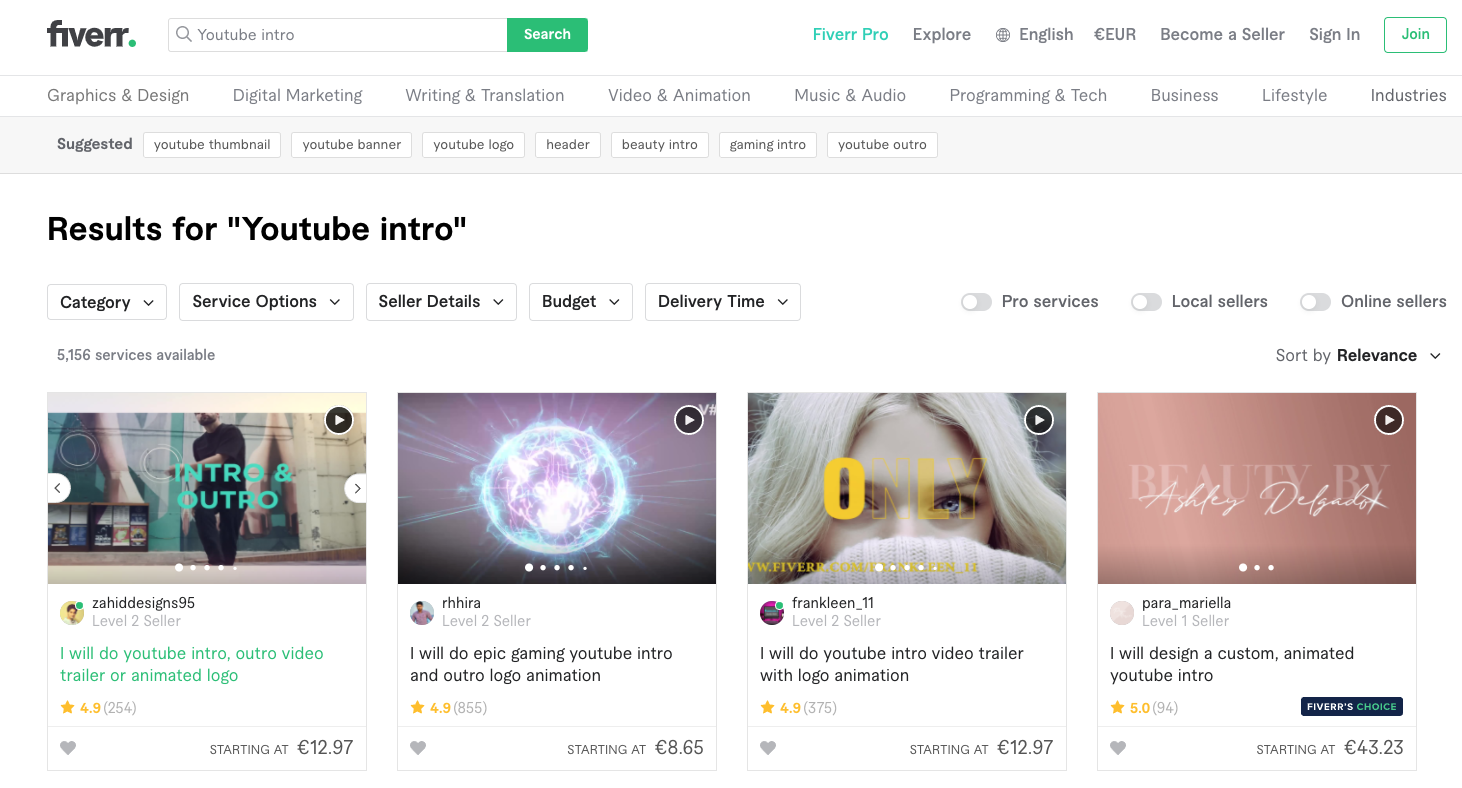
Several other similar platforms provide the same service of generating an intro video. Alternatively, if you don't like any of the templates available, you can always hire a freelancer to do the intro for you.
For example, using the Fiverr platform, it's possible to get a professionally designed video intro that fits your exact requirements by around $15 to $30:
Recording an online course video lesson - full process
Let's now go over how you would record an online course video, in the simplest possible way, using the desktop + voice recording method.
For this type of video, you don't need a full script written upfront, you just need to do some preparation work like taking some notes in a bullet point list, to help you remember everything that you want to cover.
Then start the desktop and video recording, and record your first clip. Try not to speak too slowly, but do try to keep a good pace to keep things interesting.
When you are recording, try to finish your sentences with a clear "." full stop, this will make it a lot easier to later ripple delete to the next clip.
You don't have to read from a script or get it perfect and start again. Remember that with the simplified ripple delete technique, you can very easily remove wrong sentences and empty pauses later.
But if your clip is starting to get a lot of wrong sentences and long pauses, then you might want to discard it and start again. The recording will come out a lot better the second time around, and it will be a lot easier to edit too.
Once you record a video clip for a couple of minutes or so, stop the recording and add the clip to the timeline. You don't want to record more than a few minutes at a time because on rare occasions the recording can get lost.
Between clips, gather your thoughts and think about what you are about to say next. Then hit record again, until you have covered the full lesson.
During recording, there is no need to do much editing, you can do the editing all in one go at the end. Once you cover everything that you wanted, what you end up with is the raw recording of a full video lesson.
We usually focus on recording several raw videos in one session, for example, 4 or 5, and then stop and start editing.
Editing an online course video lesson - full process
Do you need a video editing tool to create an online course?
Yes, you need the best video editing tool to make your online course stand out. The full editing process with Screenflow goes like this: start by adding your intro to the beginning of the video.
Next, you want to adjust the canvas size of the recording, in order to fit a given resolution and form factor, typically 16:9 for most videos.
You can do so by using the adjust canvas button, highlighted in red in this screenshot:
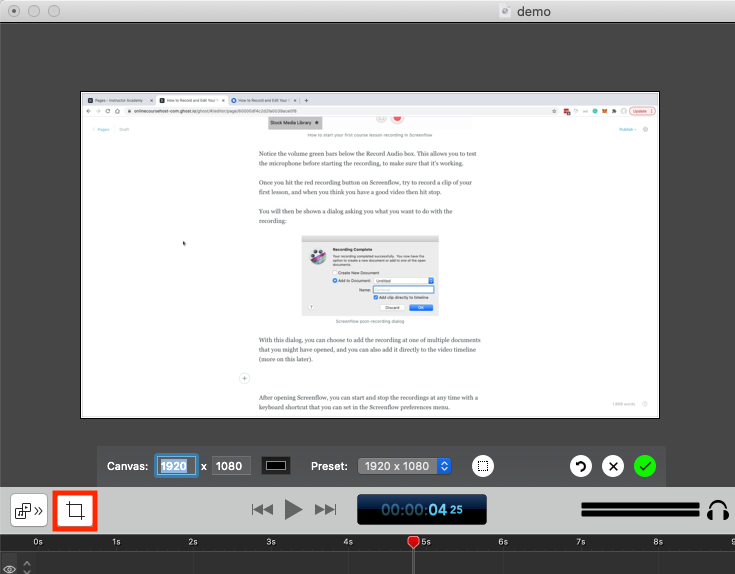
What canvas size to choose? This will depend on the resolution of the screen that you are using for recording.
For example, we do our recording on a MacBook Pro and set the canvas size to 2560 x 1440, and it works great.
This means that the bottom of the video will be clipped out in order to respect the form factor, so we need to make sure to not use that part of the screen during recordings.
If we are talking about something that is visible on the bottom of the screen, we need to be careful and scroll it to the center of the screen during recordings, otherwise, it will be clipped out.
Then go through the video by playing it, and simply ripple delete any empty pauses and wrong sentences, in order to produce a fluid video.
Make sure to test every transition by playing it again and see if the sentence sounds natural after the removal of empty pauses.
You might notice that you mispronounced a word or said something slightly inaccurate at a given point. This is OK, you can edit out the wrong sentence and leave the image only.
Then you can do a voice-only recording, and edit in the new sentence on top of the image. If your voice volume is more or less the same between the original and the new recording, the fact that you have re-recorded a sentence won't be noticeable to the user.
Continue ripple deleting your pauses and duplicate sentences all the way up until the end of the video, and you will end up with a fully edited video.
Online Course Video Recording and Editing: How to Export your Final Edited Video
Once your video is fully edited, you now want to export it. Notice that the recording that you did used the full resolution of your desktop, which is typically a lot more than we need to for the web.
If you would export your video in full size, the file size would be huge and this would pose a problem on some platforms and for users with slow networks.
A simple solution is to export all your videos to a reduced resolution. Here are the settings that we use for exporting all our videos to the mp4 format:
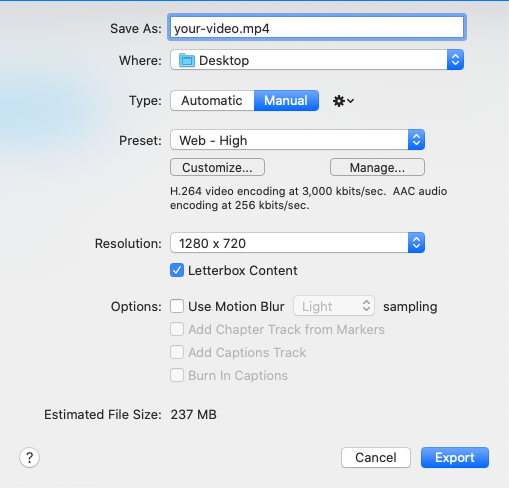
Notice the resolution box, this is the most important one to get reduced file size. If you want to fine-tune your exported video, then on the Preset box instead of choosing "Web - High", create a custom preset with settings identical to ours:
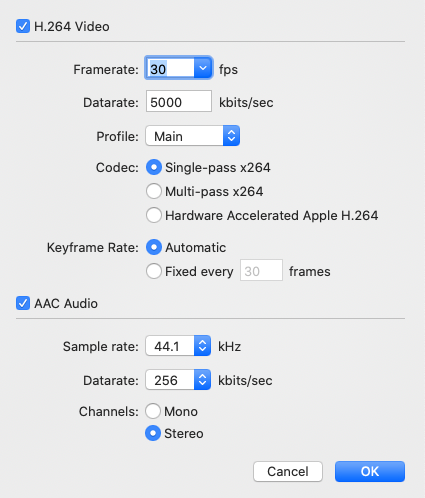
These settings will ensure you both great video quality and reduced file size, which is ideal for the web.
Should I hire a video editor for my online course?
We recommend that you first get familiar first with the video editing process, before hiring someone to do it.
And this is because even with an editor, there will always be small tweaks and fixes that you will want to do to the final video, so you will need to have some video editing awareness at least.
But if the video editing part of the course creation process starts taking up a lot of your time (and it will), then the first freelancer that we recommend that you hire is a professional video editor.
We will talk at length about this in a future article on how to build a small team of freelancers to help scale your online course business.
Summary
The best way to record high-quality online classes is by using the desktop + voice recording technique and skipping webcam recording for most videos.
You can simply film your computer desktop and show for example some PowerPoint slides, or some application that you are using, while you provide an audio explanation.
This type of video is extremely effective for teaching, and it's also very simple to both record and edit.
This means that you will be able to produce more of this type of video in less time than by using more sophisticated recording techniques like green screening.
These more advanced techniques don't add much in terms of learning and greatly complicate the recording and editing process.
We recommend that you use the simplified desktop + voice recording technique for filming most of your courses, especially at the beginning of your online course creation journey when you want quickly create your first course.
We hope that this guide will help you get started recording and editing your first online course video lessons!
If you want to learn more about online course creation, sales, and marketing in general, check out what else is available on the Course Creator Academy Home Page.
To get notified when new content is available in the Academy, you can subscribe here to our weekly newsletter:
And if you are looking for a platform to host your online courses, create an account at OnlineCourseHost.com and start creating your courses using our Free Plan.
Next recommended guide
The next guide that we recommend that you read is: How to create your online course for free
Any further questions?
If you have any other questions about online course creation in general or online course recording and editing in particular, please post them in the comment section below, or in our Course Creator Academy Facebook Group.
Either way, our team of course creation experts is happy to help you out.
Vasco Cavalheiro
OnlineCourseHost.com Founder & Online Course Creator
LinkedIn Facebook Page Facebook Group Twitter
You are welcome to ask me any questions in the comments below: 👇👇👇👇

 Start Here
 Course Creation Journey Step by Step
  Course Creation Software Reviews
 Online Course Marketing
 Course Creation Tips & Tricks
 Course Equipment
 Online Course Marketplaces
 Revenue Reports
 Best Practices
 Frequently Asked Questions
 Platform Reviews