


How to Manage Students in Your Online Course
 Platform Review
Learn effective student management techniques for your online course. Discover enrollment options, group management, engagement strategies, and more.
Whether you're an experienced course creator or just starting out, one of the key aspects of running a successful online course is effective user management.
Managing your students well goes beyond just enrolling them in your courses.
It involves guiding them through the learning process, keeping them engaged, and making sure they have a smooth experience on your platform.
In this post, I'll dive into how you can use OnlineCourseHost.com's features to streamline student management, from the moment they sign up to the completion of your courses.
If you're a course creator looking to optimize how you manage your students, this guide is for you.
I'll walk you through the steps of enrolling students, monitoring their progress, and keeping them engaged, ensuring that your courses are as effective and enjoyable as possible for your learners.
Ready, let’s get started.
Table of contents
You can also check out all the free guides available at the Course Creator Academy by clicking on the Academy link on the top menu.
Creating and Managing Groups
Groups on OnlineCourseHost.com allows you to organize students into categories. This is especially useful for managing classes, cohorts, or teams.
It simplifies the enrollment process, especially when dealing with large numbers of students.
With the group feature, you can organize your students in separate classes with different levels of access. A group can be a private coaching class, a team in your company, a customer, or partner team that you want to train, etc.
Here’s how to create and manage groups:
- Log in to your OnlineCourseHost.com account and navigate to your course dashboard.
- Select the course where you want to manually enroll students.
- Click on the "Admin" menu.
- Click on "Manage Students" on the left hand side of the screen.
- Click on "Manage Groups."
- Click "Add Group" to create a new group.
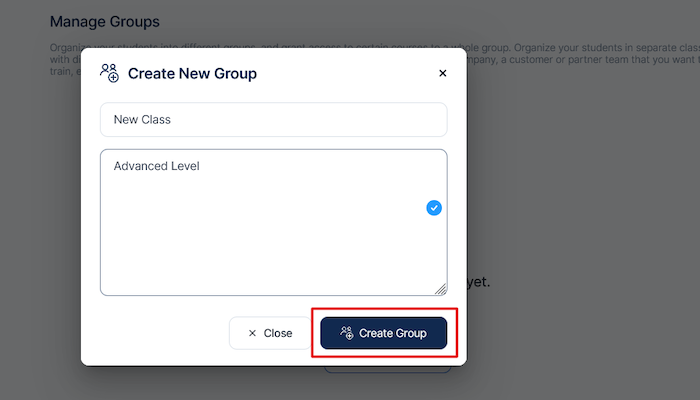
- Give your group a name and a description. Click on "Create Group" when done. Ensure the group a name reflects its purpose.
- Click on "Add Students To Group" to start adding your students.
- Add students to the group by manually entering their email addresses or selecting existing students from your course list.
- Assign courses to the group. This ensures that all students in the group are automatically enrolled in the assigned courses. We will talk more on this later in this guide.
Examples of how the Groups feature can be used
With the group feature, you can separate your students in Cohorts, you can create different groups to add your students to and grant a whole group access to certain courses.
To do this:
- Log in to your OnlineCourseHost.com account and navigate to your course dashboard.
- Select the course where you want to manually enroll students.
- Click on the "Admin" menu.
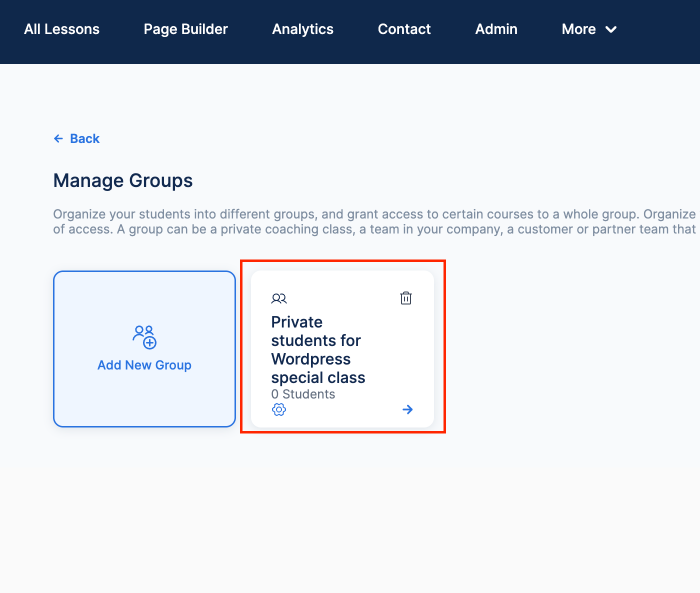
- Click on "Manage Students" on the left hand side of the screen, and "Manage Groups" as shown below.
- Click on "Add New Group".
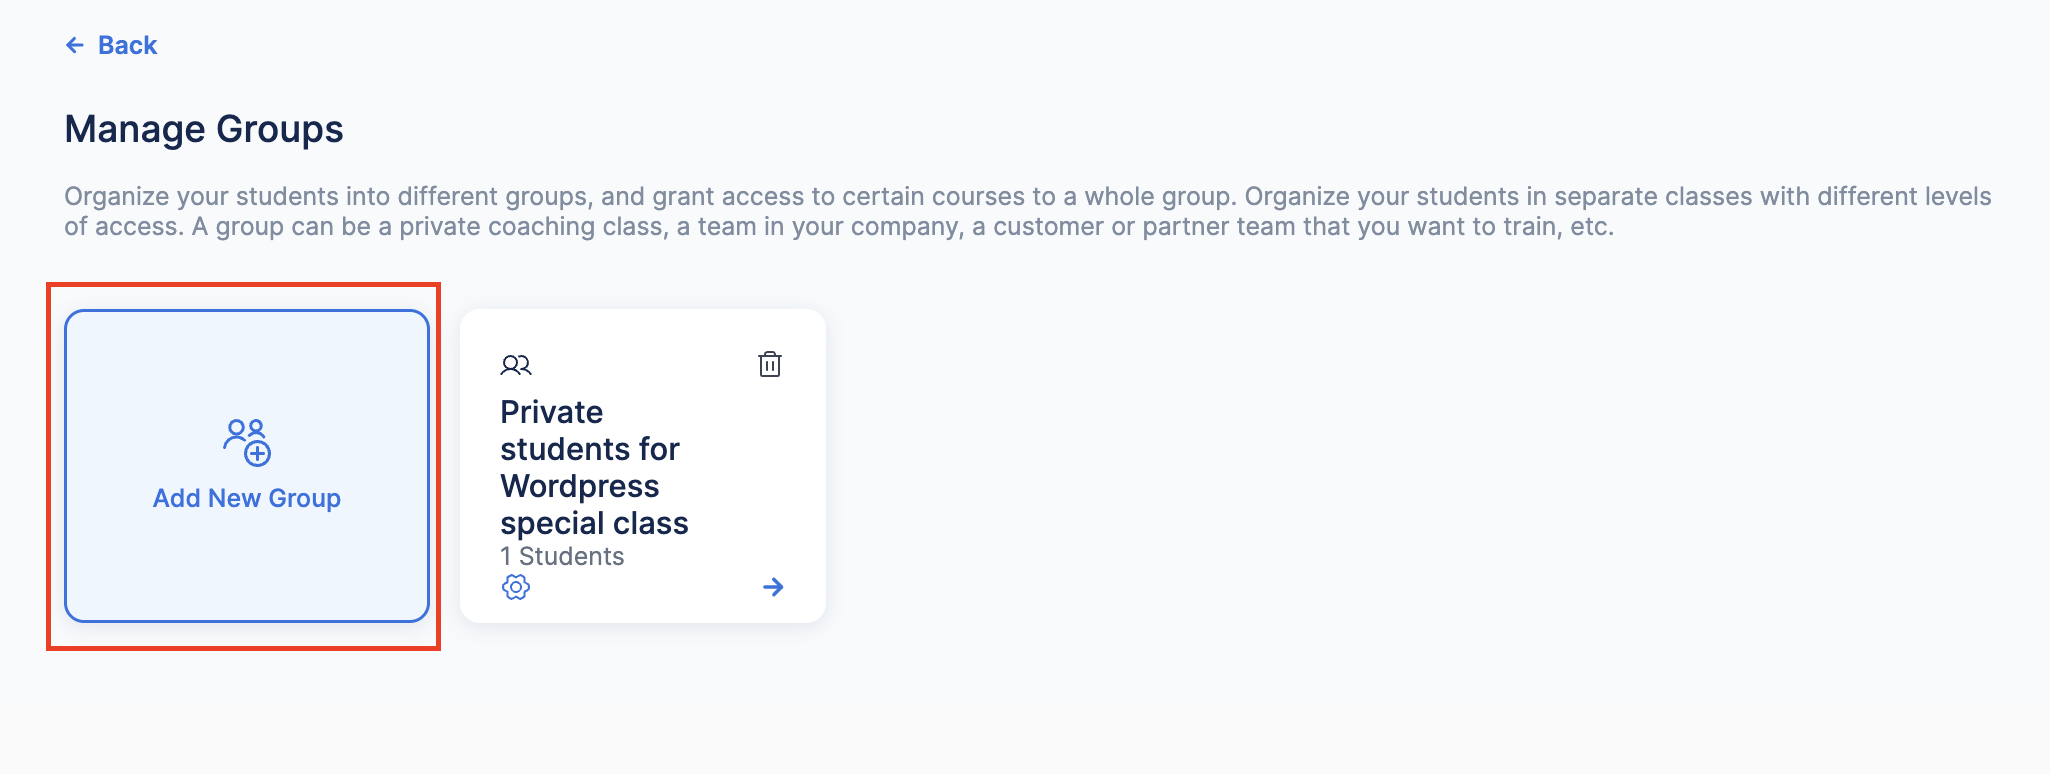
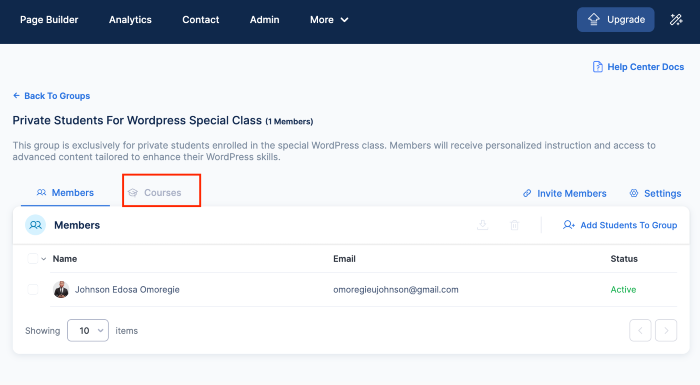
Note, in the image above, I already created a private special class for WordPress students who are already skilled creating WordPress plugins and themes, but needs to learn more and keep updated with the latest trend in the WordPress development community.
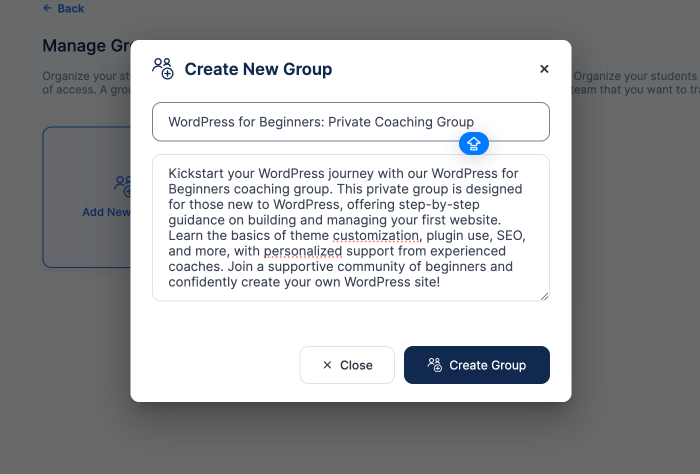
Now I want to create a different group for students who wants private teaching and are beginners in learning how to create websites using WordPress specifically.
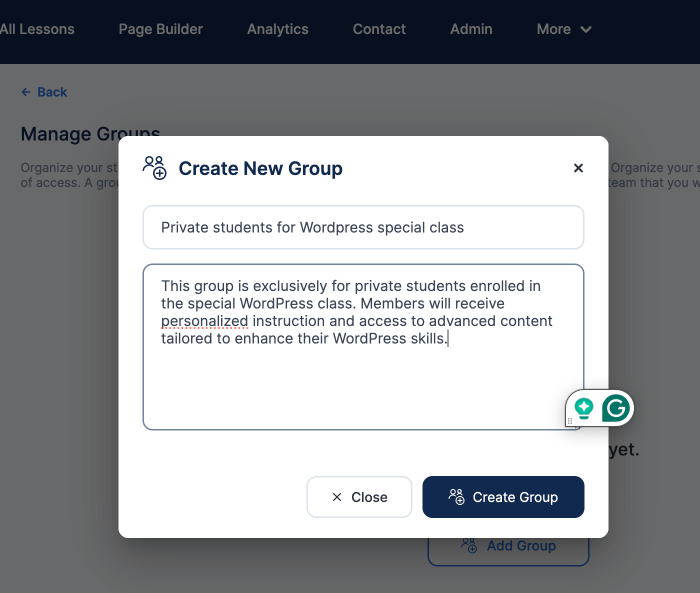
- Fill in the name of the group and description. Click "Create Group."
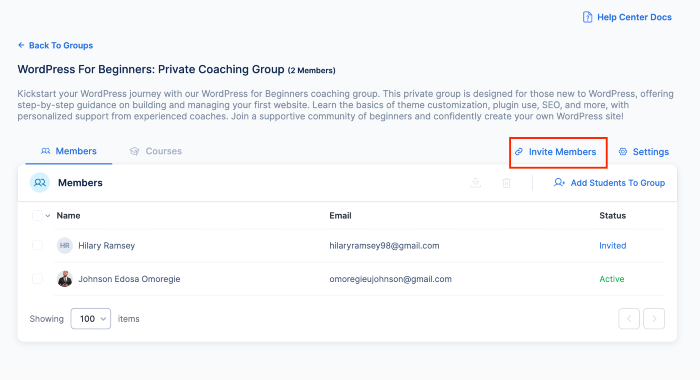
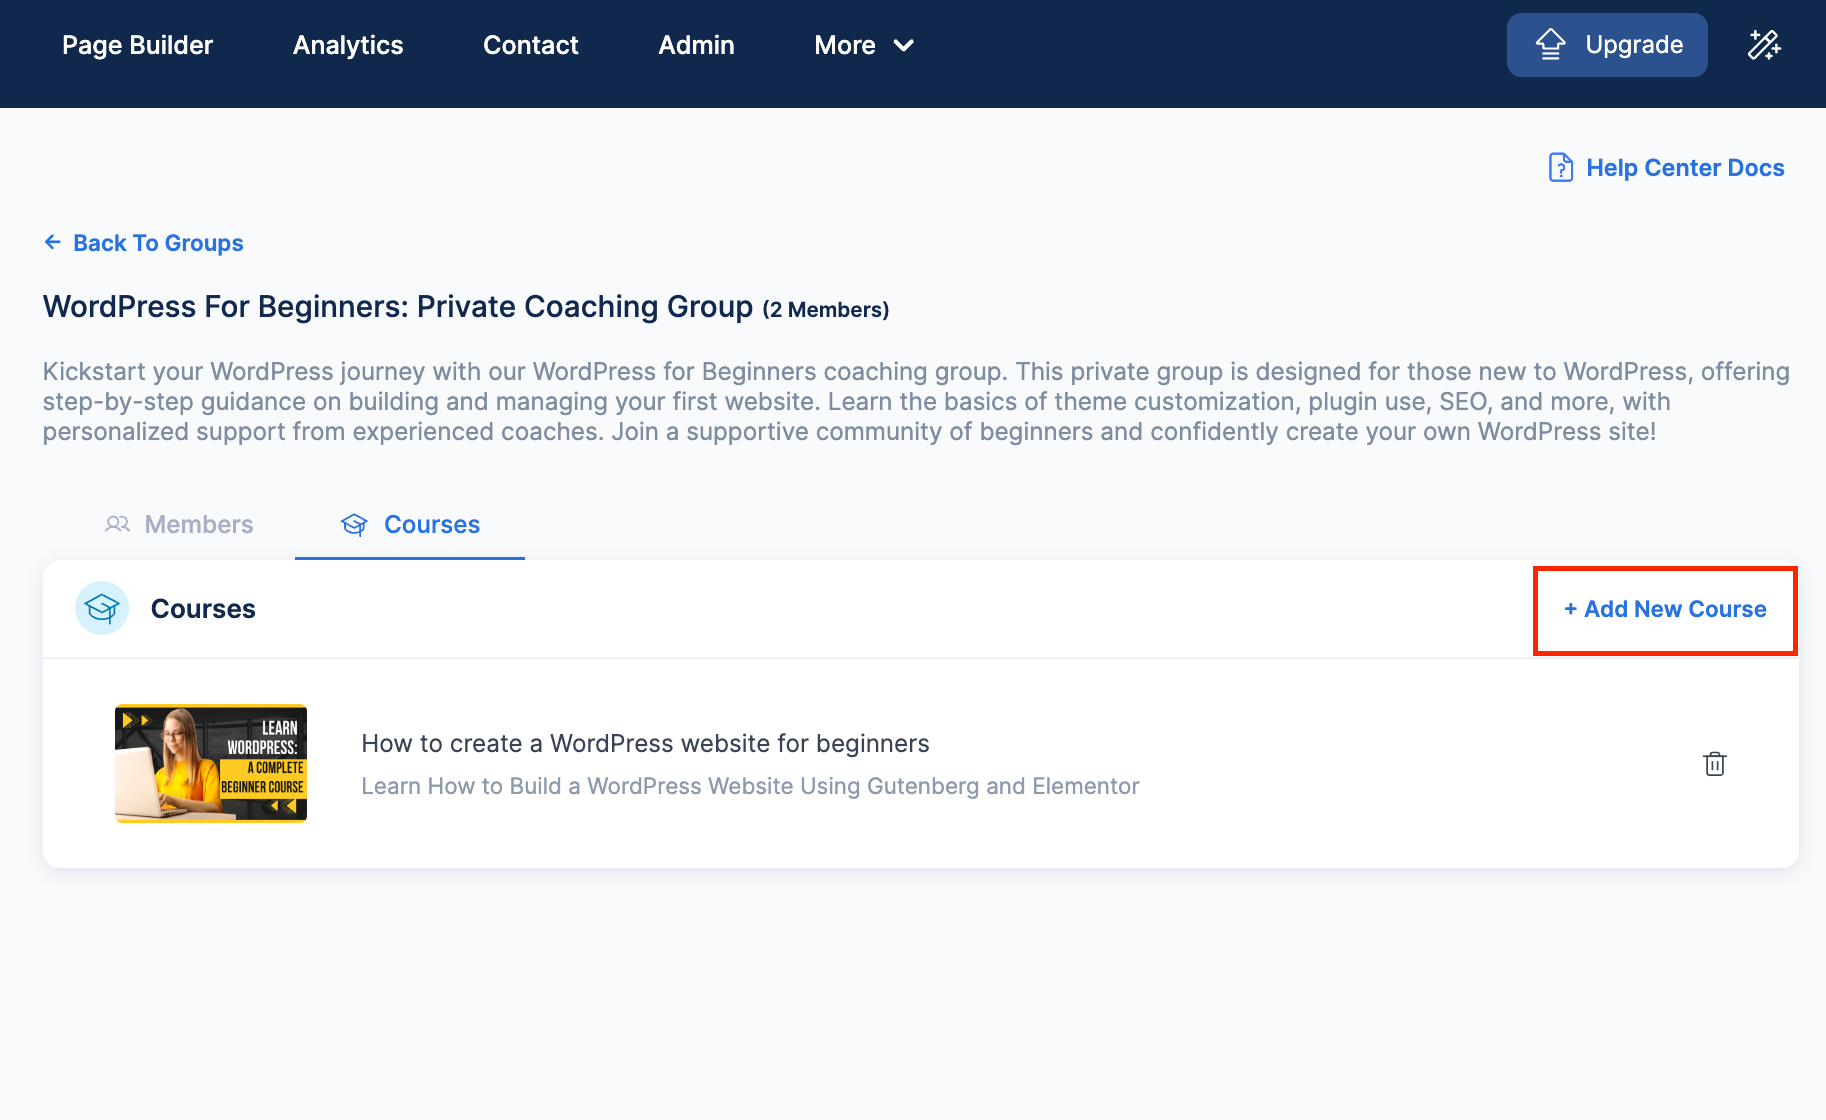
- The WordPress for Beginners Private Coaching Group is created.
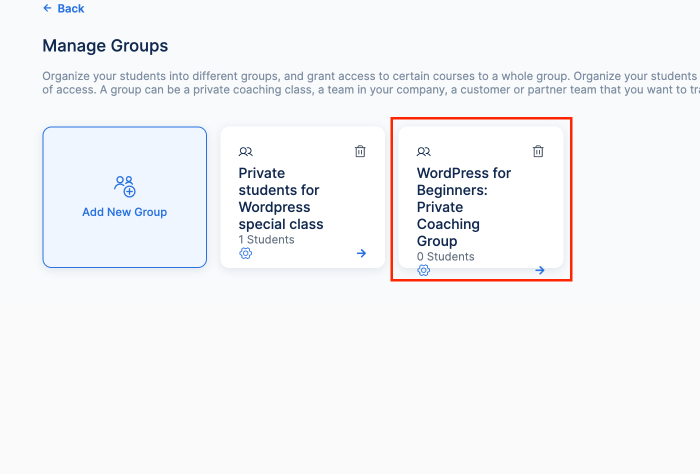
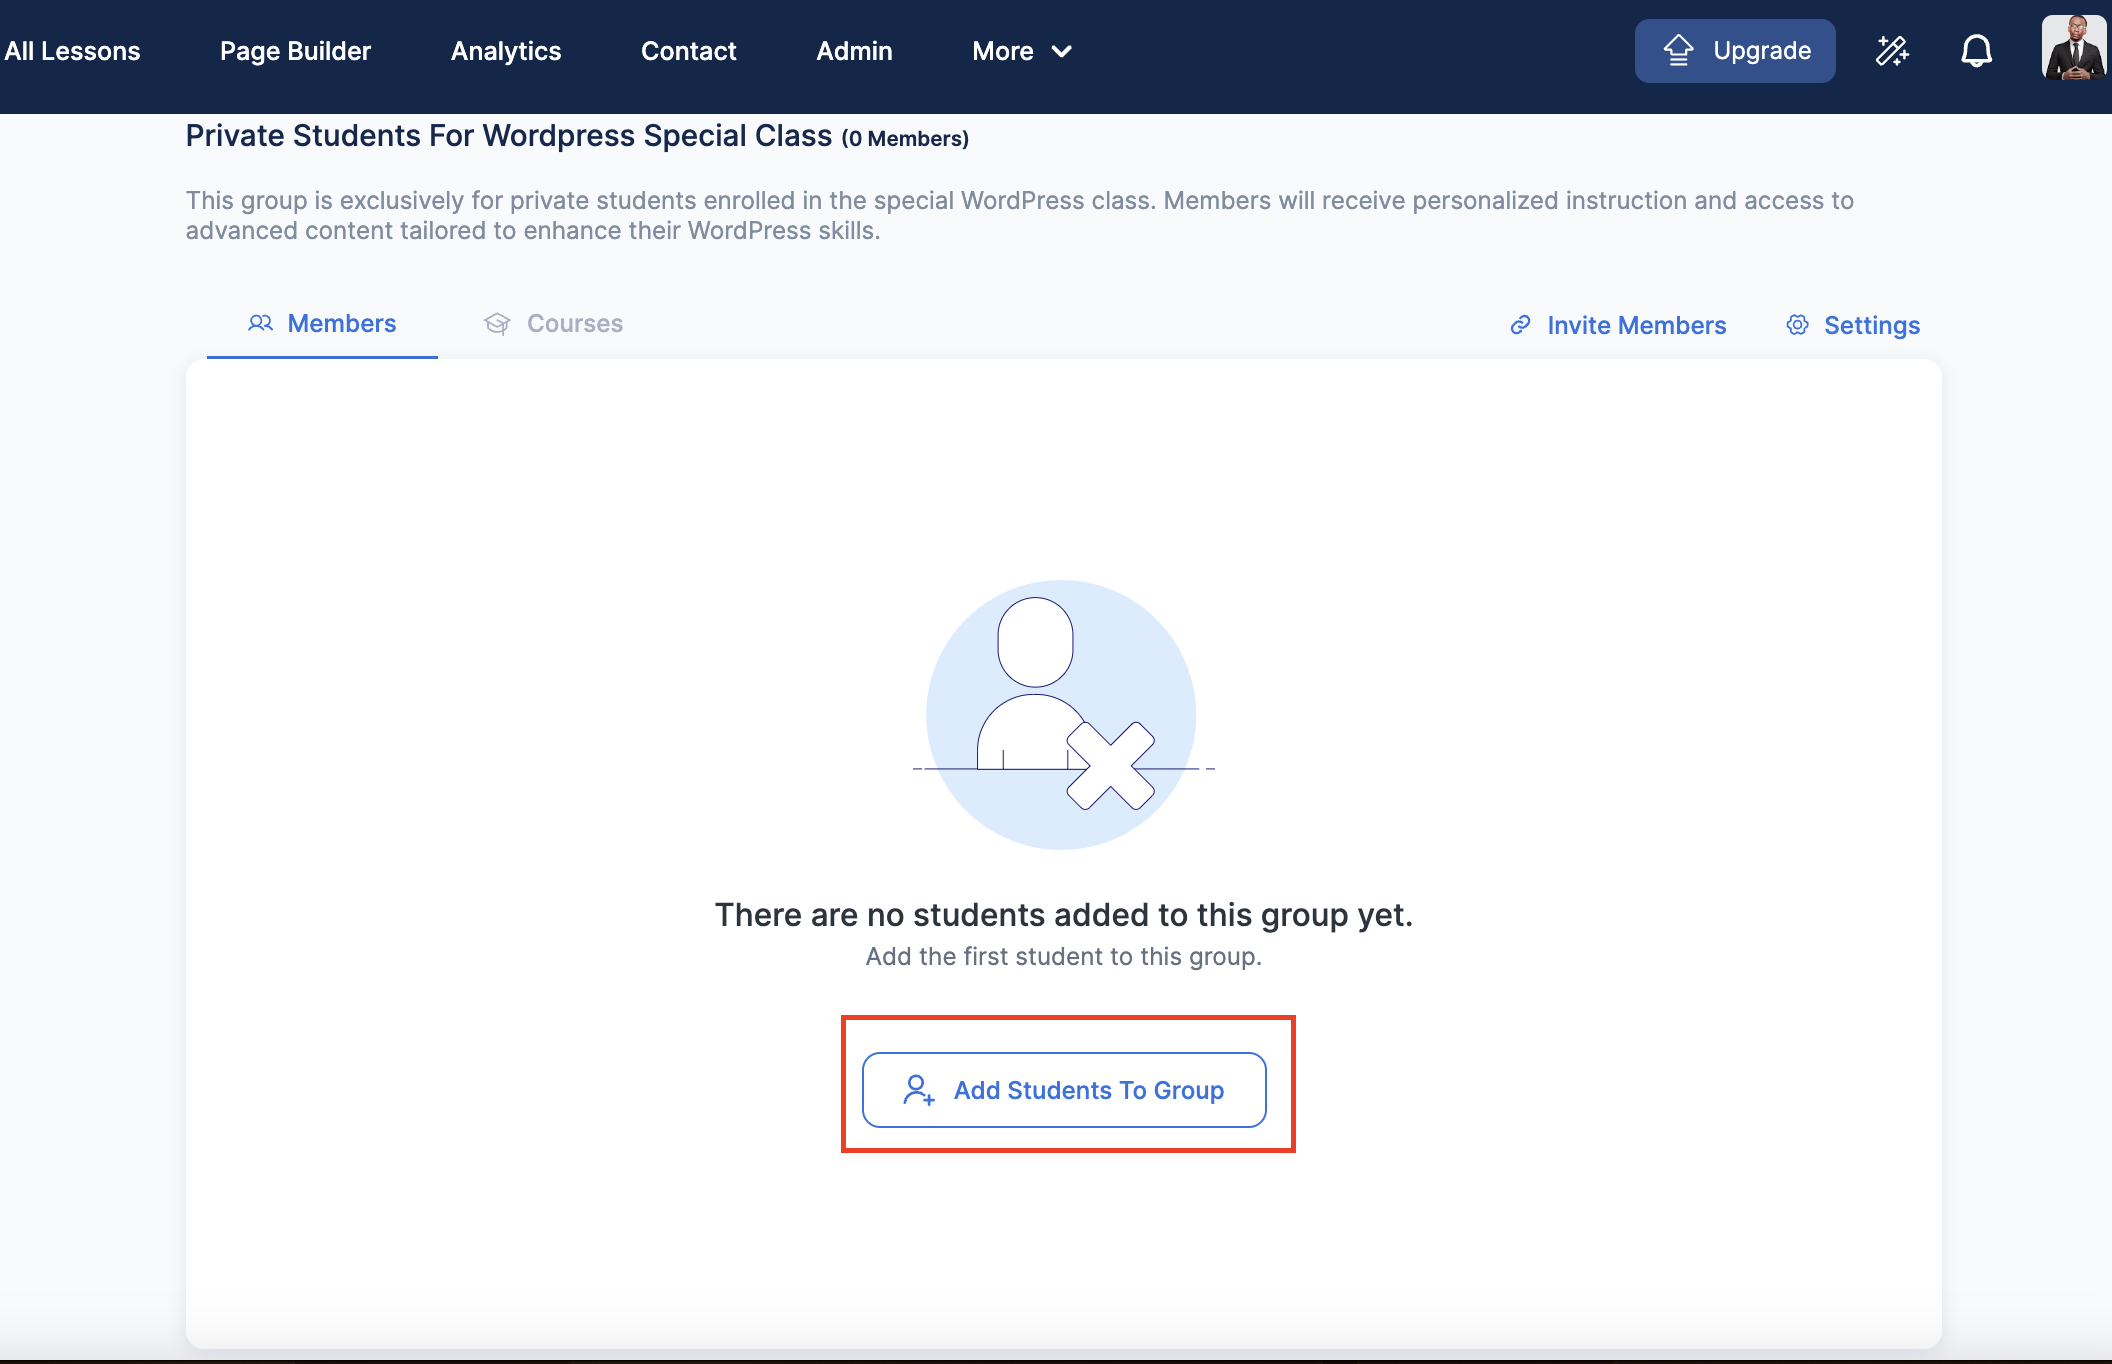
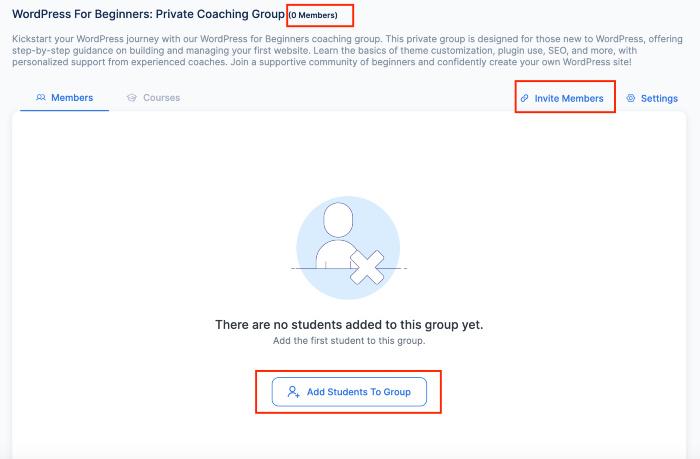
Now, we need to add students to this group. To do this, click on the group name.
OnlineCourseHost.com provides you with two ways to add students to your group. They are:
1. Using the "Add Students To Group."
- Using "Invite Members."
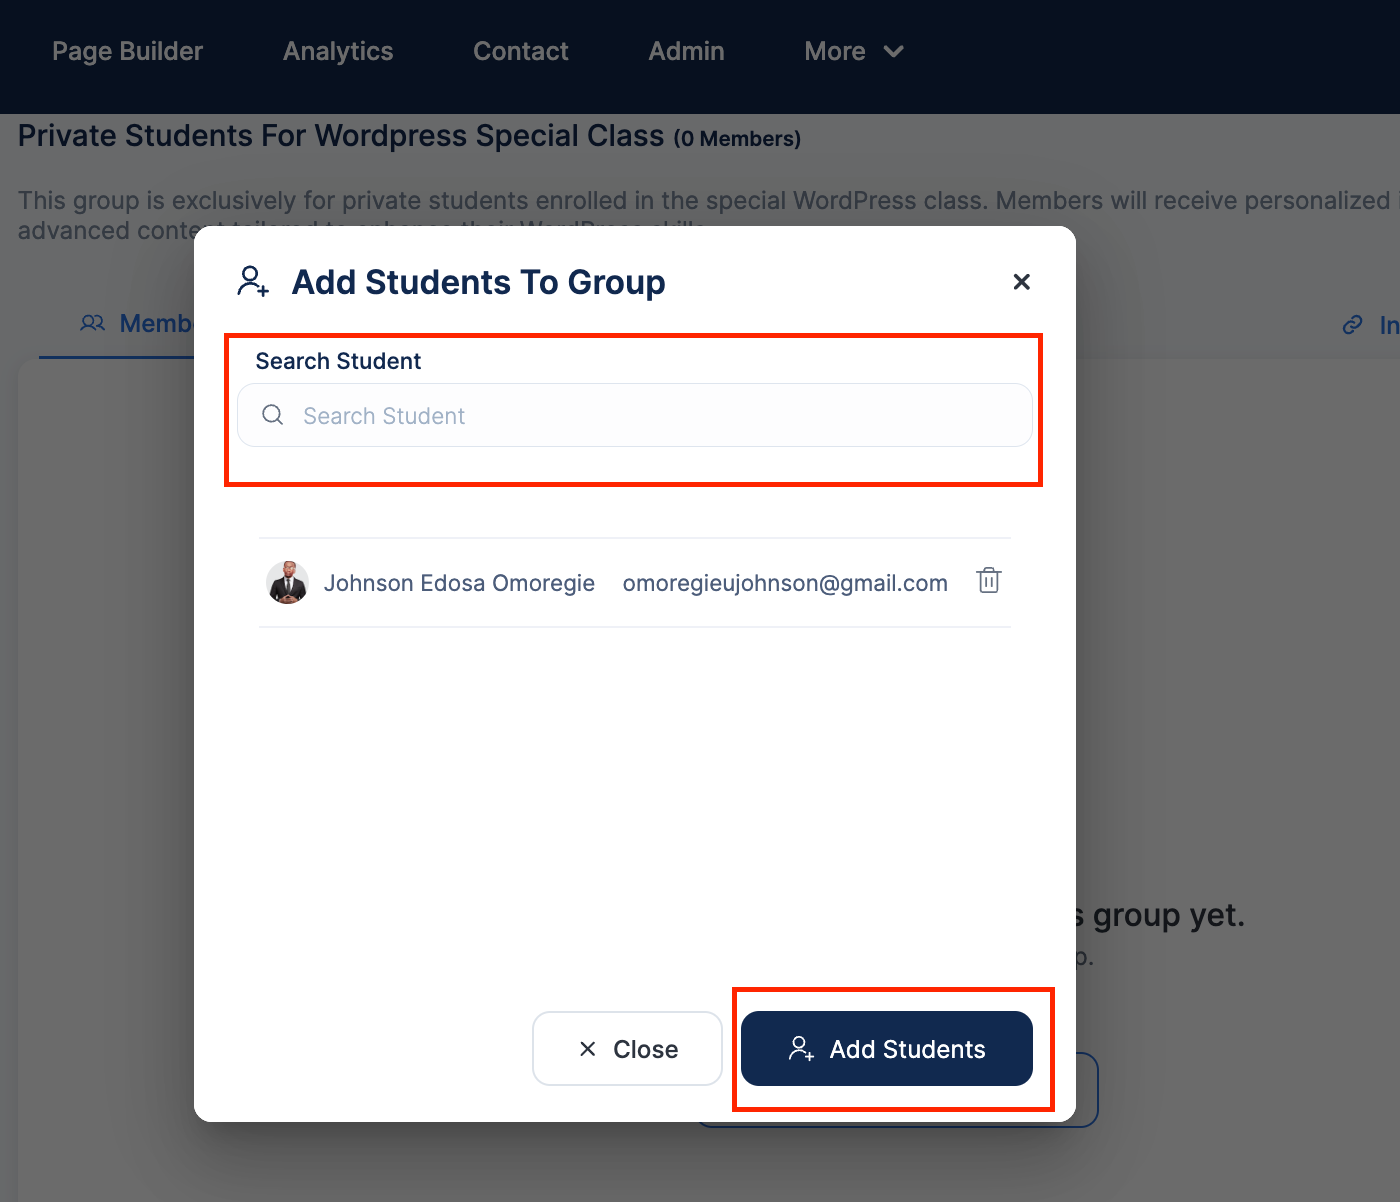
Using "Add Students To Group":
You can only use this feature for students who already signed up for one of your course.
- Click on "Add Students To Group."
- Type in at least 4 characters in the search bar to search for the student name that you want to add. You can add a single student and click on "Add Students",
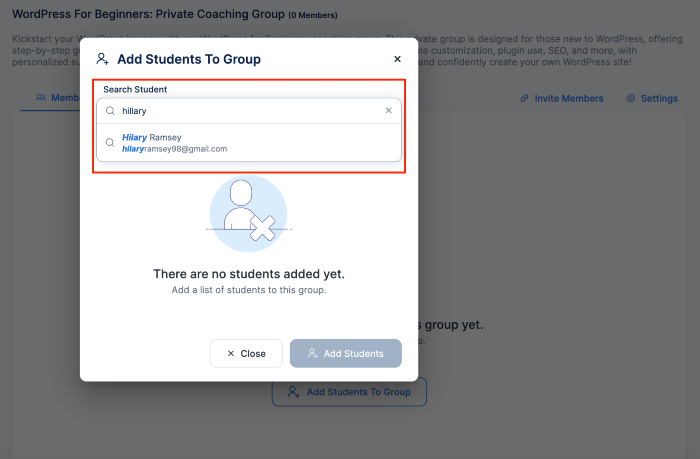
- Or you can search for all the names of the students, click to add them before clicking "Add Students."
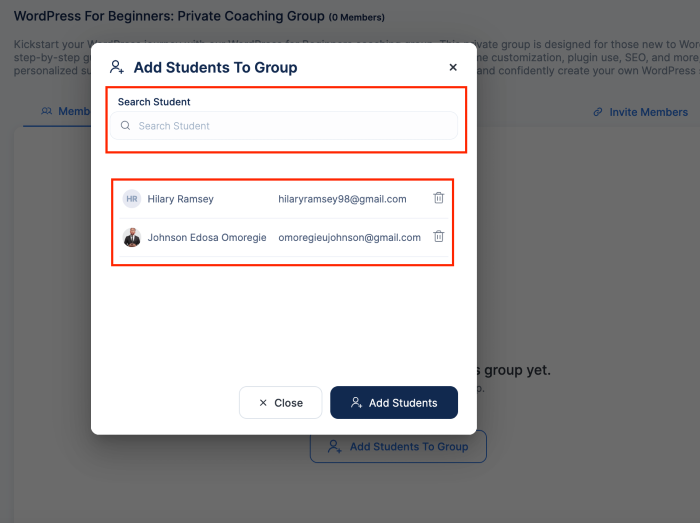
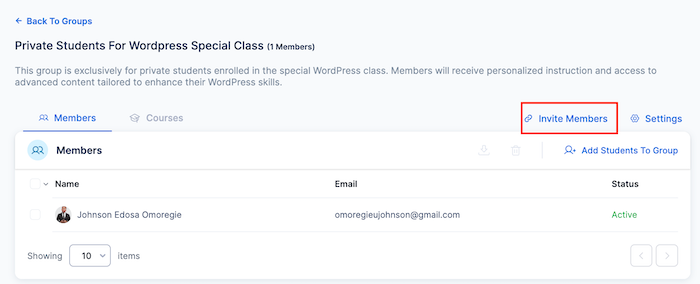
Here is an example of two students added to the "WordPress for Beginners Private Coaching Group."
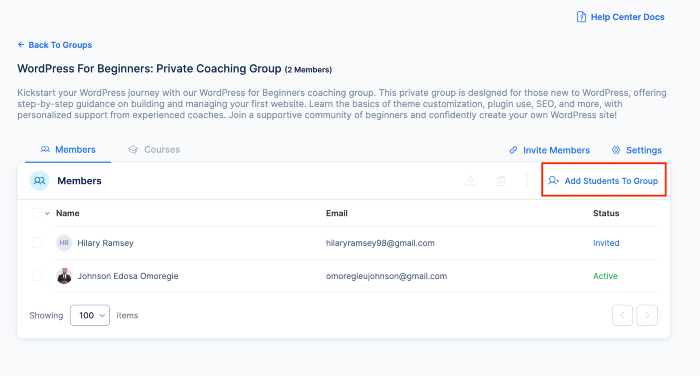
To add more students you can always click on the "Add Students To Group."
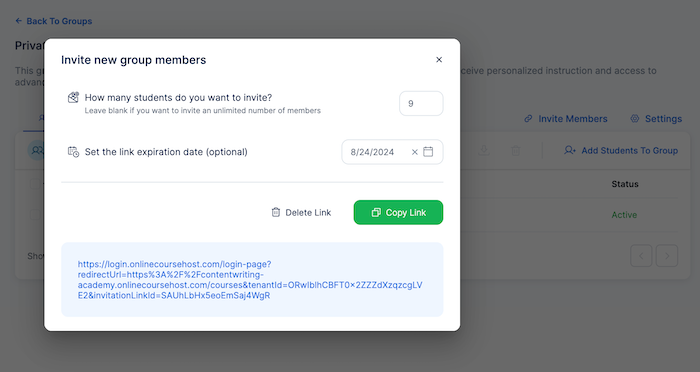
Using "Invite Members":
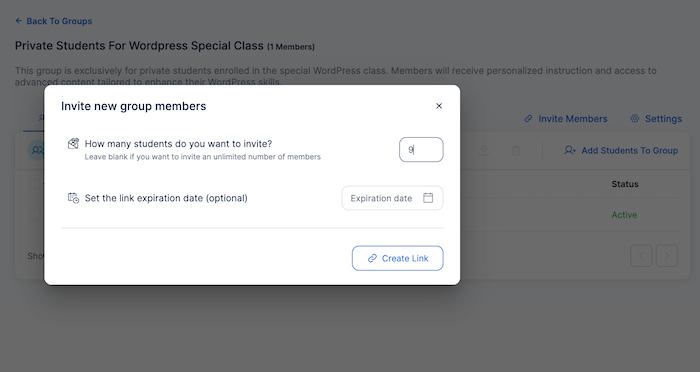
This feature allows you to invite external students into the group by generating invitation links. To do this:
- Click on "Invite Members."
- Type in the numbers of students you want to invite
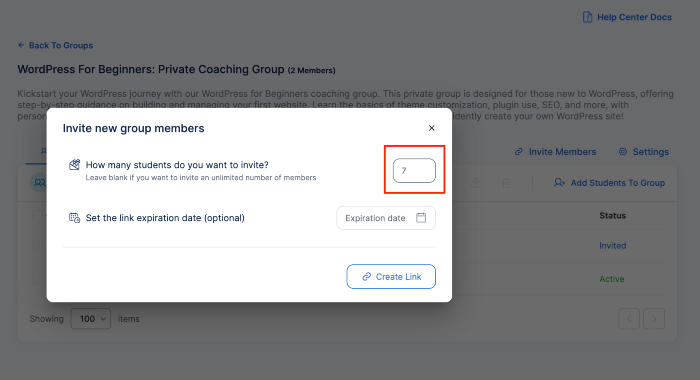
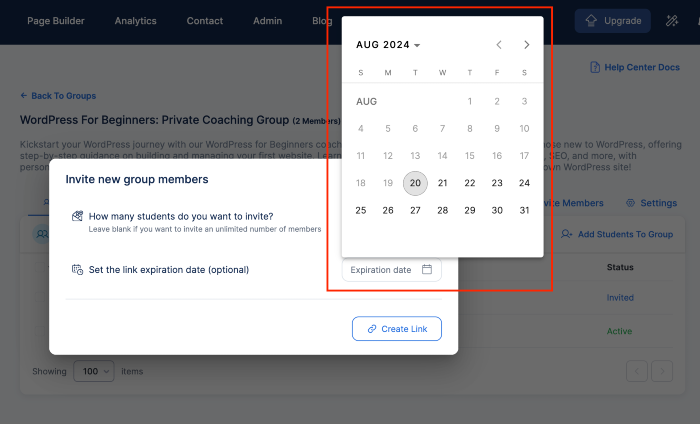
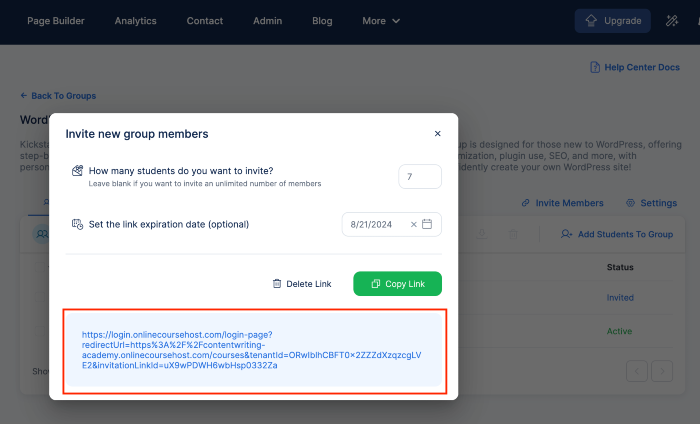
- Set an expiry date for the redemption of the link, and click on "Create Link."
- Next, copy the group link and send to the students you want to invite to the group.
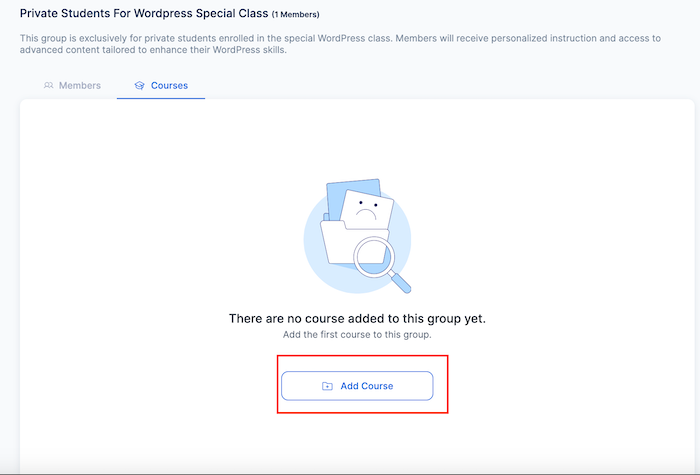
Assigning Courses to the Group
The next thing after creating a group is to assign the students in that group to a course. You can easily do this by:
- Clicking on the course tab.
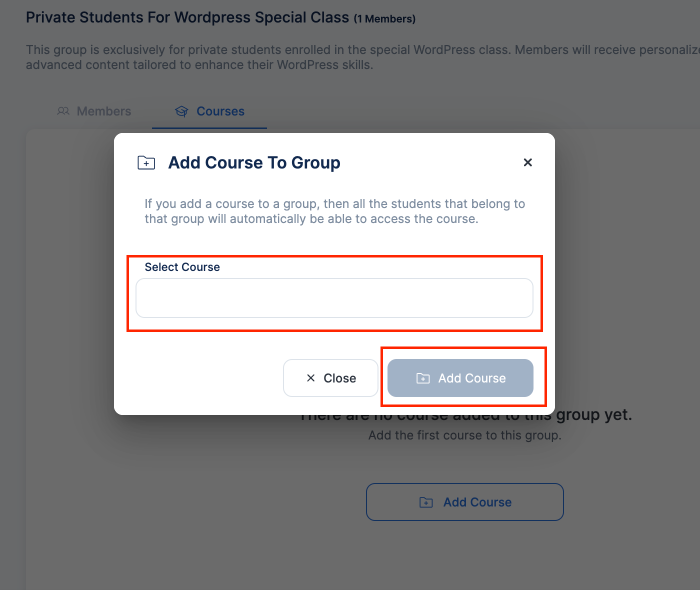
Click on "Add Course" to select the course you want to assign to the group.
- Select the course to add to the group and click on "Add Course."
- You should see the course as shown in the image below.
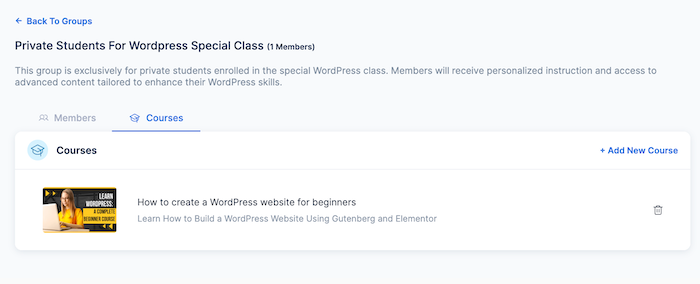
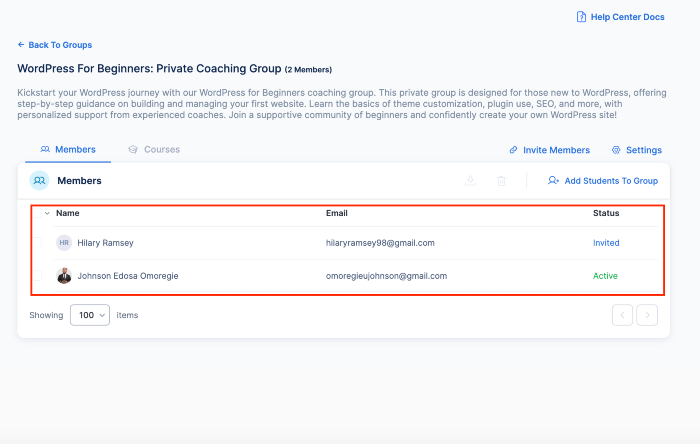
Once done, an invitation email will be sent to your students so they can create passwords and sign in to start the course.
To assign the students in that group to more courses, click on "Add New Course."
Remember, you can create a group as a private coaching class, a team in your company, a customer, or partner team that you want to train.
Understanding Student Enrollment
Managing how students enroll in your courses is a very important part of running an online learning platform.
A platform like OnlineCourseHost.com offers flexible options for enrolling students, allowing you to control who gets access to your courses and how they join.
Here's a simple breakdown of the two types of enrollment and how to manage them:
- Automatic Enrollment: When students sign up on your platform, they are automatically enrolled in your courses. This is perfect for public courses that you want to be easily accessible.
- Manual Enrollment: You need to manually enroll students in certain cases, like when a course is private or hidden, or when students pay outside the platform. This allows you to control who has access to your content.
Making Courses Public or Private
You can also make your course public or private. Let’s look into these two types.
- Public Courses: To maximize the reach of your courses, you might want to make them public. Public courses are visible and accessible to anyone who visits your website.
To ensure your courses are public:
- Log in to your OnlineCourseHost.com account.
- Navigate to the "Courses" section.

- Edit the course you want to make public.
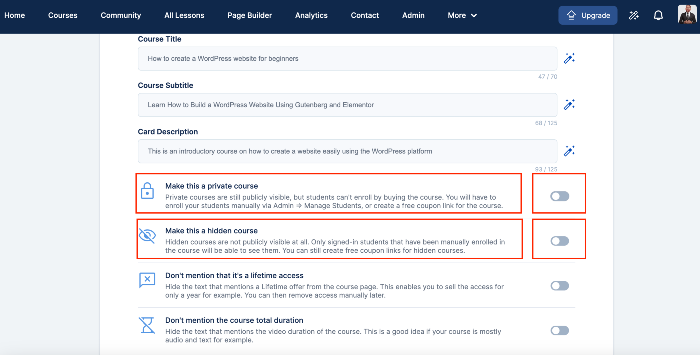
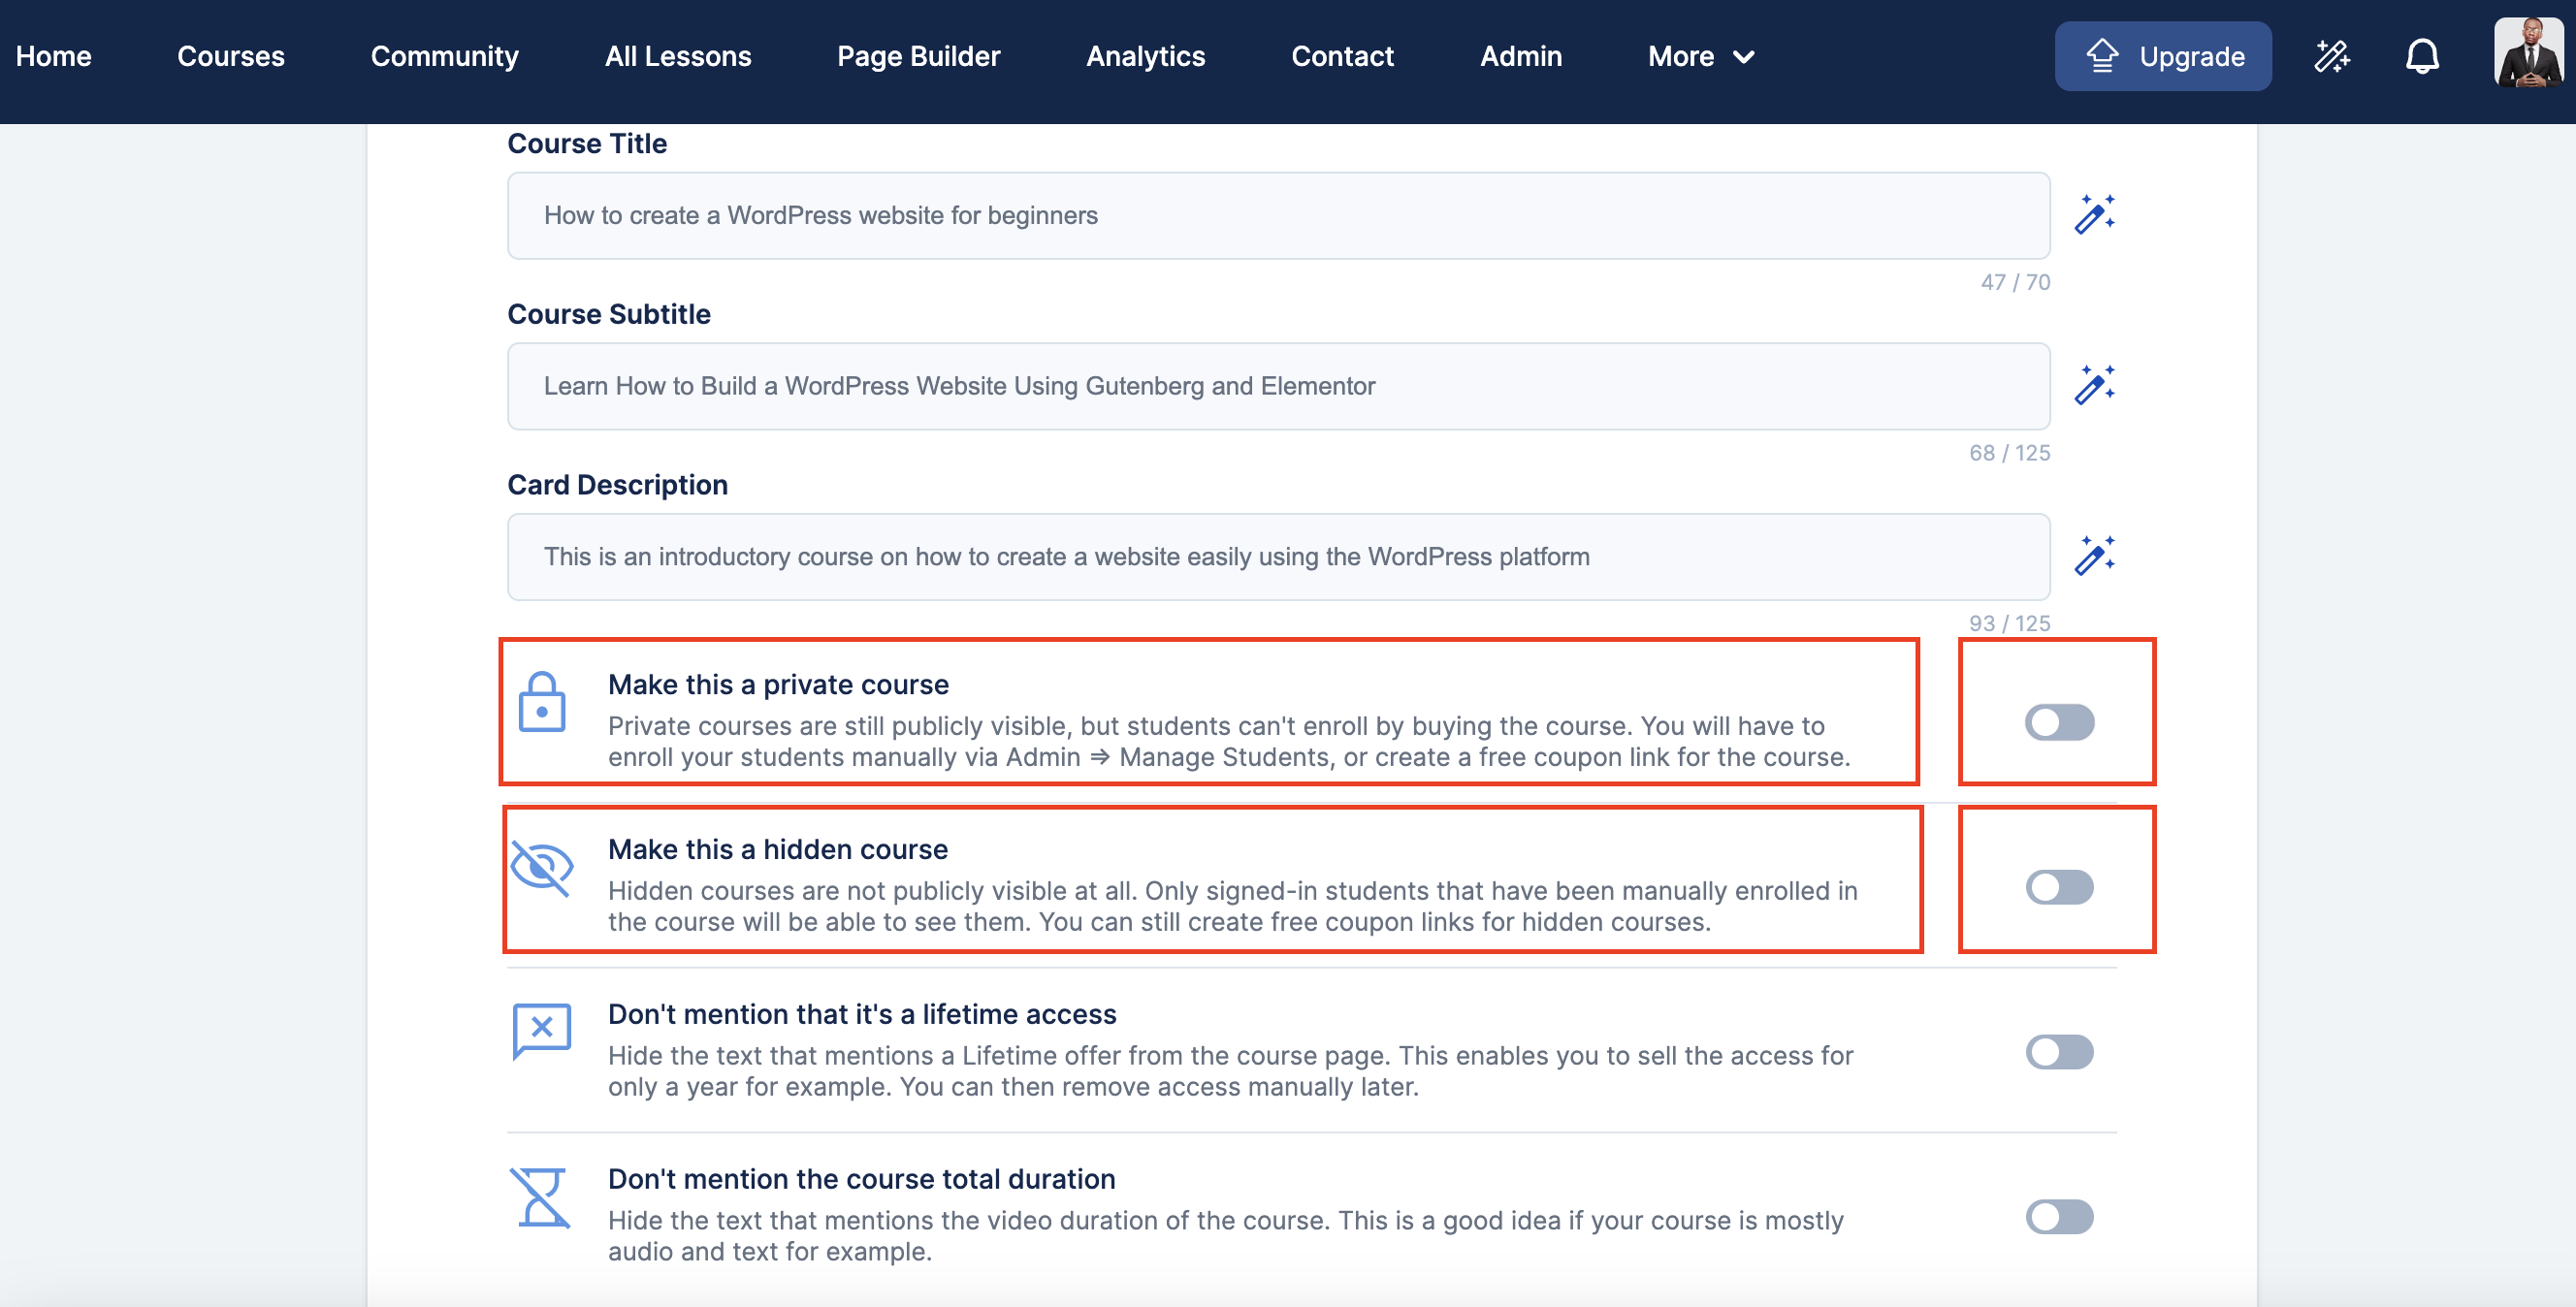
- On the "Landing Page" settings, ensure that the course is not marked as private or hidden by toggling off the "Make this a private course and "Make this a hidden course."
Making your courses public lets anyone browse, sign up, and start learning without any extra steps from you.
Sometimes, you might want to restrict access to a course. OnlineCourseHost.com offers two options for doing this: private and hidden courses.
- Private Courses: These are visible but can’t be purchased or enrolled in automatically. You control who gets access, which is useful if you want to show the course but only allow certain students to join.
- Hidden Courses: These are completely invisible to the public. Only students you manually enroll can access them, making them ideal for exclusive content like private coaching or company training.
To set a course as private or hidden:
- Log in to your account.
- Go to the "Courses" section and select the course you want to edit.
- Under the "Landing Page" settings, activate the sliders for "Make this a private course" or "Make this a hidden course," depending on your needs.
Knowing the difference between public, private, and hidden courses helps you control who can access your content and when, ensuring it reaches the right students at the right time.
How to Manually Enroll Students
While automatic enrollment is convenient, sometimes you may need to manually enroll your students.
OnlineCourseHost.com makes it easy to manually add students, manage groups, and create user accounts. This is useful when your course is private, hidden, or you collect payment for your course externally.
So, to manually enrol your students, you have to set your course to hidden or private.

Here’s how to do it:
- Log in to your OnlineCourseHost.com account and navigate to your course dashboard.
- Select the course where you want to manually enroll students.
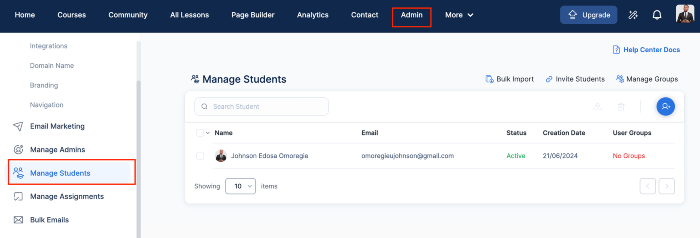
- Click on the "Admin" menu.
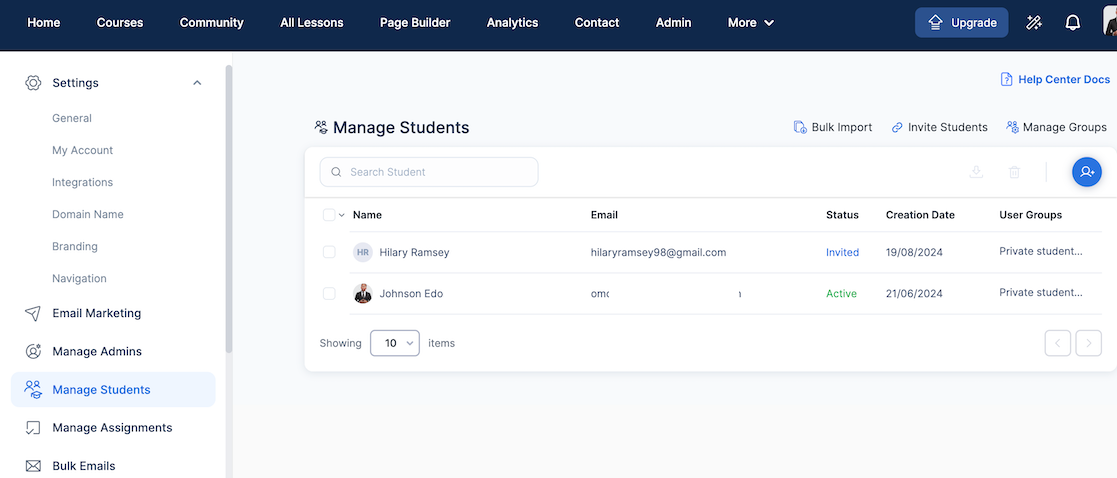
- Click on "Manage Students" on the left hand side of the screen.
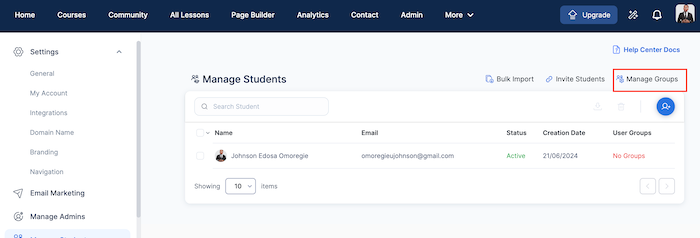
- Click on "Manage Groups."
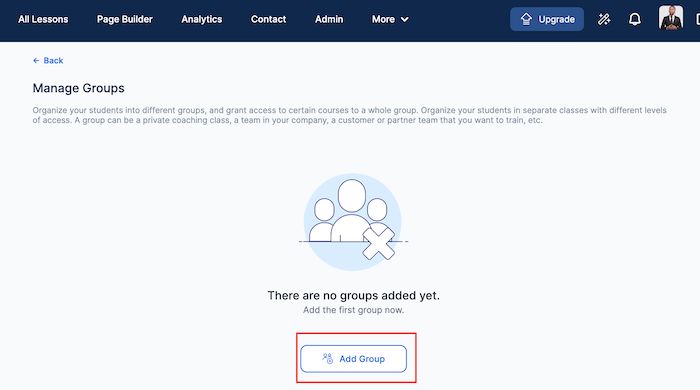
You can create groups, add your students to them, and assign courses to each group.
- Click "Add Group" to create a new group.
- Give your group a name and a description. Click on "Create Group" when done.
Once the group is created, you can add existing students, assign courses, and invite external students using invitation links.
You should be able to see your newly created group as shown in the image below. Go ahead and click on it.
- Click on "Add Students To Group" to start adding your students.
- You can search for existing students name to add to the group. Click on "Add Students" to add students to group.
- You can assign a course to the group by clicking on the course tab.
Click on "Add Course" to select the course you want to assign to the group.
- Select the course to add to the group and click on "Add Course."
- You should see the course as shown in the image below.
After this has been done, an invitation email will be sent to your student's email addresses so that they can create their passwords, and sign in to take the course.
Using the Invite Students Link Feature
While you can assign your existing students to the group using their names and email, you can also create and send invitation links to formally invite them to your platform.
This method is great for enrolling students who didn’t sign up through your platform or need special access.
Here's how to do this:
- Login to your account and click on Admin
- Scroll down the left side of your screeen, and click "Manage Students" then click "Invite Members."
- Specify the number of students you want to invite using the link, and set an expiry date for the redemption of the link.
- After creating this link, you can then send it to your students, so that they can sign up on your website, and start taking their courses.
Invitation links are particularly useful for quickly enrolling students in private or hidden courses without manually entering their details.
Manual Enrolling Students Using Email Invitations
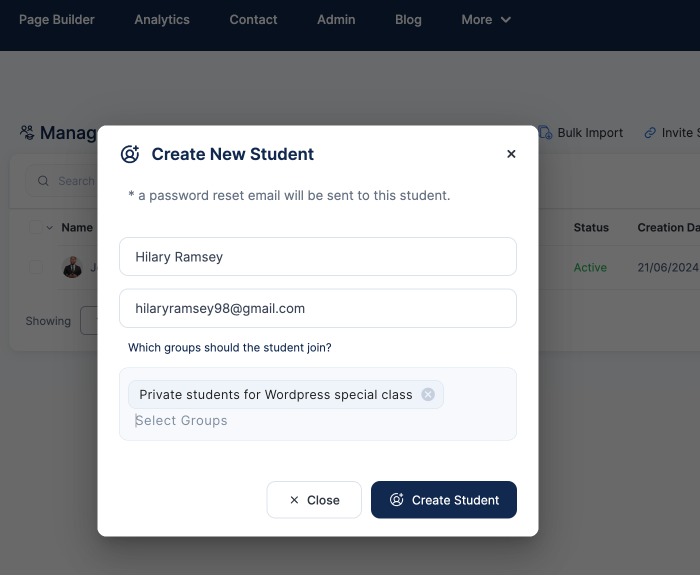
To manually enroll your students using a form,
- log in to your account. click Admin
- By your left-hand side, scroll down, and click Manage Students. Then "Create New Student." This is the blue image as shown in the image below.
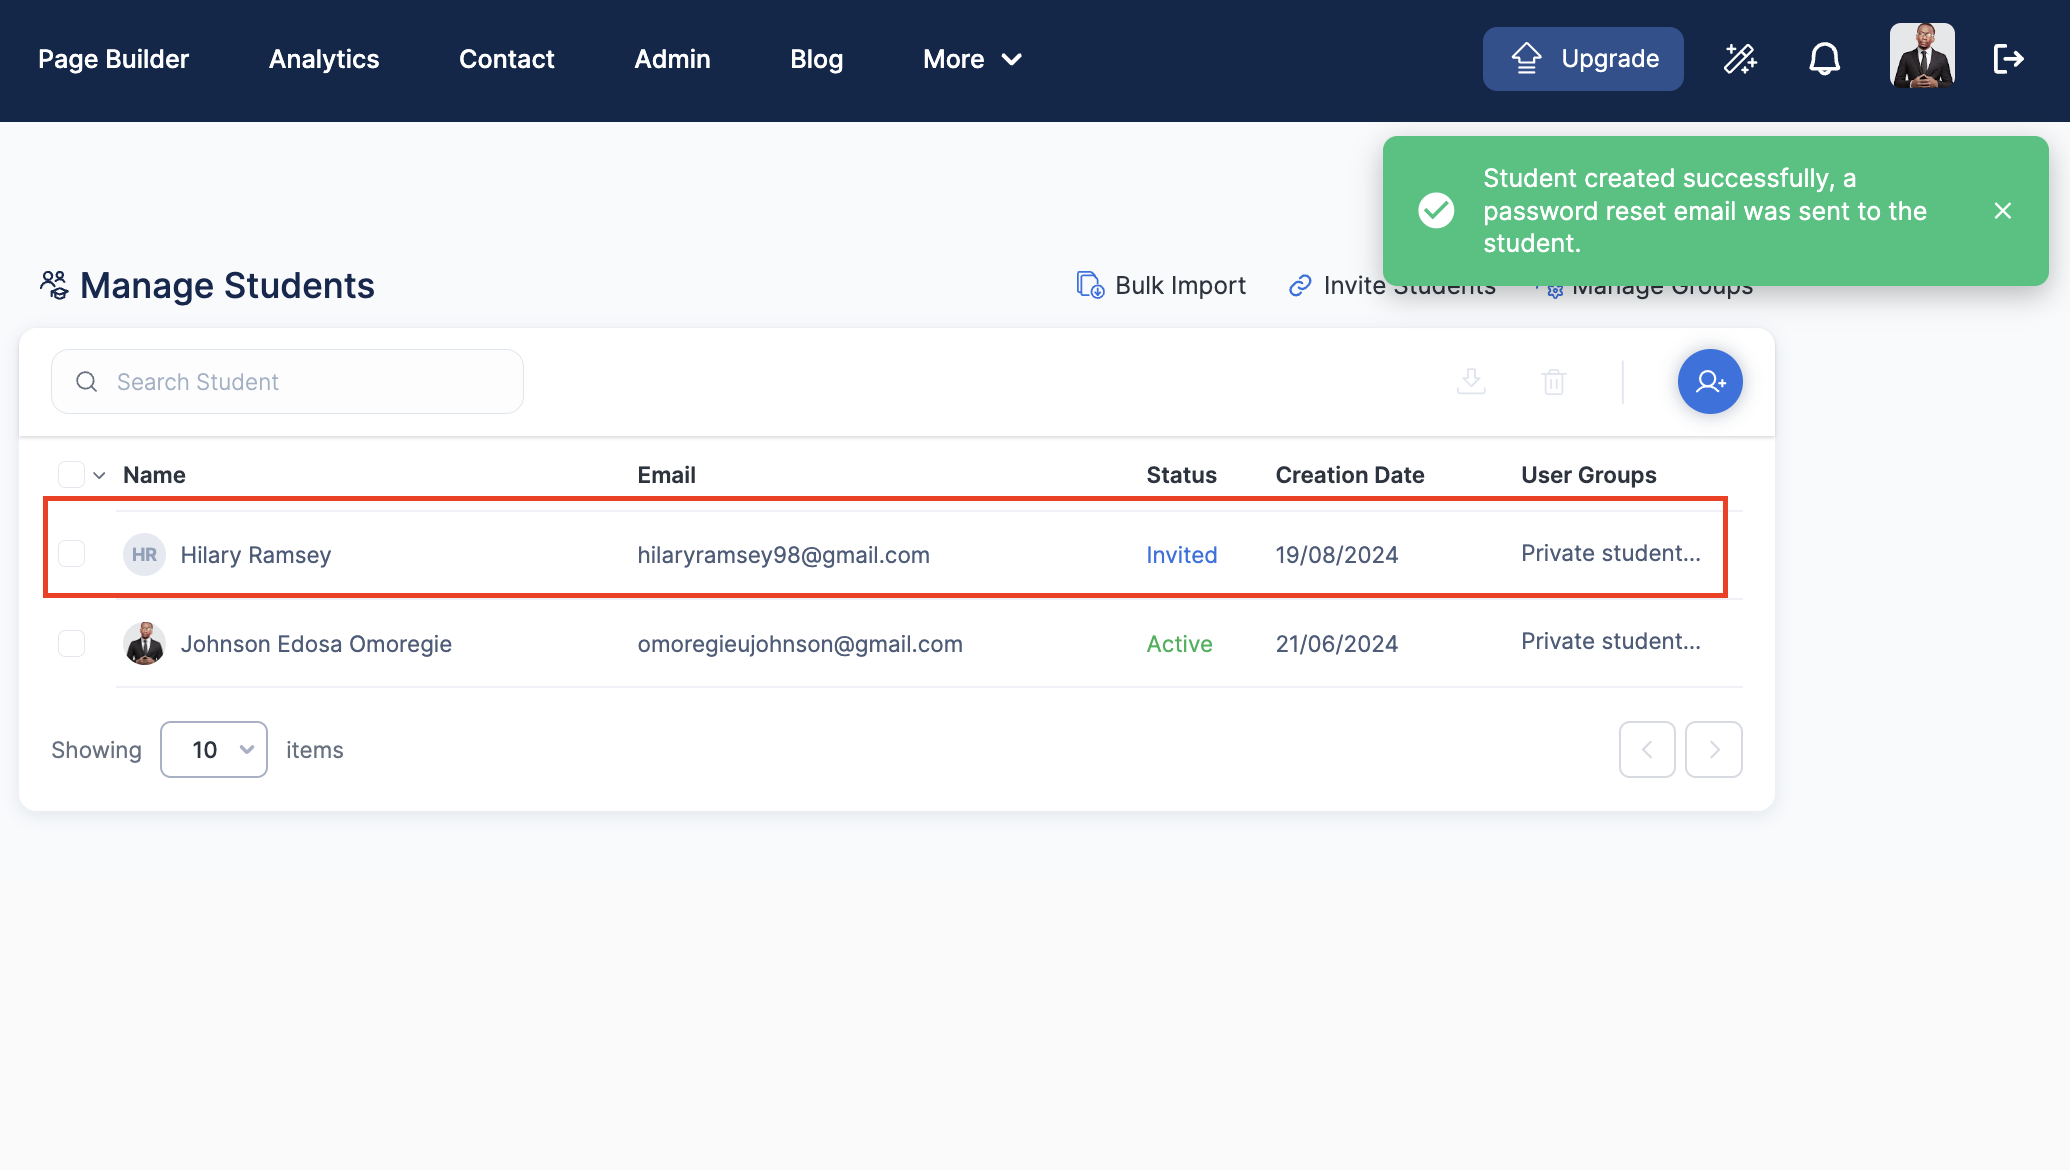
- Fill in the student's name, email and select the group to assign the student to. Click "Create Student."
- You still see the students name added to the group
Email Invitations: When you manually enroll a student or create a new user, OnlineCourseHost.com sends an email with:
- A link to log in to their new account
- Instructions on accessing the course
- Any necessary passwords or login details
Students click the link, log in, and immediately access the course. This process simplifies manual enrollment and ensures students start learning right away.
Understanding these steps helps you manage student access effectively, ensuring they get the right content on time.
Advanced Student Management Techniques
Managing a large number of students can be complex, but OnlineCourseHost.com provides advanced features to simplify this task. This section explains how to:
- Search for students
- Import student data
- Edit student information
- Manage assignments
These tools help you efficiently handle student data and track their progress.
Searching for Students
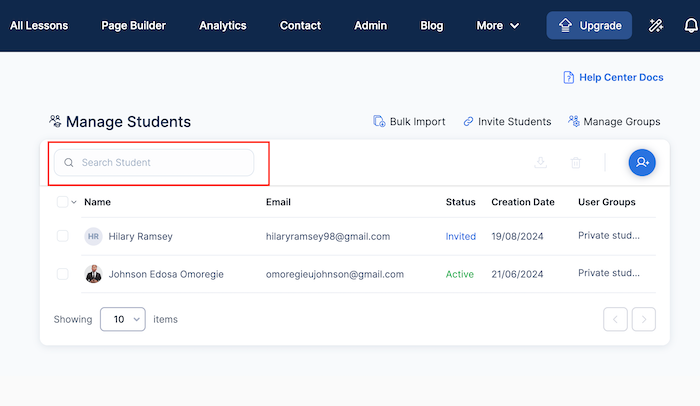
When managing many enrolled students, quick searches are essential. OnlineCourseHost.com offers several search options:
- By Name: Enter the first or last name to find matching students.
- By Email: Fastest method since each email is unique.
- By Stripe ID: Useful for verifying payments and resolving payment issues.
These options help you easily update information, check enrollment status, or track student progress.
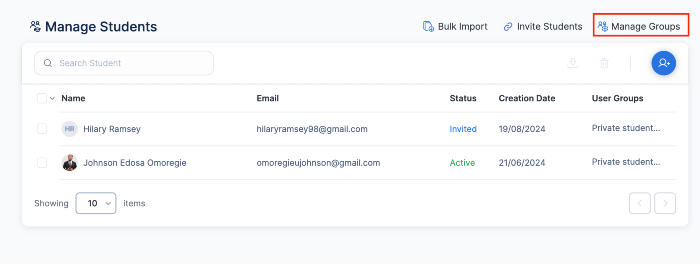
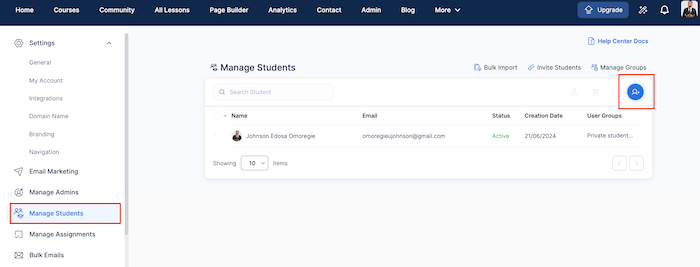
To search for students, go to admin/manage students and use "Search Students" to search for your student.

This is particularly useful if you have many students, and you do not want to keep scrolling down, you can search using their email addresses, names, Stripe Customer ID, Stripe Subscription ID, or the last 4 digits of a credit card.
Importing Student Data
If you’re transitioning from another platform or have a large group of students to enroll, bulk importing is a time-saving feature. Here’s how to import student data:
Bulk importing:
Bulk importing is especially useful for onboarding large groups of students without having to manually enter their information one by one.
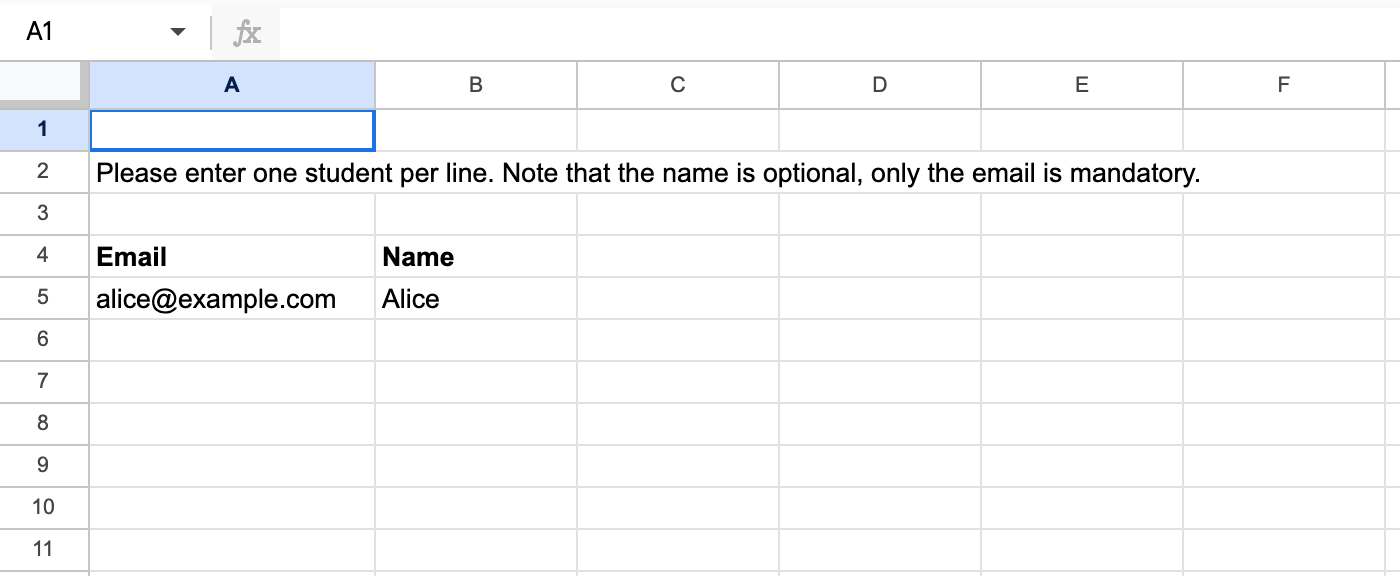
- Prepare your student data: Create a spreadsheet (usually in CSV format) Use the format shown below. Call this "Enrollments Sheet".
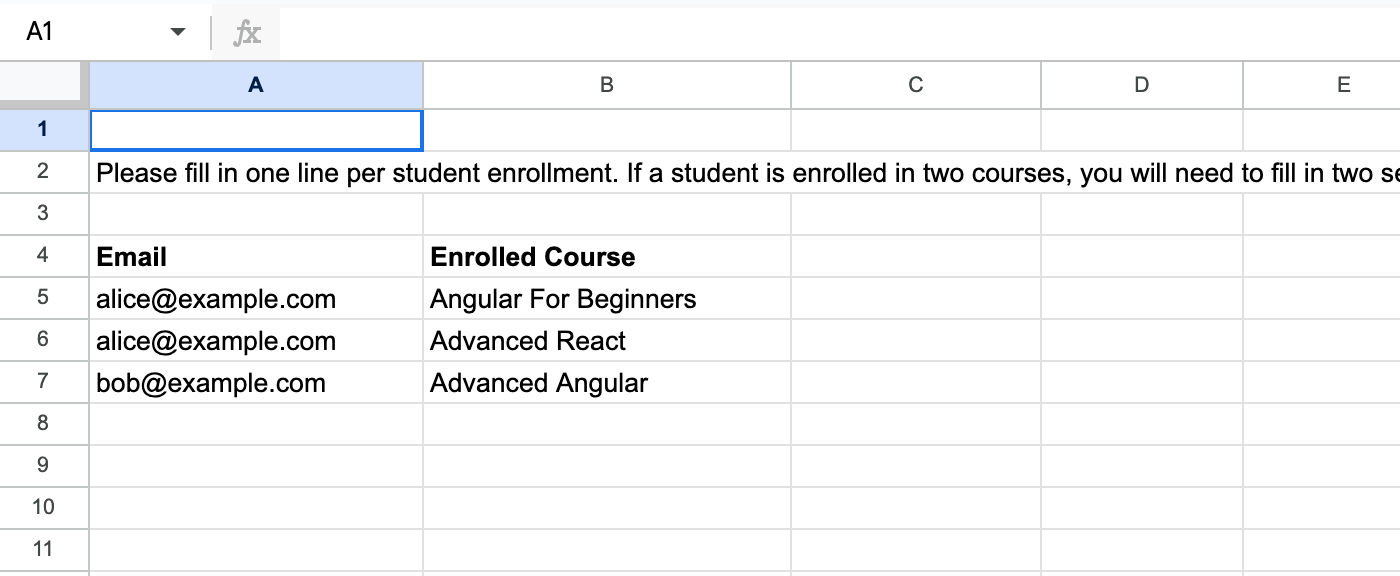
- Create another using the format shown below. Save this as "Students Sheet".
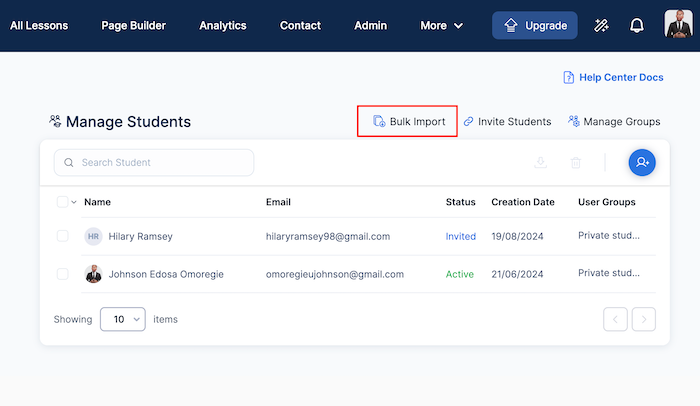
You can also go to the "Manage Students" section on your OnlineCourseHost.com dashboard and click on "Bulk Import."
- Select "Enrollments Sheet" or "Students Sheet" depending on what you want to bulk import, and upload your sheet, and fill the template for both.
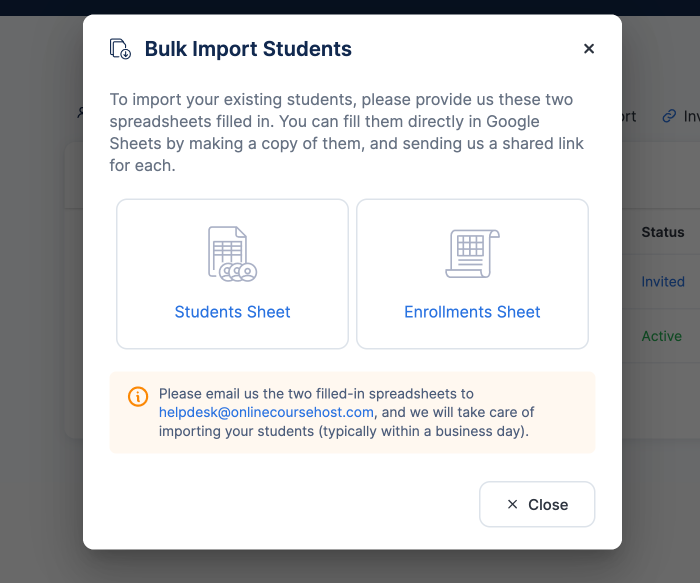
- Send both filled spreadsheets as email to the helpdesk at Onlinecoursehost.com and they will take care of importing your students within a business day.
Editing and Managing Student Information
There may be times when you need to update a student’s details, assign them to new courses, or manage their access. Here’s how to edit student profiles:
- Search for the student using the search options mentioned earlier.
- Click on the student’s profile to view their details.
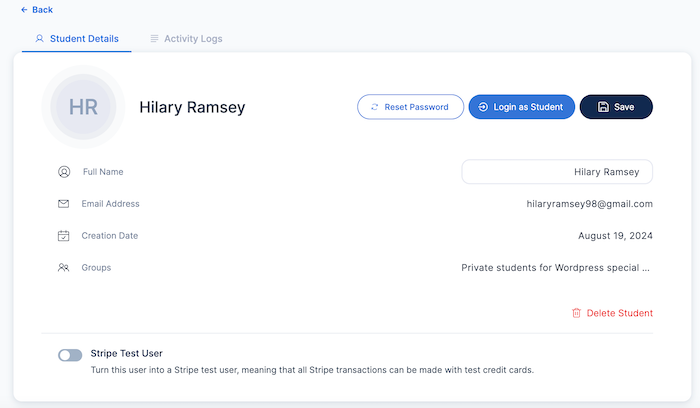
- Edit the information as needed, such as updating their name, email, or assigned courses.
- Save the changes to update their profile.
Editing student profiles allows you to keep their information up-to-date and ensure they have access to the correct courses.
Activity Logs:
Tracking student progress is essential for gauging engagement.
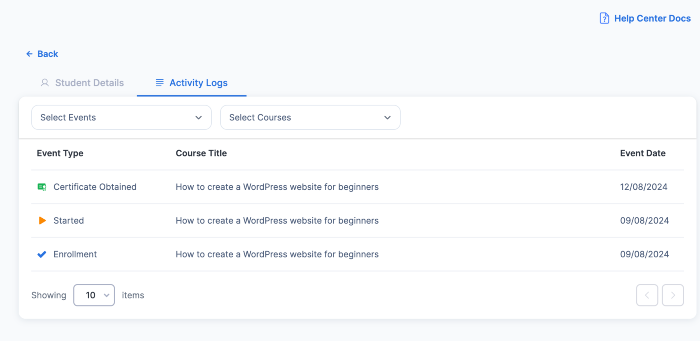
OnlineCourseHost.com provides activity logs showing:
- Course Progress: Track how much of the course a student has completed, including specific modules or lessons accessed.
- Engagement: Metrics on logins, discussion participation, and assignment submissions.
Reviewing these logs helps you identify students who may need extra support and assess the effectiveness of your course content.
Handling Assignments
Efficient assignment management is very important for timely feedback and keeping students engaged.
Here's how to manage assignments on OnlineCourseHost.com:
- Log in to access your OnlineCourseHost.com account.
- Go to the "Admin" menu, then select "Manage Assignments" from the left hand side.
- Note that you’ll receive an email whenever a student uploads an assignment, so you can review it right away.
- Click the three dots next to the course title and select "Download File" to save the assignment to your device.
- Use the "Send Message" option to provide feedback to the student.
- Approve the Assignment: Select "Approve Submission" to notify the student that their assignment is accepted.
- Reject the Assignment: Choose "Reject Submission" if the assignment doesn't meet the criteria. You can then send a message explaining the reasons and offer tips for resubmission.
Students can upload assignment files in various formats, as long as they're under 100 MB:
- Documents: DOCX, PDF, RTF, ODT, TXT, ZIP, EPUB
- Sheets: XLSX, ODS, TSV, CSV, PDF, ZIP
- Slides: ODP, PPTX, JPG, PNG, SVG, PDF
- Videos: MP4
- Music: MP3
- Images: JPG, PNG
Mastering these advanced student management techniques on OnlineCourseHost.com helps you better handle student data, track progress, and manage assignments.
This improves your students' learning experience and makes your job as a course creator easier and more efficient.
Enhancing Student Experience
Creating an engaging and user-friendly experience is key to student success and satisfaction. OnlineCourseHost.com offers tools to boost the learning journey.
This section covers how to:
- View the platform from a student's perspective
- Engage students effectively
- Manage certificates for achievements
These features help you improve the overall learning experience.
Viewing the Platform as a Student- Testing the User Experience
To ensure your course is user-friendly, you can experience it as a student on OnlineCourseHost.com. Here's how:
- Create a Test Account: Use a different email from your instructor account.
- Log In as a Student: Navigate the course materials to see what students will experience.
- Test Everything: Go through the entire process, from enrollment to completing lessons, to ensure everything works smoothly.
This allows you to spot and fix any issues that might affect the learning experience.
Exploring Student Features: Understanding the features available to students helps you support them better. Key features include:
- Course Viewing: Students can easily access their courses and track progress.
- Lesson Search: Allows students to quickly find specific lessons or topics.
- Subscription Management: Students can manage, upgrade, downgrade, or cancel their course subscriptions, giving them control over their learning.
Familiarizing yourself with these features will help you guide students to make the most of their learning experience.
Q&A Sessions with Your Students
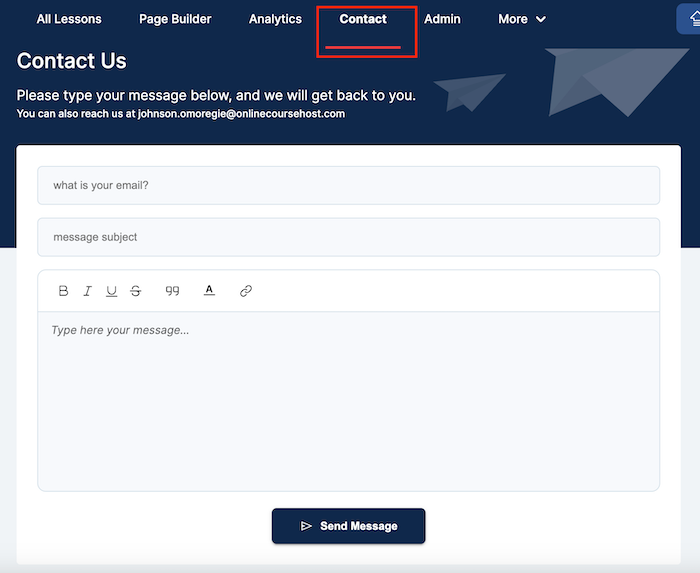
Just like in a physical classroom, students on OnlineCourseHost.com can ask questions at the end of each lecture. Here’s how they can contact you:
- Contact Screen: This menu tab lets students send you messages, which are emailed to you with their email addresses for a personalized response.
- Lesson Commentary Screen: This button, found under each lesson, allows students to ask questions about specific lectures. To enable it:
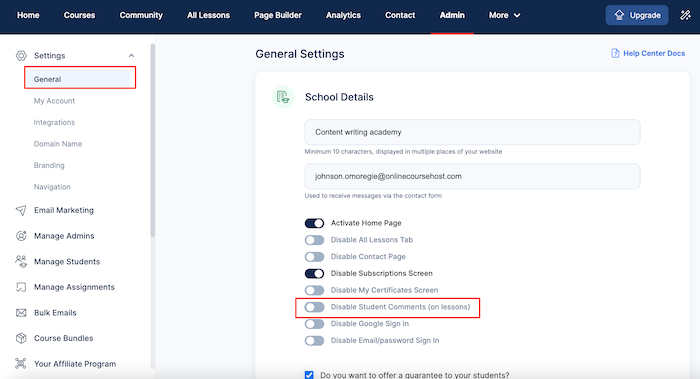
- Log in to your account
- Click "Admin"
- Go to "Settings" and select "School Details"
- Make sure "Student Comments on Lessons" is enabled
Once enabled, students can ask questions by:
- Logging in
- Clicking "Courses"
- Viewing the course and lecture
- Scrolling down and clicking "Add a new question"
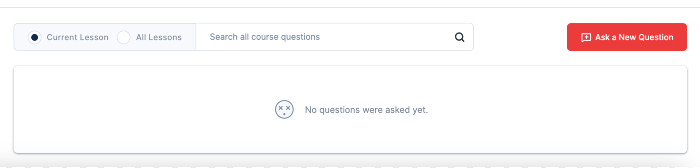
You’ll receive these questions via email and can answer them by:
- Logging in
- Clicking "Courses"
- Viewing the course and lecture
- Scrolling down and clicking "Add Answer"
All students in the course can see the questions and answers, which helps them find solutions to their queries and reduces the number of repetitive questions you receive.
Troubleshooting Common Issues
When managing an online course, it's important to handle common student issues promptly to ensure a positive learning experience.
This section covers frequent problems like password resets and student inquiries, along with simple solutions.
Password Resets
One of the most common issues students face is forgetting their passwords. Here’s how to help them reset their passwords:
- Go to the Login Page: Start at the course platform’s login page.
- Click ‘Forgot Password’: Find and click the ‘Forgot Password’ link.
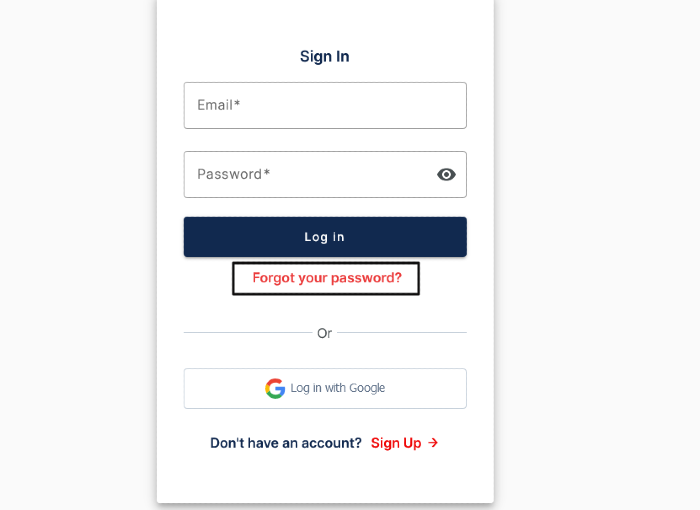
- Enter Email Address: Provide the email address used to register.
- Check Email for Reset Link: Look for a reset link in their inbox or spam/junk folder.
- Click the Reset Link: Follow the link to a page where a new password can be set.
- Create a New Password: Enter a strong, secure password following any platform guidelines.
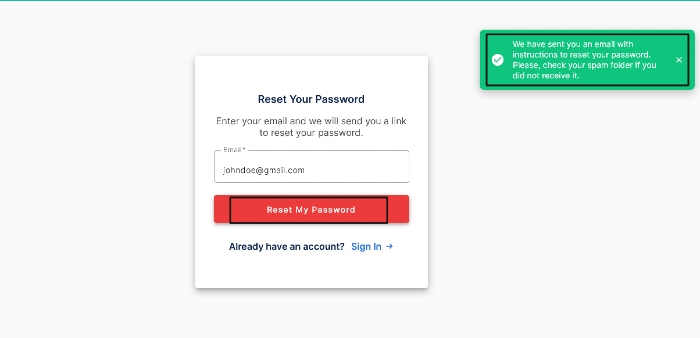
- Log In: Use the new password to log in to the account.
If students continue to have issues with resetting their passwords, reach out to support for further assistance.
Handling Student Inquiries
Effective management of student inquiries ensures ensures they feel supported and valued throughout their learning experience.
Here are some tips on what to do:
- Inform students of the best way to contact you and your typical response time, either through an introductory email or a course section on communication guidelines.
- Use a Support System: If available, use the platform’s support ticket system for technical issues. If not, set up a dedicated support email address.
- Be Responsive: Reply to inquiries as quickly as possible. Acknowledge receipt of their message even if you don’t have an immediate solution.
- Provide Clear Instructions: Give simple, easy-to-follow instructions for technical issues or course questions.
- Create a FAQ Section: Add a FAQ section to your course for common questions and issues to save time and provide quick help.
Troubleshooting is key to user management in an online course platform, and being prepared and responsive, whether for password resets or handling inquiries, improves the student experience.
By implementing these strategies, you can minimize disruptions and keep your students focused on learning.
Wrapping-up
As you've seen, taking good care of your students is really important for your online course to do well, and OnlineCourseHost.com has tools that make it easier to:
- Add students to your course
- Keep an eye on how they're doing
- Keep them interested in learning
Here are the main things to remember:
- You can let students join on their own or add them yourself, depending on if your course is open to everyone or just for certain people.
- You can put students in groups to make things easier to manage.
- There are handy ways to find students, add a lot of them at once, and change their info if needed.
- You can see what your course looks like to students, let them ask questions, and fix common problems quickly.
- You can easily check and give feedback on students' work to keep them involved.
Using these tips and tools from OnlineCourseHost.com will help make learning smoother and more fun for your students. It also makes your job as an online course creator and instructor easier.
In essence, when you use these ideas, you'll find that running your online course gets easier and more rewarding. This lets you focus on making great lessons and building a strong learning community.
I hope you find this post helpful, and to get notified when new content is available here at the Academy, you can subscribe here to our weekly newsletter:
If you are looking to ask any questions on online course creation, you can reach me here on my Facebook group:
Join the Course Creator Academy Facebook Group
Ready to learn how to launch your first coaching program or course on OnlineCourseHost.com? Here are the helpful guides for you to check out:
- Best Online Course Platforms (Ultimate Guide)
- How To Choose An Online Course Topic That Sells
- How To Record And Edit Your First Online Course
- Affordable Online Course Equipment - Complete Practical Guide
- How To Hire An Online Course Team
- The Ultimate Online Course Launch Checklist
- How To Create The Perfect Online Course Sales Page
- Create A Powerful Brand For Your Online Courses (In 5 Steps)
- How To Sell Online Courses? The Ultimate Guide
- How To Promote Your Online Course - Complete Guide
Let me know in the comments below what other topics you would like me to cover or any questions that you have.
Thanks for reading… and enjoy the course creation process! 😉
Course Creators Academy, a community by OnlineCourseHost.com
Founded by Vasco Cavalheiro
Online Course Creator

 Start Here
 Course Creation Journey Step by Step
  Course Creation Software Reviews
 Online Course Marketing
 Course Creation Tips & Tricks
 Course Equipment
 Online Course Marketplaces
 Revenue Reports
 Best Practices
 Frequently Asked Questions
 Platform Reviews