


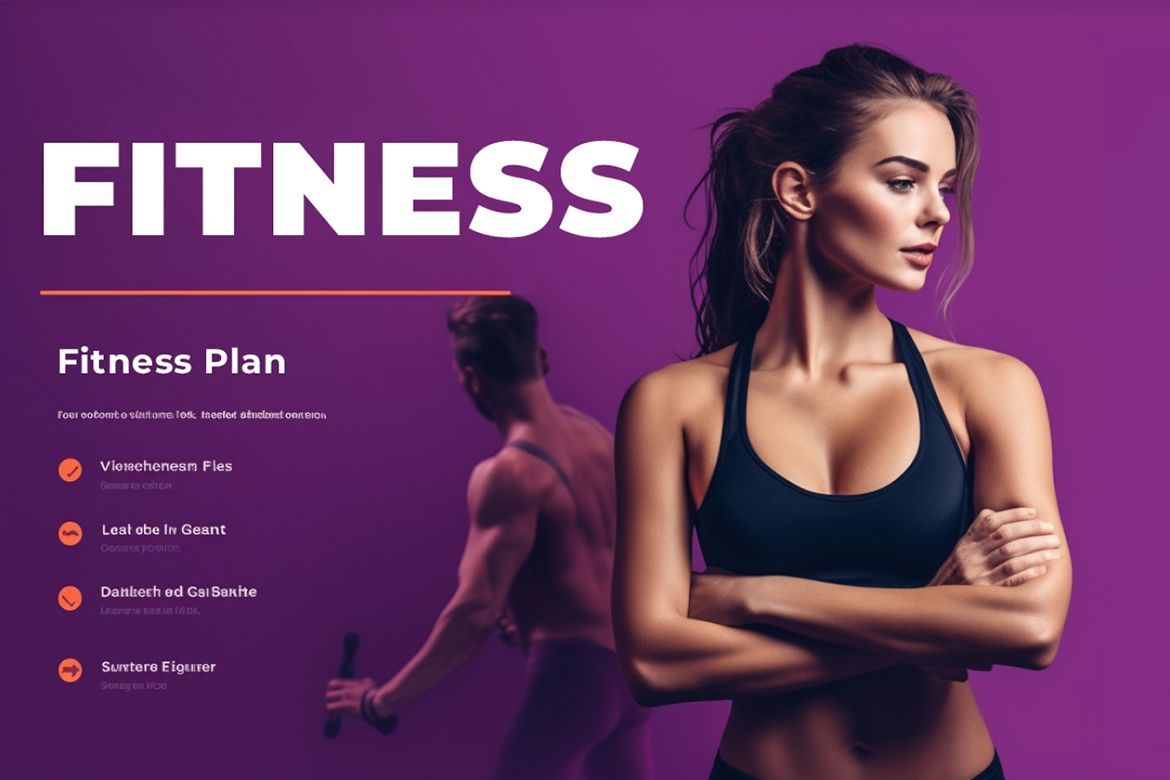
How to Create an Online Fitness Course (Complete Guide)
 Platform Review
A complete step-by-step guide on how to create your own online course on fitness, from the point of view of an experienced course creator. I will walk you through all the steps, including recording, editing, creating a website as well as marketing your course.
Are you thinking about how to start an online fitness program?
In this post, you are going to learn exactly how to record, market, and sell an online course on fitness, similar to this example here.
I'm an experienced course creator, and I will walk you through all the steps and make the process as specific to fitness courses as possible, especially when it comes to equipment, recording, etc.
But you're confused if you should launch your own online course on fitness.
Well, you can’t find a better time than now. 😉
Many people are quite happy with taking fitness courses online as it's less expensive than going to the gym, more convenient, and more private.
So, fitness trainers, coaches, and everyone in the industry are launching their own online fitness courses!
By going online, they are able to get more way students and expand their business worldwide, as opposed to just in their local city.
The online fitness industry is booming with lots of online fitness courses and training programs.
The good news is that is means that it's viable, but the bad news is that there’s already lots of competition.
So how to create a fitness program online that stands out from all the rest?
Follow these exact steps to create a viable fitness course:
- Choose your niche, target audience & unique value proposition
- Validate your online fitness course idea
- Create an outline for your fitness course
- Record your fitness course
- Host your course on a reliable platform
- Price your course
- Market your fitness course
Don't worry, I'll go through each stage in detail and provide you with a detailed strategy to follow.
Table of contents
By the end of the post, you will know exactly what to do to launch a successful online fitness course.
You can also check out all the free guides that you have available here at the Course Creator Academy by clicking on the Academy link on the top menu bar.
This guide is specific to fitness courses. If you are looking for help on how to create an online course in general, check out this guide: How To Create an Online Course (In 15 Easy Steps).
So without further ado, let's learn how to make an online fitness program from scratch.
STEP 1: Choose your Niche And Target Audience
Don't overlook this step because it might very well be the most important one that decides if your course will succeed or fail.
The fitness industry is crowded, and if you go and launch another beginner course, you probably won’t be in business for long.
For one simple reason, there are already many course creators who have done exactly that!
Going after such an extremely competitive niche as fitness for beginners is likely a waste of time because it already has lots of established courses.
Better to pick a micro-niche that isn’t crowded but has a decent amount of students.
How to choose a micro-niche in the fitness industry?
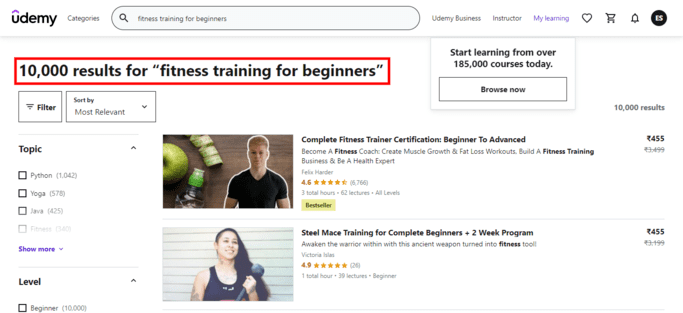
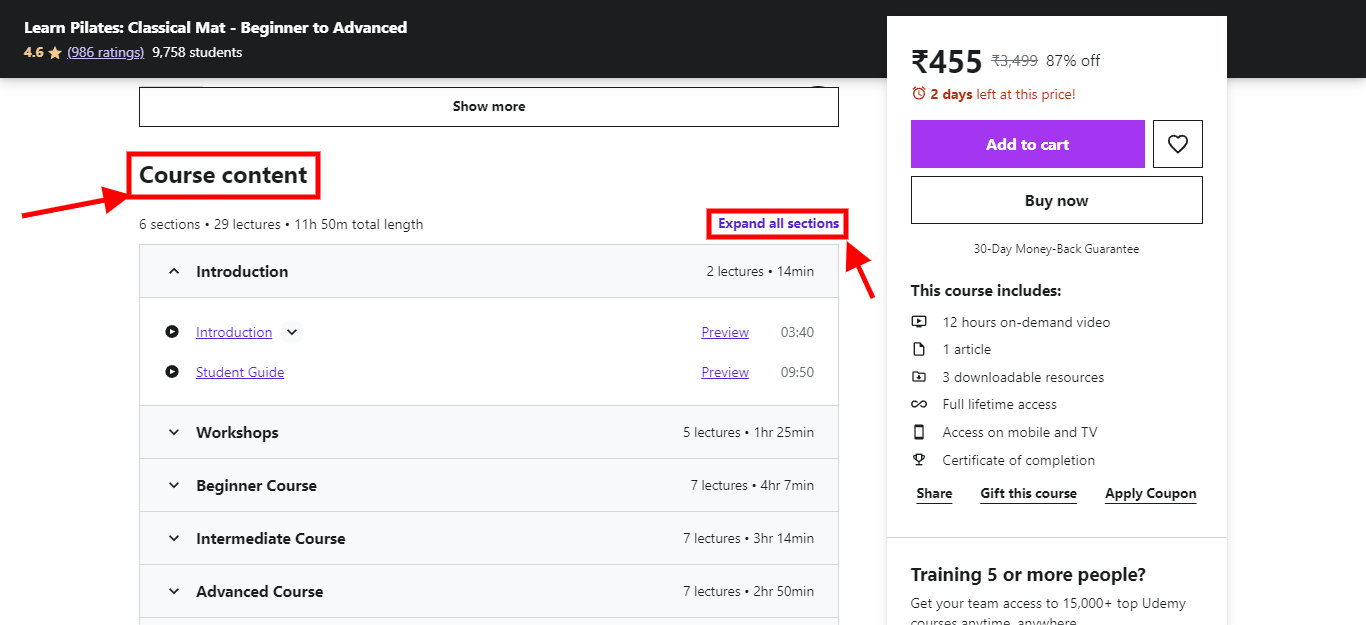
To choose your niche wisely, you need to do some upfront research, and a great place to start is Udemy.
Udemy is the most popular online course platform (with over 49 million monthly students), and it is the perfect place to begin our research.
The main niche, “fitness training for beginners,” has 10,000 courses listed on the Udemy marketplace. This means that this is a competitive topic and your chances of standing out are thin.
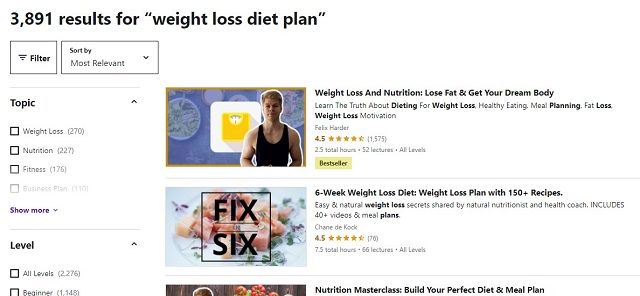
But when we choose a sub-topic from the main niche, “weight loss diet plan,” it gets way less crowded. There are only 3,891 courses listed on Udemy.
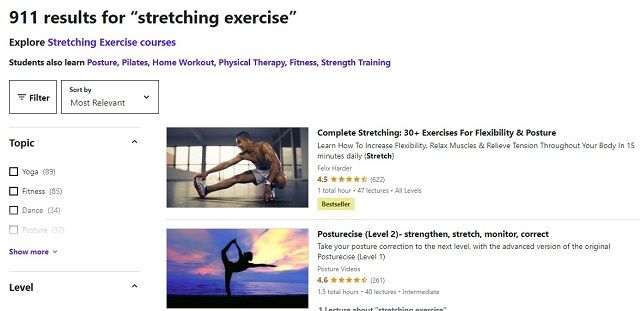
And another micro topic is “stretching exercise,” which has only 911 courses listed on Udemy.
So, if you want to stand out from the crowd, the first step is to pick the right micro-niche.
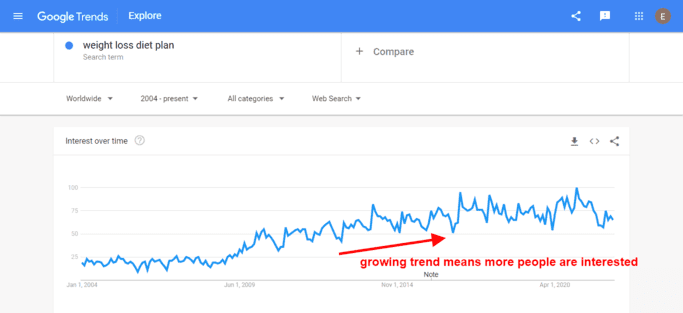
Besides Udemy and other course marketplaces like Skillshare, you can also use the Google Trends tool to verify your research.
For example, notice the increasing popularity of the term “weight loss diet plan” on Google.
Once you nail down a micro-niche, the next step is to figure out your target audience. Because your course can’t target everyone, especially when your niche is fitness.
For example, the diet plan for male bodybuilders is very different from the diet plan for female bodybuilders.
So, target a smaller audience but make it as specific as possible. For example, if you train women, then target a specific age group such as “30-day workout training for busy moms”, or "90-day muscle building plan for men over 40".
STEP 2: Create a Fitness Course Outline
Now that you have found a course idea and validated it, it's time to decide exactly what you will include in the course.
- Start with your competitors. You might have found one or two courses on your topic. Go through their outline and use it as a guideline to help you create yours.
2. Find gaps that your competitors missed. Include them in your outline.
3. Use your survey answers to create sections. Basically, create solutions to the specific problems your students might have.
These three steps will help you create a master outline for your online fitness course. But here are some more points to consider:
- Include one onboarding session: hold the students accountable for their growth. Tell them that the course is designed to work with the students. So, if they don’t put in their efforts, they will not see the results.
- Add variety: add workout sessions, practice sessions, a fitness schedule for them to follow, a fitness diet, exercises, nutritional recipes, and lifestyle tips.
- Use different formats: such as videos for live real-time and pre-recorded classes, images/infographics, interviews, Text, PDFs, written guides, audio files, etc.
- Clear Schedule: Give them a specific roadmap to follow. Tell them to set aside X hours every day for the training program.
- Make it time-specific: If your course follows a 60-day program, then organize the course in such a way that it brings results within the set time.
By now, you will have everything to get to the most exciting part - the actual recording of the course. 😉
STEP 3: Record your Course
Video quality plays a huge role in fitness courses, so you have to get the light, video, and audio just right. But, there are other things to keep in mind too.
Let’s quickly start with getting the basics right.
- Figure out in advance the content topics you will be filming. Separate them with text and audio material so you don’t have any confusion.
- Plan mini-workouts. Focus on keeping your videos short, so your students are not exhausted.
- Pick one fitness clothing style. Keep it neutral and use colors that go well with your background to make the videos look more polished and well-produced. If you have a T-shirt with your company logo, use it for brand building.
Now that the basic things are covered let’s find a nice place to film videos.
How to find the right place to shoot a fitness course?
When choosing a place to record, find a place that is simple, clean, and not distracting. You don’t want to film next to some eye-grabbing object or furniture such that it distracts your students.
If you’re teaching about exercises that can be done inside the home, such as Yoga, then the best place is to find a room with lots of space. If you want to keep the lighting and the sound under control, you probably want to record indoors as it's easier for you to control those factors. If you are going to need some heavy equipment, most likely, you will be recording in a gym.
Keep close attention to lighting conditions. You don’t want your videos to be too dark or too bright.
Here are the two lighting setups I recommend for indoor shooting that I use myself:
Now that you have a perfect place with nice light let’s set up your camera.
What's the right camera equipment?
If you want to know the equipment that I use to record my courses, check out this guide that I wrote: Affordable Online Course Equipment - Complete Guide.
Video quality is an important factor here. You should record high-quality videos, preferably from different angles so that the exercise movements are easily visible to the viewer.
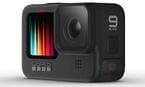
First of all, you need a nice camera that records the best quality videos.
Most modern phones have a camera that will be more than enough for your needs, but if you want to take it to the next level and buy a better camera, then I recommend using the GoPro Hero 9 Black. It’s affordable and records 4K videos.
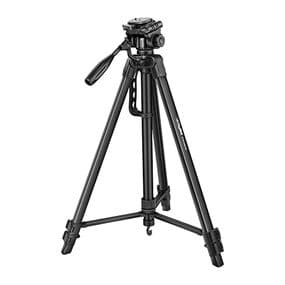
Now, you will need a tripod stand to set up your camera. This way, you can record smooth videos without any shakiness. You can just put your camera on the tripod stand, adjust the angle and start recording.
For example, the Digitek tripod stand will work for you:
Once you get it, set it in a place from where you want to record videos. Ensure the camera is set up at a horizontal position, and the location has the best lighting possible.
How to set the right audio?
Then you must ensure that the video's audio is as good as possible. Your students will be much more forgiving with the video quality than with the audio.
If the video does have the maximum resolution, it's still OK for most people.
But if your course has terrible audio, for example, we can't hear you properly, or it has a lot of background noise, that's a massive deal-breaker for most people, so make sure to pay even more attention to your audio quality.
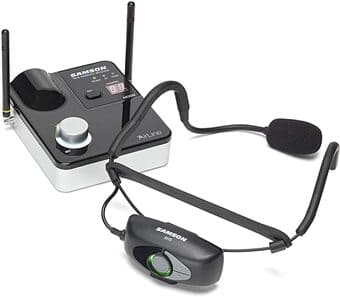
While recording the workout sessions, you will be standing away from the camera, so your voice might not be properly audible. That's why you need a microphone that can be attached to your body as you do the exercises.
For example, the Samson Airline 99m headset will work fine for you.
Now you have the setup right. The next step is to go ahead and record your video lessons. Follow these tips to record the videos nicely.
- Make eye contact with the camera a lot of the time. Such that when your viewers watch it, they can feel you’re talking to them.
- Start every video with a quick introduction and discuss how this lesson is a follow-up to previous lessons. This will remind your students of what they learned and set up the stage for what's next.
- Practice in front of a mirror before shooting the video. Do it until you get comfortable.
After you have recorded the videos, it's now time to edit them.
If you know a bit about video editing, then you can do it yourself, but otherwise, don't get into it.
You can simply hire a professional video editor from Fiverr to get it done. This way, you will be saving both time and resources.
If you still want to edit your own videos, here is a complete guide I wrote on that: How to Record and Edit Your First Online Course.
Once you know that all of the content is ready, it's time to organize it in a logical sequence. So collect all of the text, video, audio, and your PDF content in one place and open your course outline.
You're now ready for the most amazing part, which is launching your course. 😉
But you first have to pick an online course hosting platform, right?
Something that isn't complex. Don't worry; I've got you covered.
STEP 4: Host your course on a Reliable Platform
Finding a nice online course hosting platform that is beginner-friendly, reliable, and affordable is not an easy task at all.
I think as a fitness instructor, you probably want something as easy to use and as user-friendly as you can possibly find. Something that allows you to keep your focus on your business and not on your tech.
OnlineCourseHost.com is a beginner-friendly, reliable, and affordable online course hosting platform that comes with built-in email marketing.
It allows you to publish your courses easily and enables you to contact your students via bulk emails, sending them targeted messages.
You can send a discount coupon to specific groups of students: for example, students that took your beginner's course but didn't take yet your advanced course.
You can upload your course in minutes, use the pre-made course landing page, integrate Stripe and Paypal for free, set a course price, and launch your course online.
How to do that? Follow this step-by-step tutorial.
How to create an account?
The first step is to create a free account on OnlineCourseHost.com. So, click on the link, and you will see this screen.

Click on the "Sign up free" button on the top right or the left bottom.
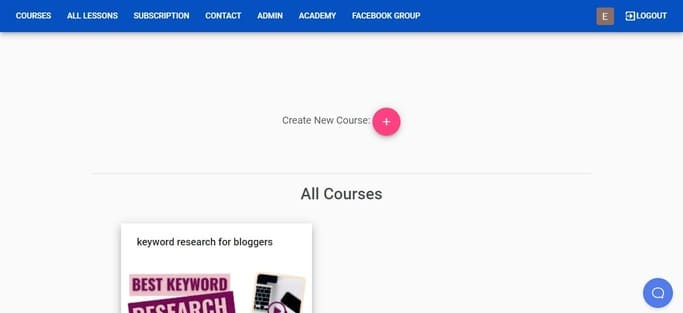
After signing up, the next step is to create a free website. Fill in the details on the next screen to get your free domain name. Then click on "Create My Website Now."

The screen you will see is your new course dashboard:
Now, if you already have a website and want to use that domain name, then you can do it too. On your dashboard, go to "Admin" and then "Admin Settings." then the Domain Name tab.
You can enter your domain name on the first option then choose the applicable options, you can also put your questions in the blank space and then click on "Request Custom Domain."
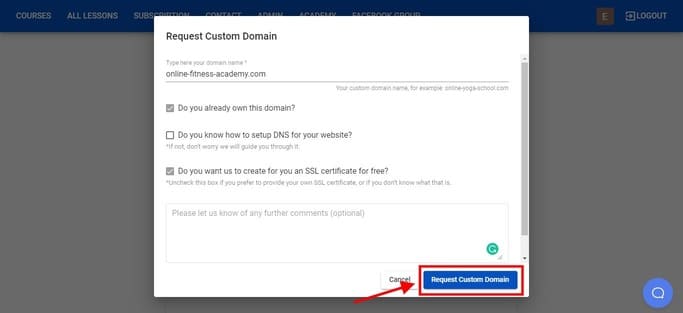
You have done your part, now our administrators will contact you typically within a day and take care of everything!
Notice that you don't have to use a custom domain; this is optional. Instead, you can also keep using your free subdomain if you prefer.
How to upload your course content?
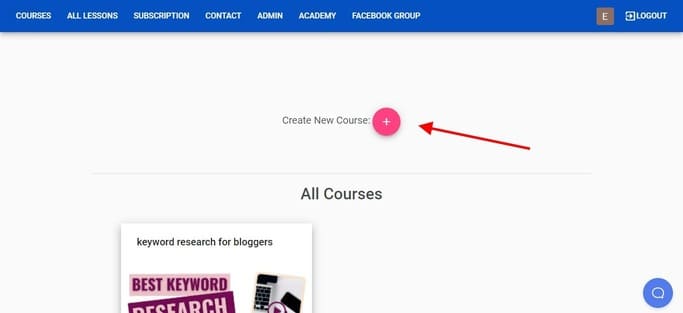
Now is the time to create your first course. All you need is to upload your course content on OnlineCourseHost.com. So, on your dashboard click on the plus button next to "Create New Course."
Now, enter your course title and a short description of your course. Make sure the title is short, catchy, and descriptive.
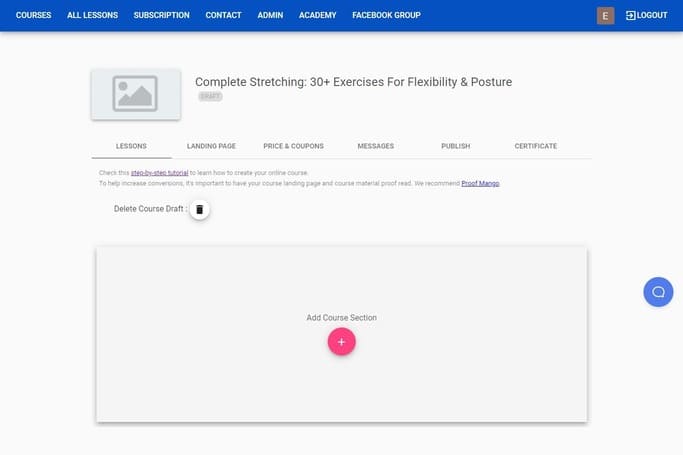
Next, you see the course editing screen. Currently, the course is a draft. Click on the "Add Course Section" to add sections to your course.
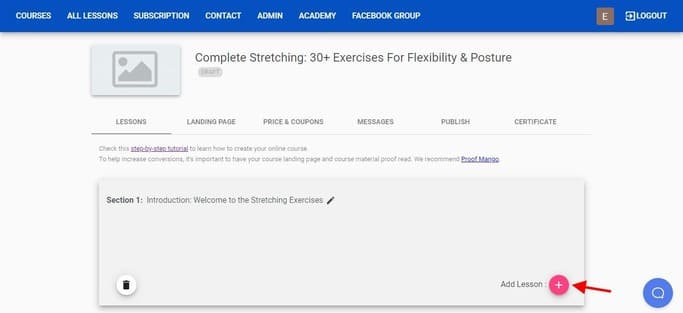
Now, give your section a title and click on "Create Section."
Inside sections, you can add course lessons. This will give your course a proper structure. To add a new lesson click on the plus button next to "Add lesson."
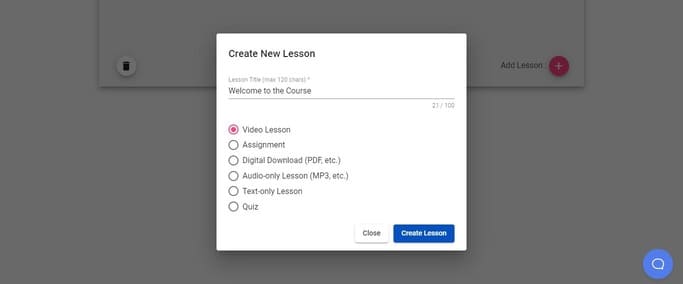
On OnlineCourseHost.com, you can use different formats like video, audio, pdf, text, etc to create a course. So, choose which format you would like to use.
If you want to upload a video lesson then choose "Video Lesson" and click on "Create Lesson."
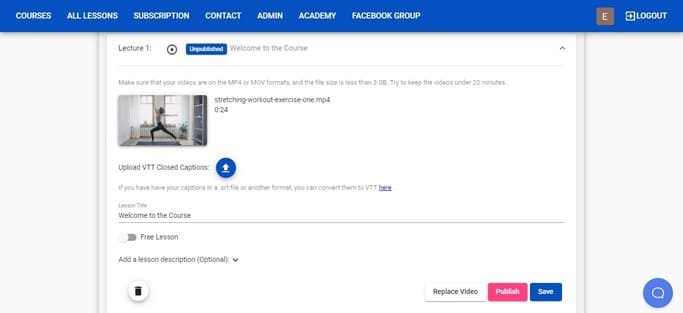
It will be added to your course structure. Click on the "Add Content" to add your videos.
Upload the video directly from your computer. You can also add subtitles, make it a free lesson and add a video description. Then click on the "Save" button.
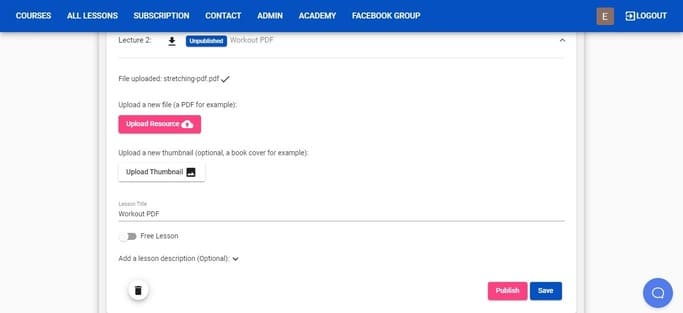
Similarly, if you want to give your students an ebook or pdf, then choose the "Digital Download" option and click on the "Create Lesson" button.
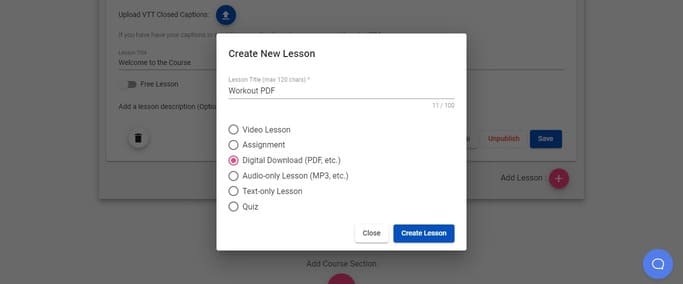
Click on the "Upload Resource" button to directly upload a PDF through your device.
You can also add a thumbnail (eBook cover), description, etc. After you're done, click on the "Publish" button.
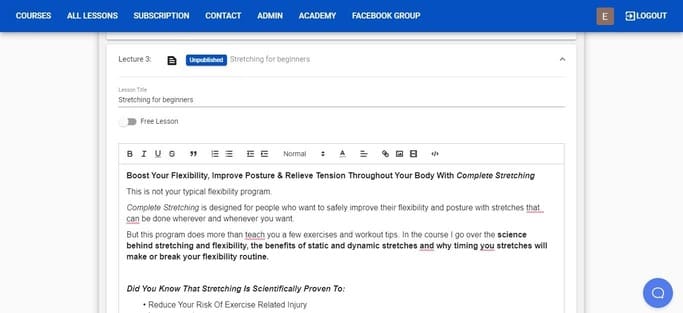
Now, if you want to add text content then choose the "Text-only lesson." Enter your text content in the space and scroll down to click on the "Publish" button.
Similarly, you can create quizzes by choosing the "Quiz" option.
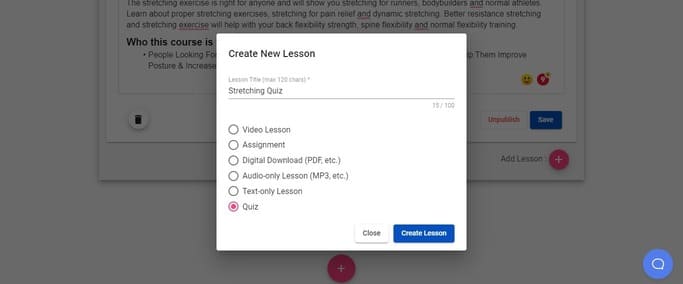
You can add questions, choose a related lesson, add answers and answer hints and then click on the "Publish" button.

How to create a landing page for your course?
Once done, click on the "Landing Page" option. This is where you will get a high-quality landing page for your course. All you need to do is to fill in some details, like the title and thumbnail.
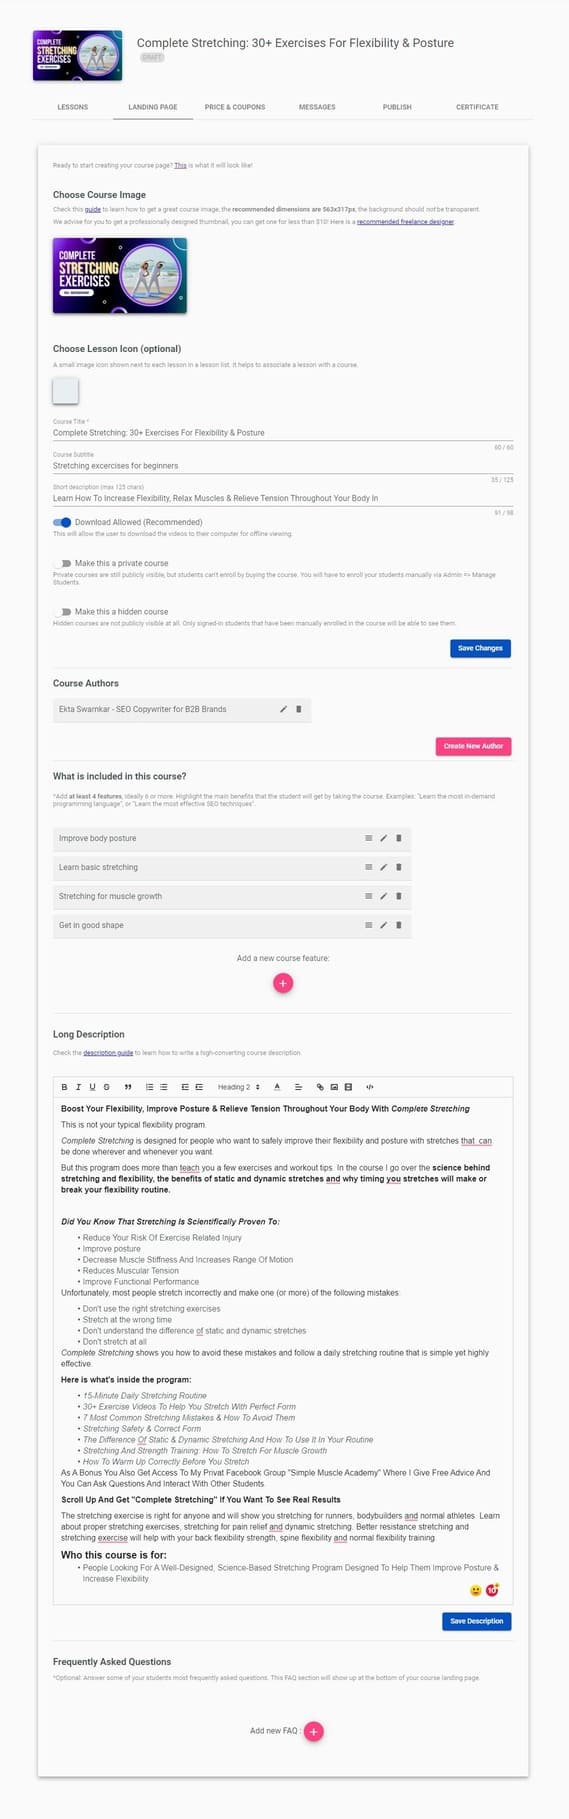
Follow each step to fill out the details on the course landing page. Once done, click on the "Save Description" button.
See, this is how easy it is to upload your course on the platform!
Now, let's get to the fun part, which is pricing your course. 😉
STEP 5: Price your Course
To add pricing to your course, click on the "Price & Coupons" option. You will notice that it is asking you to integrate Stripe or PayPal. Do that so you can accept payments.
How to integrate Stripe?
Click on the "Connect with Stripe."

You will land on the Stripe account activation page. From there, you can either create a new Stripe account or link to an existing one.
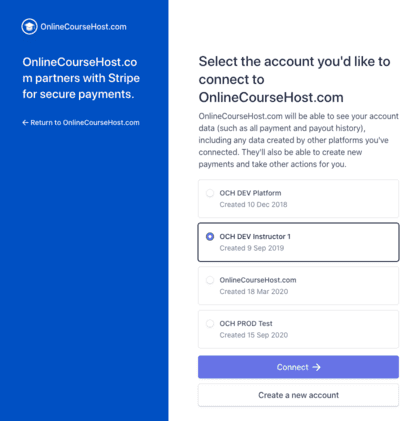
You will be asked to fill in some details, and once done, your account will be integrated, and you can now price your course.
How to integrate PayPal?
You can also integrate PayPal as it is an easier and better option to both collect and make payments. To integrate PayPal, go to the "Admin Settings" and click on the "Integrations" option.

From there, you can either create a new PayPal account or connect an existing one. From your business PayPal account, get your PayPal account email and merchant id, just enter them in the space and click on "Activate."
How to create Coupons?
You also get the option to add coupons if you ever want to run sales. To do that, scroll down and click on "Create New Coupon." Now, enter a coupon code, discounted price, coupon deadline, and click on "Create Coupon."

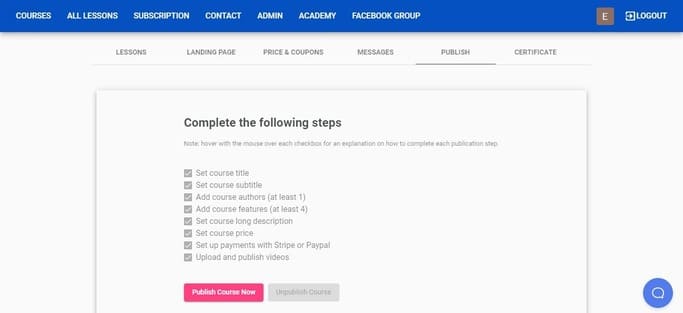
How to publish your course?
Move on to the "Publish" option. Notice that all of the options are automatically checked in the checklist. So, click on the "Publish" button. If not, go back to complete the missing steps.
Congratulations! you just published your fitness course using OnlineCourseHost.com. Here's how the landing page will look like to your students:.
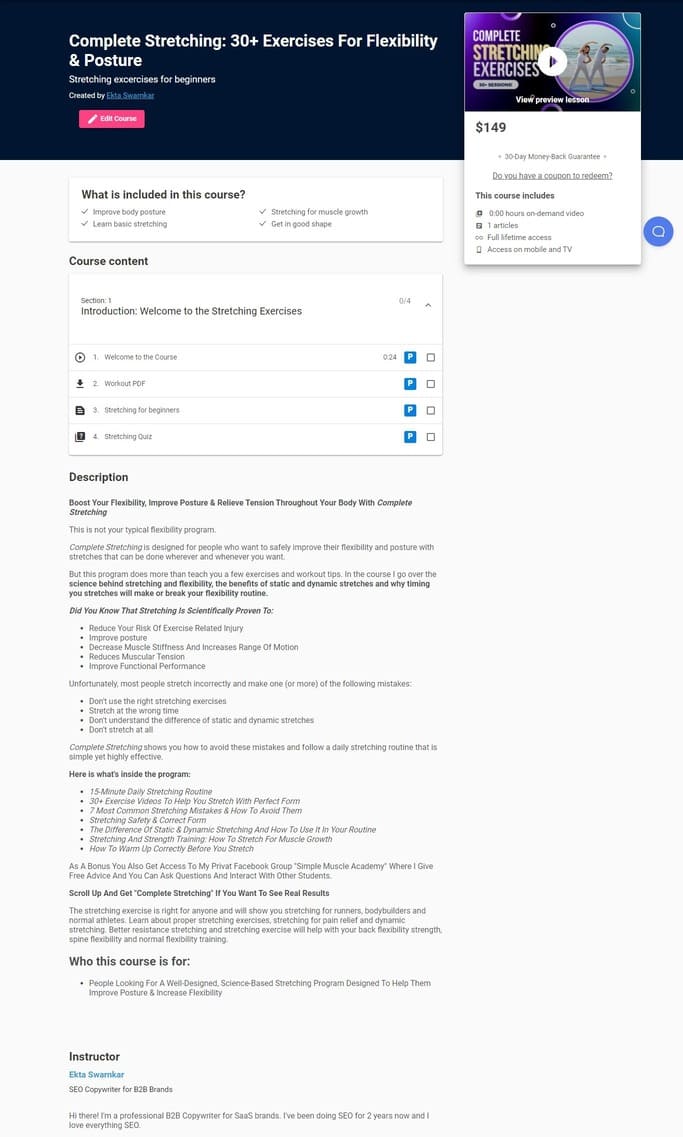
See how easy it is to launch your fitness course?
Now, you're a course creator too.
But launching a course isn't enough; you will have to market your course well to get your first few students.
STEP 6: Market your Course
Launching a fitness course only doesn't guarantee student enrollment. Not even if you've created the best program.
Remember, the fitness industry is competitive, and it's hard to get noticed.
So to get students to enroll in your course, you will have to somehow find a way to put your course in front of them. You will have to market your course online.
So, create a marketing strategy to drive quality traffic to your course landing page.
This could be paid ads, influencer marketing, SEO, one-on-one sales, etc.
Use social media and content marketing tools like videos, blogs, podcasts, webinars, live-streaming, etc. to promote your course.
Our Course Creator Academy has a whole series of free guides to help you market your course in all sorts of ways.
One of the things you can do with the platform is to run Facebook Conversion Ads or use the bulk email marketing features to email specific subsets of students.
Conclusion: How to Create an Online Fitness Program?
Now you know how you create an online fitness training program and market it from scratch!
As you can see, once you have the right equipment and learn how to do it step by step, it's not that hard.
In general, you will be able to figure out the content creation part after some trial and error.
What is way more difficult is learning how to grow an audience of students who trust you and are interested in buying your courses; that is the hardest part.
To help you out with that and much more, I created the Course Creator Academy so that you can find the information that you need to become a successful online course creator all in one place for free.
To get notified when new content is available here at the Academy, you can subscribe here to our weekly newsletter:
If you are looking to ask any questions on online course creation, you can reach me here on my Facebook group:
Join the Course Creator Academy Facebook Group
From here, I want you to follow these guides to learn more about online courses.
- Best Online Course Platforms (Ultimate Guide)
- How To Create An Online Course (In 15 Super-Practical Steps)
- How To Choose An Online Course Topic That Sells
- How To Record And Edit Your First Online Course
- Affordable Online Course Equipment - Complete Practical Guide
- How To Hire An Online Course Team
- The Ultimate Online Course Launch Checklist
- How To Create The Perfect Online Course Sales Page
- Create A Powerful Brand For Your Online Courses (In 5 Steps)
- How To Sell Online Courses? The Ultimate Guide
- How To Promote Your Online Course - Complete Guide
I hope you found this post helpful, let me know in the comments below what other topics you would like me to cover, or any questions that you have?
Thanks for reading… and enjoy the course creation process! 😉
Vasco Cavalheiro
OnlineCourseHost.com Founder & Online Course Creator
LinkedIn Facebook Page Facebook Group Twitter
You are welcome to ask me any questions in the comments below: 👇👇👇👇

 Start Here
 Course Creation Journey Step by Step
  Course Creation Software Reviews
 Online Course Marketing
 Course Creation Tips & Tricks
 Course Equipment
 Online Course Marketplaces
 Revenue Reports
 Best Practices
 Frequently Asked Questions
 Platform Reviews